Before You Begin
Pull the code for Lab 3 from Github.
Learning Goals for Today
First off, this lab'll get you up and running with IntelliJ, a Java IDE. Next, we'll move on to an introduction to Java loops and conditionals (the if, while and for statements), followed by a brief explanation of Java Arrays. We assume no prior experience with any of these topics in Java, but we do assume some prior knowledge of these concepts, either from reading the textbook, or (preferably) from an earlier course (like Python flow control and lists as taught in CS61A).
Because of this, there is a lot of information presented in this lab, but hopefully most of it will be review that can be skimmed through quickly.
This course strives to teach you how to "program", and this includes not just teaching you how to write code, but how to do a variety of activities. Today's lab includes some self-testing exercises that tests your ability not only to write code, but also to analyze code (to figure out what code does), to test code (to see if given code is doing what it should do) and to evaluate multiple versions of code. While it is easy to skip over these sections, we highly recommend that you spend due time on all these activities, since they are extremely important skills for programmers to learn, and later labs and projects will be much harder if you have not mastered these skills.
Pair up for the Lab Exercises
At the end up the day you will submit the following six files. Some of them have been given to you, some of them you will have to create. You should submit these assignments with a partner, so please use pair programming throughout the lab today. Tell your TA if you don't have a partner.
DateConverter.javaTriangleDrawer.javaTriangleDrawer2.javaAddingMachine.javaUnshuffled.javaArrayOperations.javaSieveOfEratosthenes.java
Be alert to differences between your approaches to today's activities and your partner's. Which ones will work for you? Which ones don't?
A. IntelliJ Download and Plugins
Download IntelliJ IDEA. You want the community edition.
If you're using the lab computers, you can run it with idea.sh &.
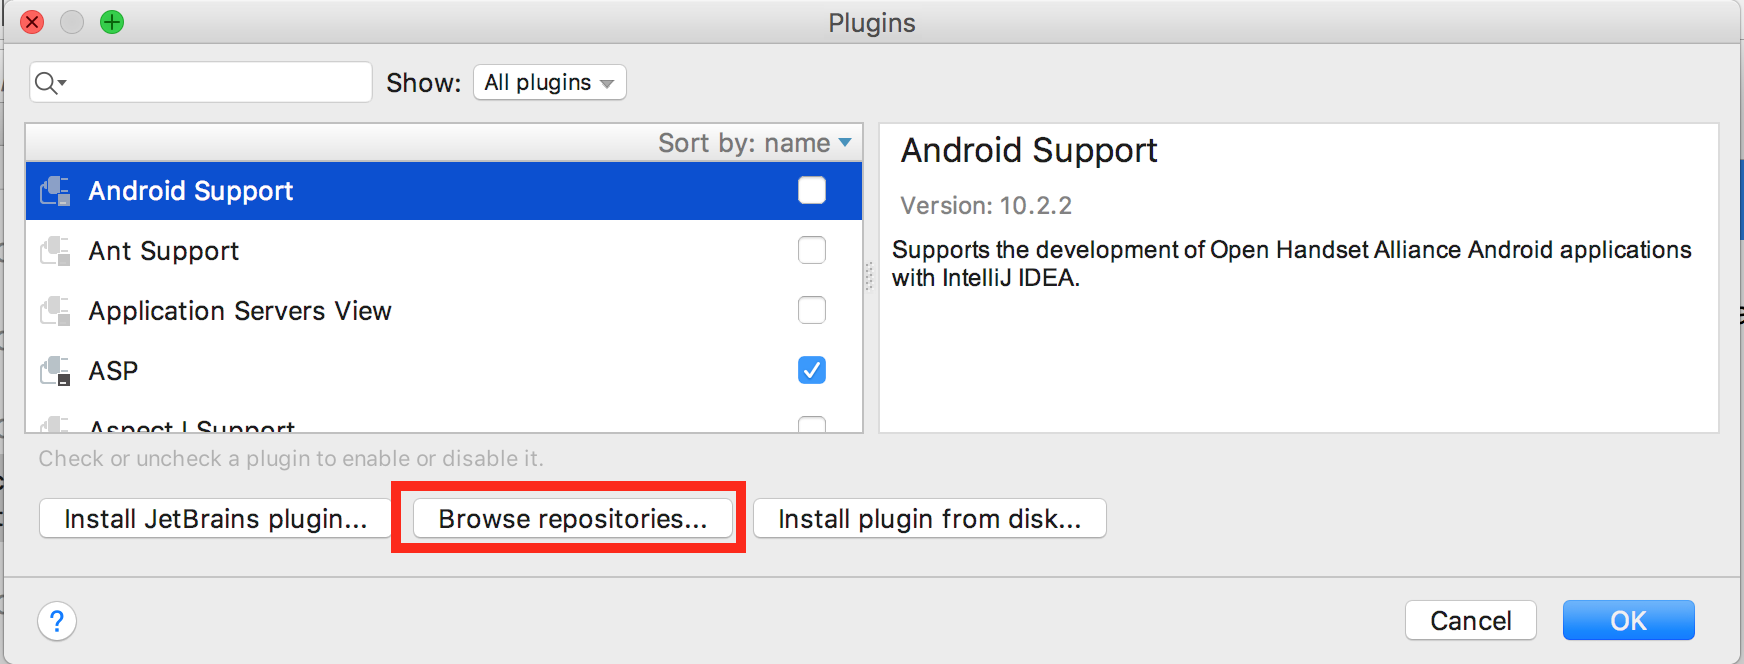
After firing up IntelliJ, you'll be greeted by its welcome screen. Before we open up any projects, let's install a couple plugins that'll come in handy later in the course.
- In the Welcome window, click the Configure -> Plugin button on the bottom right of the window.
- Click the button labeled Browse Repositories... on the bottom.
- In the window that appears, enter "CS 61B" in the search bar at the top. The CS 61B plugin entry should appear.
- Click the green Install button.
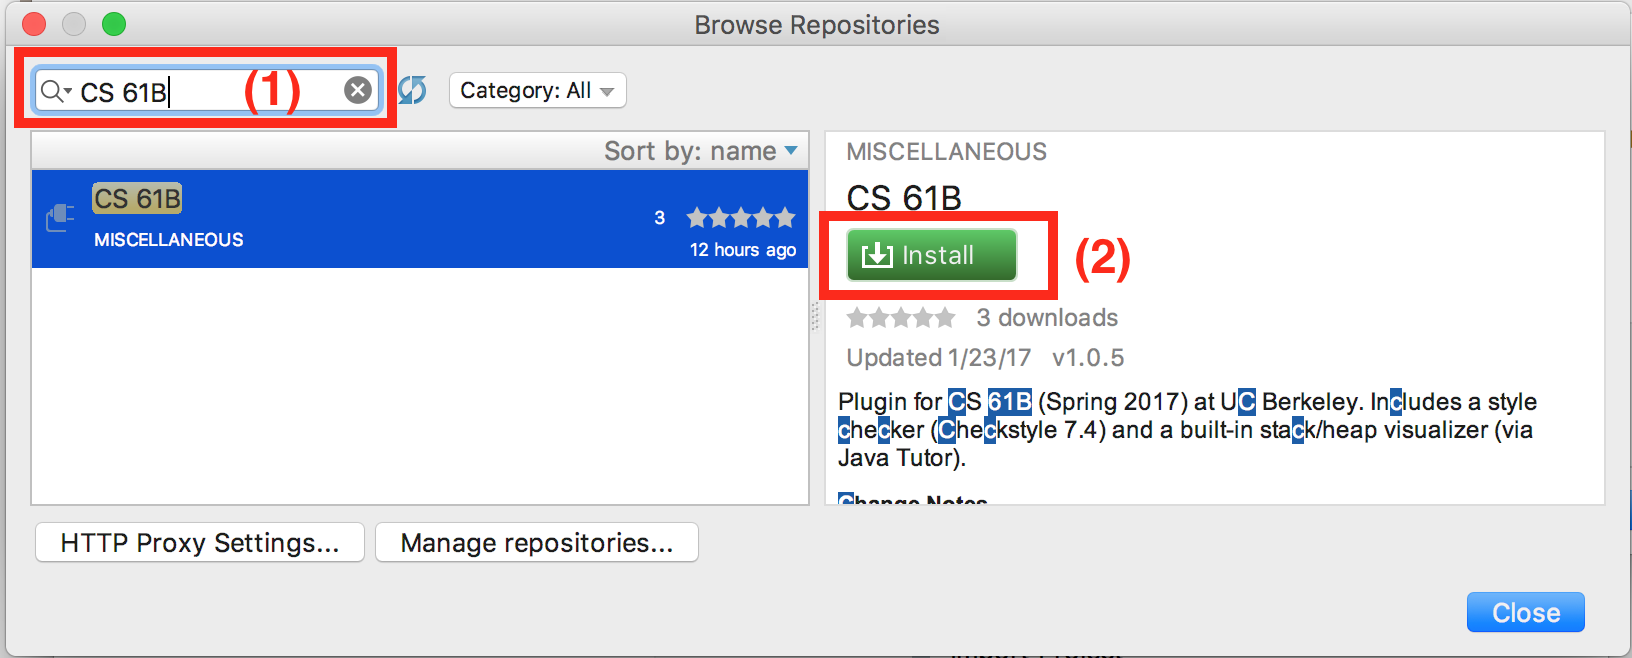
- Wait for the plugin to download and install.
- Now, repeating steps 3-5, install the "Python Community Edition" plugin.
- Click the grey Restart IntelliJ IDEA button to finalize the installation.
For more information on using the CS 61B plugin, read the plugin guide. You can skip this reading for now.
B. Creating a Project
To create a new IntelliJ project, click File -> New -> Project from Existing Sources. Or at the welcome screen, click "Import Project".
Select your lab03 folder and click OK. Press next a few times until you arrive at the "Select SDK" page. Typically it should look like the screenshot below, but the first time you use IntelliJ, you might not see anything in the left sidebar...
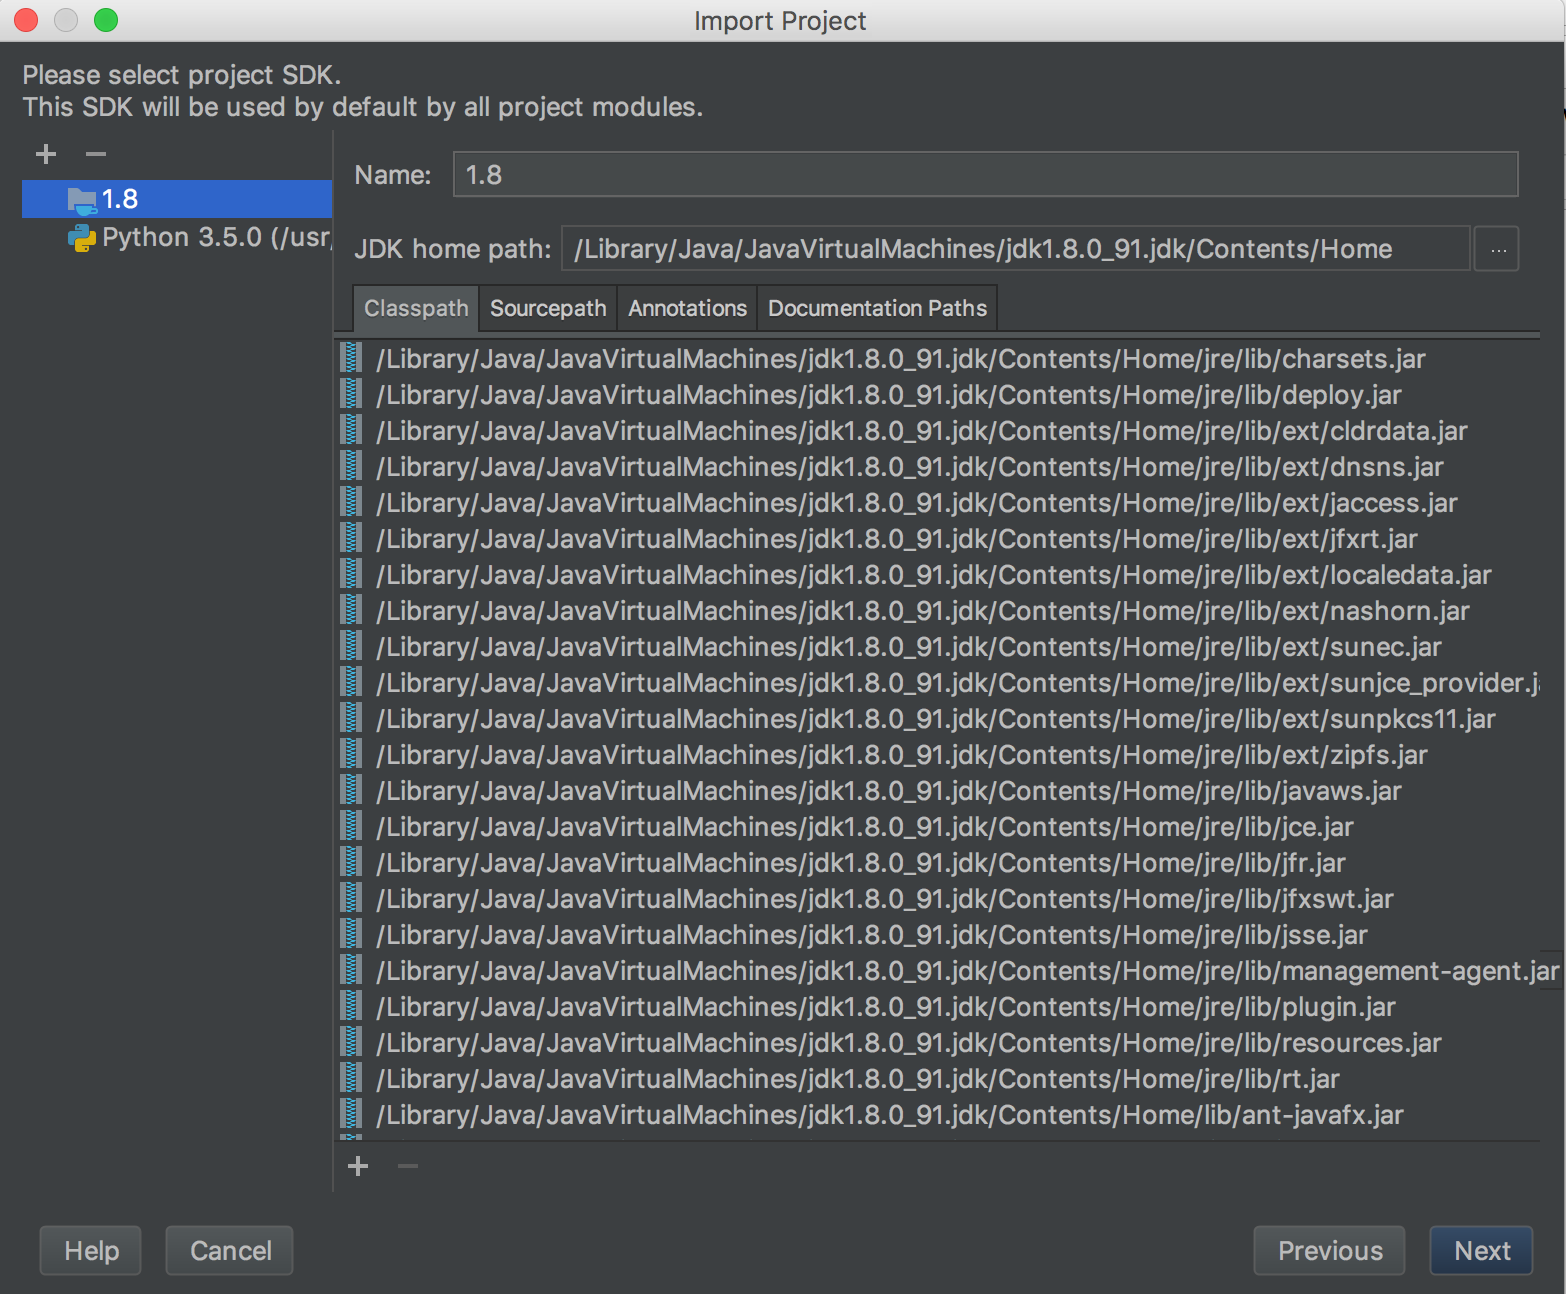
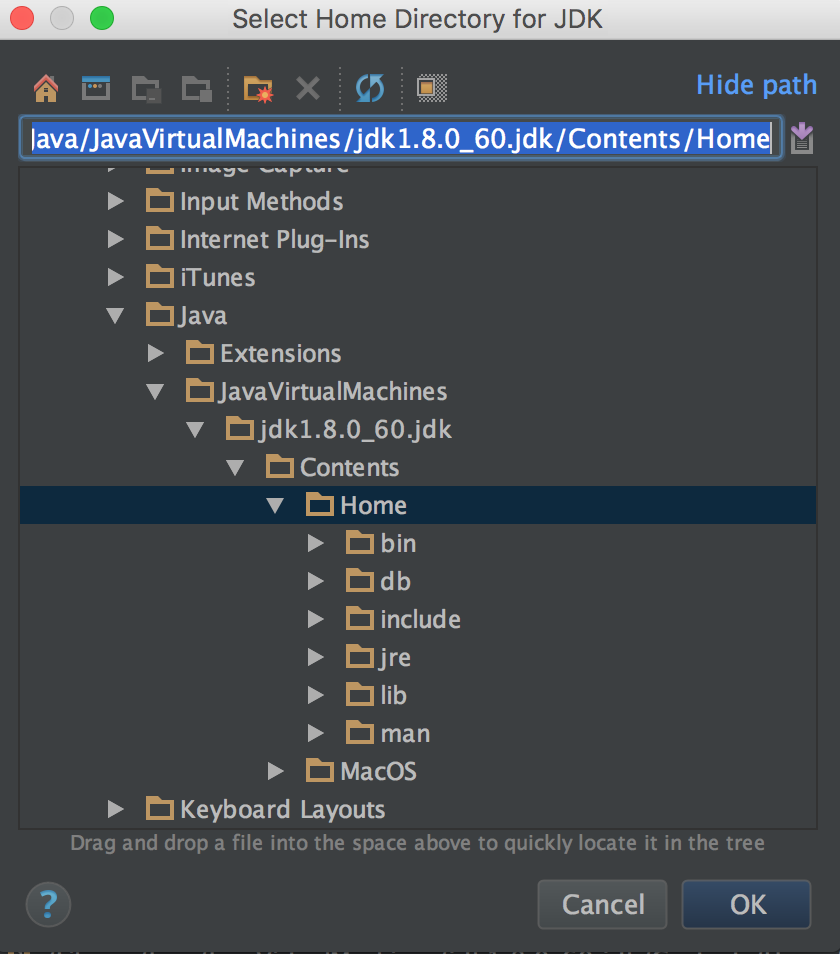
To set this up, click the "plus" in the upper left corner and click "JDK" from the drop-down menu.
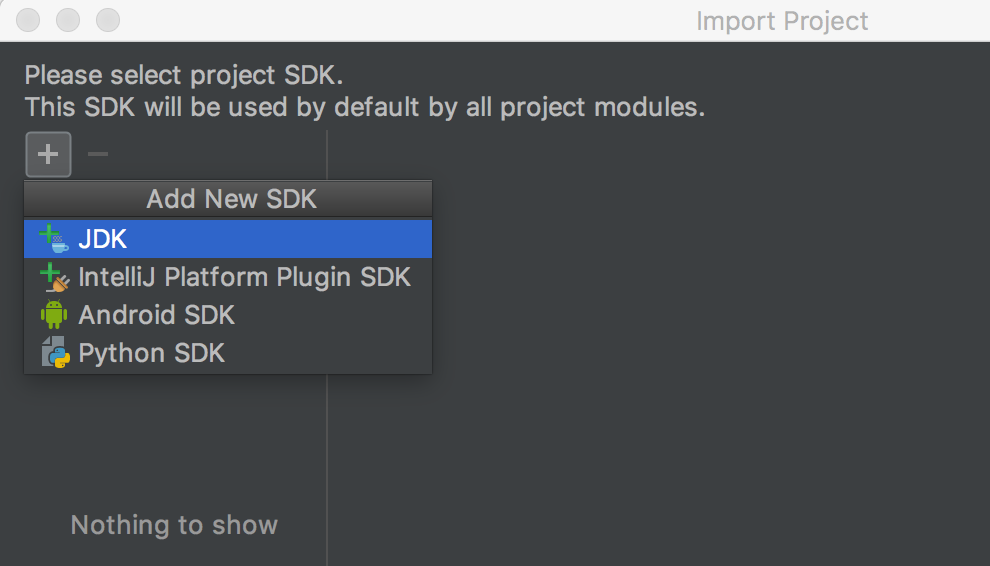
Find where your JDK is saved, select it, and press the "OK" button (as shown below). On a Mac, it is at "/Library/Java/JavaVirtualMachines/jdk1.8.0_82.jdk/Contents/Home". If you're on Windows, your path may look like "C:\Program Files\Java\jdk1.8.0_92". If you're on a lab or Ubuntu computer, it should be at "/usr/lib/jvm/Java-8-oracle/". The actual number after jdk1.8.0 may differ depending on which update of Java 8 you downloaded. It does not matter as long as you are using Java 8.
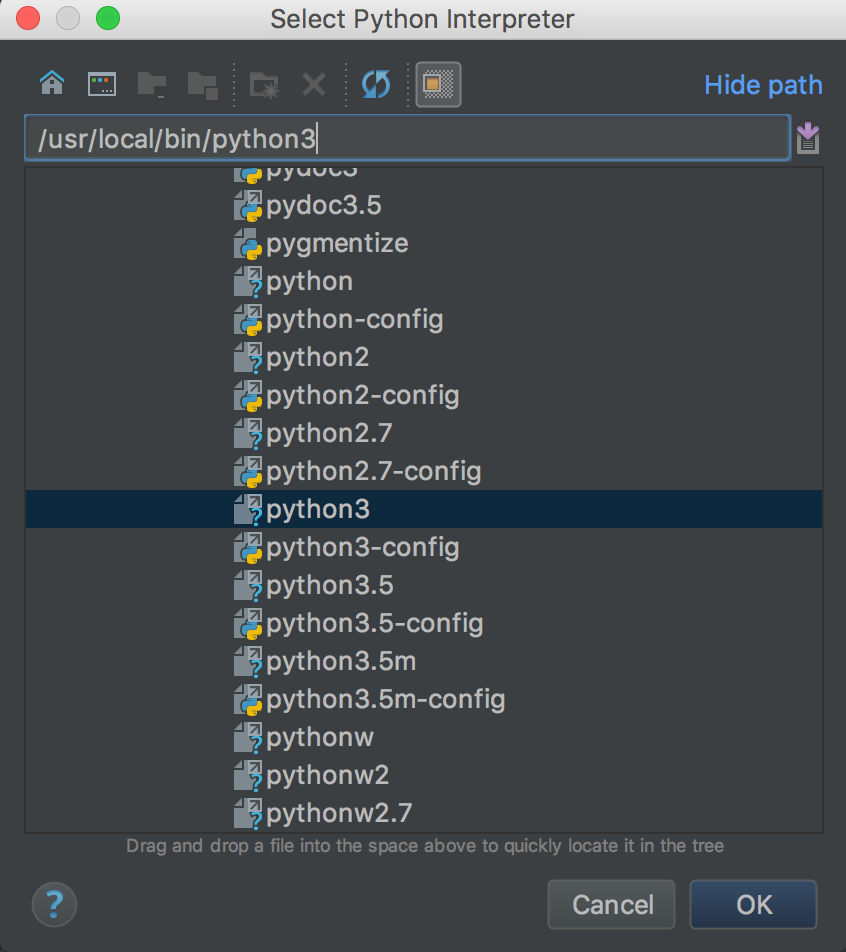
Next, we'll set up your Python SDK. Click the "plus" again, and this time click Python SDK -> Add local. Find where your python3 executable is saved, select it, and click "OK". On a Mac or on Ubuntu, you can figure out the path to python3 by typing "which python3" into your terminal. On Windows, you can find python3 by inspecting your environment variable settings.
Once this window closes and your screen looks similar to the very first screenshot we showed you, press "Next", then "Finish", and you've got the project set up.
Import Libraries
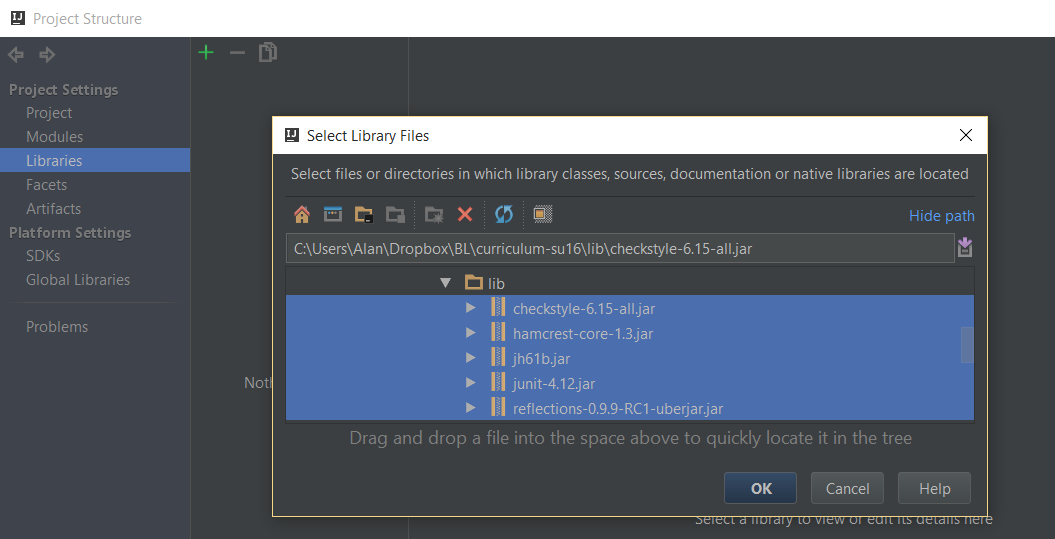
Finally, you'll want to import libraries. You'll have to do this for every project you set up. Go to "File" -> "Project Structure". On the left sidebar, click "Libraries", then the green "plus" and select "Java". Navigate to your repo's "lib" folder, and select all of the jar files. (Make sure to select each jar file as shown below; simply selecting the "lib" folder may not work.) Click "OK" several times to exit.
C. Review of if/else and while
How if and if ... else Work
You've already seen some of this from the first lab, and hopefully in another course, so it should be a bit of a review — but read on!
An if statement starts with the word if. It is followed by a condition statement in parentheses that is either true or false (a boolean expression). There is then a sequence of statements surrounded by braces, which is called the body. For example:
if (year % 4 == 0) {
    System.out.println (year + " might be a leap year.");
}
(Note: like in Python, the % symbol above is called mod, and it takes the remainder after division. The above statement is checking if year has no remainder when divided by 4).
The braces after an if statement aren't technically necessary if there is only one statement in the sequence; however, it is good practice to always include them since it makes it easier to add lines to the body later.
Unlike other languages (Python in particular), the condition of the if statement must be a boolean statement or a statement that reduces to a boolean expression. "if (5):" is a legal statement in Python, but will throw an error in Java.
Boolean expressions often involve comparisons. The comparison operators in Java are == and != for equality and inequality testing, and >, >=, <, and <= for comparison of magnitudes. Multiple comparisons can be chained together with the logical operators && (and) and || (or). If instead you wish to negate an expression, you can prefix your expression with !, the Java negation operator.
The block of statements following the if statement above will not execute if year's value is not divisible by 4. If you wanted something to happen when the test fails, use the else keyword. Here's an example:
if (year % 4 == 0) {
    System.out.println (year + " might be a leap year.");
} else {
    System.out.println (year + " is definitely not a leap year.");
}
You can also add further tests that are executed only if above boolean expressions evaluate to false, for example:
if (year % 4 != 0) {
    System.out.println (year + " is not a leap year.");
} else if (year % 100 != 0) {
    System.out.println (year + " is a leap year.");
} else if (year % 400 != 0) {
    System.out.println (year + " is not a leap year.");
} else {
    System.out.println (year + " is a leap year.");
}
Note that only one body section, the one corresponding to the first true boolean expression (or else if none are true), will execute. Afer that, your program will continue on, skipping all the remaining code in this if structure. This implies that none of the conditions below the first true boolean expression will be evaluated.
One consequence of conditions reveals in non-void methods. Recall that in Java, you must return something of the return type. Consider the following code snippet
public int relu(int x) {
    if (x < 0) {
        return 0;
    }
}
As the code is, it will not compile. That is because currently, a value is only returned when x is less than 0. What happens when that's not the case? Java must be assured that relu() always returns an int, and thus will not allow you to compile your code.
How while Works
The while statement is used to repeat a sequence of statements. It consists of the word while, followed by a continuation test in parentheses, also called the condition. It is then followed by a sequence of statements to repeat enclosed in braces, called the loop body.
The while statement works by evaluating the condition. If the condition is true (the test succeeds), the entire loop body is executed, and the condition is checked again. If it succeeds again, the entire loop body is executed again. This continues, possibly infinitely.
A common mistake when first learning a Java-like language is to think that the behavior of while is to stop as soon as the test becomes false, possibly in the middle of the loop. This is not the case. The test is checked only at the end of a complete iteration, and so this is the only time the loop can stop.
Here's an example that implements the remainder operation dividend % divisor, and produces some output. We assume all variables have already been declared, and that divisor and dividend have already been assigned positive values.
while (dividend >= divisor) {
dividend = dividend - divisor;
System.out.println ("loop is executed");
}
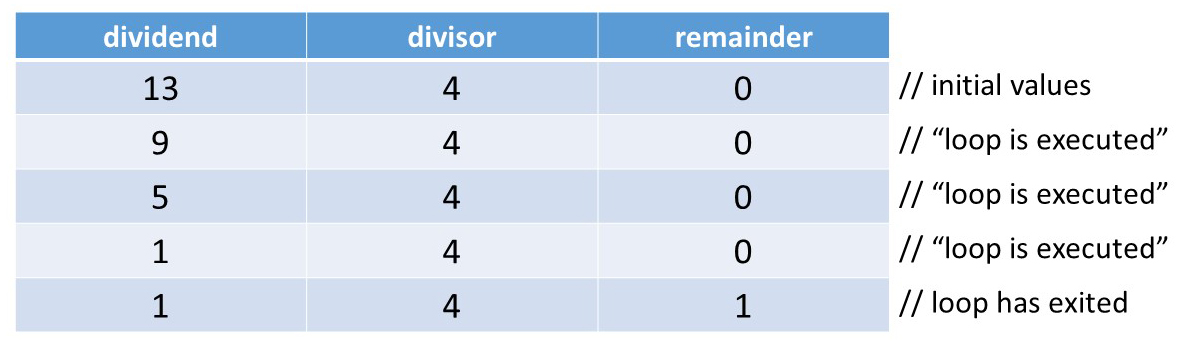
remainder = dividend;All statements of the loop body are executed, even if one of them affects the truth value of the test. In the example above, values of 9 for dividend and 4 for divisor result in two lines of output. We show a representation with values of 13 for dividend and 4 for divisor and initially 0 for remainder. This results in 3 lines of output.
When debugging while loop code, sometimes it's useful to make charts like the one below to keep track of the value of each variable.
Exercise: A Fill-in-the-blanks Problem
The program DateConverter.java (which you have been given) is missing two assignment statements. The missing statements will either both be at one of the lines marked with ***, or one will be at one of the *** lines and one will be at the other. In a bit, you'll determine what the statements are and where they go. But first, you'll come up with a small but comprehensive set of tests for the code before writing the code itself. This technique is called test-driven development, and we'll be doing it more in subsequent labs.
Testing the code involves supplying a value for dayOfYear on the command line. A few new things about the code:
- The value for
dayOfYearis read fromargs[0], which is a command line argument. Review the previous labs if you don't remember how to run a program with different command line arguments. - The statement
import java.io.*;makes Java library methods involving input and output accessible inside the program. You don't have to worry about this. - The five lines starting with
try {catches an exception that would occur if the command line argument isn't an integer. We'll learn about exceptions in a couple of weeks.
Along with your partner, list out five different test cases (arguments you might give to DataConverter) that should be able to tell you whether or not the program is running correctly.
Once you've finished that, complete DateConverter.java by putting in two assignment statements as specified above. Once you're done with that, compile your program and try each one of your test cases.
IntelliJ will automatically compile your code when you save the file; in order to provide an input argument go to Run -> Edit Configurations, and put the arguments in the Program Arguments box:
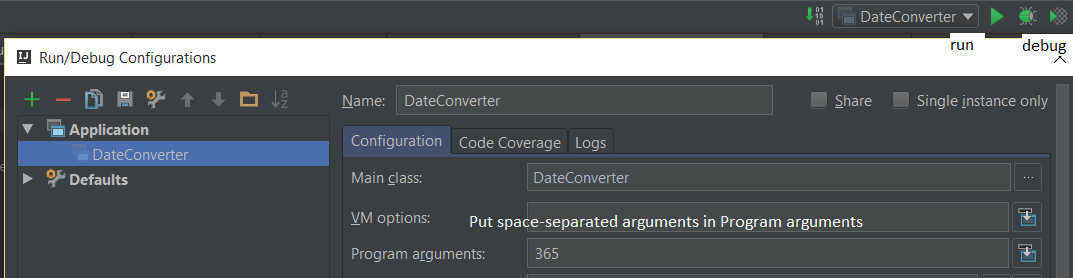
You can run it with the green play button in the top right (as labeled). Clicking the name of the class in the top right will allow you to change the class that is run. Another way is to right click the name of the class you want to run in the left sidebar and select "Run".
Did they all work as expected? Can you think of a way that your tests might not have been comprehensive (meaning that all your tests pass but there is still some type of input which will not work the way you want it to)?
Exercise: A Jigsaw Puzzle - Drawing a Triangle
The file TriangleDrawer.stuff contains a collection of statements. Some of the statements, together with some extra right braces, form the body of a main method that, when executed, will print the triangle:
*
**
***
****
*****
******
*******
********
*********
**********
(Each line has one more asterisk than its predecessor; the number of asterisks in the last line is the value of the SIZE variable.)
First, switch places with your partner. Copy and paste statements from the TriangleDrawer.stuff file into the main method of a new class you create called TriangleDrawer.java. You'll have to add some right braces in addition to the copied lines that you've chosen and rearranged. (You won't need all the statements. You shouldn't need to use any statement more than once.)
Many students encounter infinite loops in their first solutions to this problem. If you get an infinite loop, be sure to hit the big red square button ("Terminate") in IntelliJ's console to stop the program.
D. Review of For statements
The for Statement
The for statement provides another way in Java to repeat a sequence of statements, similar to while but slightly different. It starts with for, continues with loop information inside parentheses, and ends with the loop body (the segment to be repeated) enclosed in curly braces.
for (loop-information) {
    loop-body;
}
Loop information consists of initializations, a test (condition), and increments. These three sections are separated by semicolons, and any of these may be omitted. If there is more than one initialization or increment, they are separated by commas. If the test succeeds, the loop continues.
for (initialization; test; increment) {
loop-body;
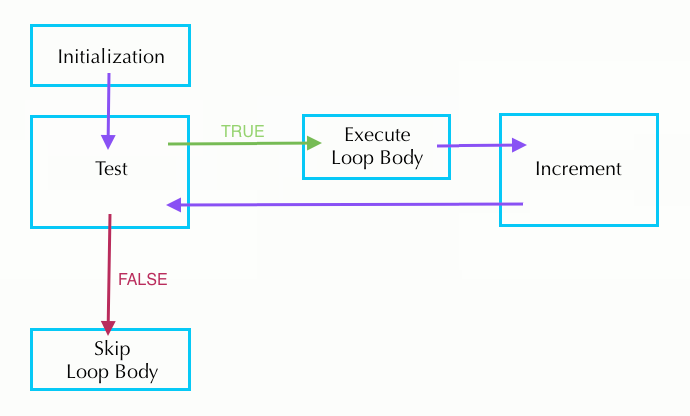
}Loop execution proceeds as follows:
- Initializations are performed.
The test is evaluated.
- If the condition is false, the loop is finished and execution continues with the code following the for loop.
- If the condition is true, the loop body is executed, increments are performed, and we loop back to the top of step 2 where the test is evaluated again. (Note: We never re-initialize.)
The following loops are several equivalent ways to compute n factorial
(the product of all the positive integers up through n).
Two initializations in loop-information
for (int k = n, product = 1; k > 0; k = k - 1) {
    product = product * k;
}
Product initialized outside for loop
int product = 1;
for (int k = n; k > 0; k = k - 1) {
    product = product * k;
}
Decrement performed inside the loop-body
int product = 1;
for (int k = n; k > 0; ) {
    product = product * k;
    k = k - 1;
}
While loop equivalent
int product = 1;
int k = n;
while (k > 0) {
    product = product * k;
    k = k - 1;
}
Look over these four options and decide with your partner which is the easiest to read. Why?
As the last loop demonstrates, the for loop is basically a
repackaged while loop that puts all the information about how long the
loop should continue in one place. Thus, a for loop is generally easier
to understand than an equivalent while loop.
Exercise: while-to-for Translation
Either do these with your partner, or compare notes with them after you
complete them. Translate the following while loops to for loops. The
body should contain only the call to println.
1.
int k = 0;
while (k < 10) {
    System.out.println(k);
    k = k + 1;
}
2.
int k = 0;
while (k < 10) {
    k = k + 1;
    System.out.println(k);
}
Shortcuts for Incrementing/Decrementing
Let k be an integer variable. Then the three following statements are
equivalent in that they all increment k.
k = k + 1;
k += 1;
k++;
Similarly, these three statements all decrement k by 1.
k = k - 1;
k -= 1;
k--;
Note: The motivation for this shorthand notation is that the operations of incrementing and decrementing by 1 are very common. While it is legal to increment or decrement variables within larger expressions like
System.out.println(values[k++]);this is a risky practice very susceptible to off-by-one errors. Therefore,
we ask that you only use the ++ or -- operations on lines by themselves.
The Break Statement
The break statement "breaks out of" a loop (both for and while loops). In other words, it stops the execution of the loop body, and continues with the statement immediately following the loop. An example of its use would be a program segment that searches an array named values for a given value, setting the variable found to true if the value is found and to false if it is not in the array.
boolean found = false;
for (int k = 0; k < values.length; k++) {
    if (values[k] == value) {
        found = true;
        break;
    }
}
This break statement allows us to save computation time. If we find the value within
the array before the end, we don't waste more time looping through the rest
of the array.
However, the break statement is not always necessary, and code with a lot
of breaks can be confusing. Abusing the break statement is often considered
poor style. When using break, first consider if instead it would be more
appropriate to put another condition in the test.
The Continue Statement
The continue statement skips the current iteration of the loop body,
increments the variables in the loop information, then evaluates the loop
test. This example checks how many 0's there are in array values:
int count = 0;
for (int i = 0; i < values.length; i++) {
    if (values[i] != 0) {
        continue;
    }
    count += 1;
}
System.out.println("Number of 0s in values array: " + count);
Similar to the break statement, the continue allows us to save time by
skipping sections of the loop. In this case, the continue allows us to add
to the count only when there is a 0 in the array. Removing continue will
give an incorrect output.
The difference between break and continue is that break immediately stops the loop and moves on to the code directly following it. In comparison, continue stops going through the current iteration of the loop body and immediately continues on to the next iteration as given by the loop information.
Like with break, abusing continue is often considered poor style. Try not
to go crazy with nested breaks and continues.
Both break and continue apply to only the closest loop it is enclosed in. For instance, in the case of the following nested loop, the break will only exit out of the inner for loop, not the outer one.
for (int i = 0; i < values.length; i++) {
    for (int j = i + 1; j < values.length; j++) {
        if (values[i] == value[j]) {
            break;
        }
    }
}
Self-test: Nonstandard for Loop
What output is produced by the following program segment? We strongly recommend
that you use a table to keep track of the value of k.
for (int k=1; k<10; k=k+1) {
    // increment is not normally done in both places
    k = k + 1;
    System.out.print(k + " ");
}
System.out.println();Answer: 2 4 6 8 10
E. Exercises with if..else, while and for
Self-Test: Code Analyzing
Working with your partner but not using a computer, determine what the following program prints.
This is tricky! Get a pen or pencil and keep careful track of the values of each variable at every stage.
class Test3 {
    public static void main (String[] args) {
        int x = 1;
        int y = 1;
        while (x < 5) {
            if (y < 5) {
                x = x + 1;
                if (y < 3) {
                    x = x - 1;
                }
            }
            y = y + 2;
            System.out.print(x + "" + y + " ");
            x = x + 1;
        }
        System.out.println();
    }
}
Exercise: Another Jigsaw Puzzle
Again working with your lab partner, use the following parts to complete a program that, when run, produces the output
a-b c-dYou should use each part exactly once. You will have to add some right braces to complete the code. Here are the parts.
Part 1
if (x == 1) {
    System.out.print("d");
    x = x - 1;
}
Part 2
if (x == 2) {
    System.out.print("b c");
}
Part 3
public class Shuffled {
    public static void main (String[] args) {
Part 4
if (x > 2) {
    System.out.print("a");
}
Part 5
int x = 3;Part 6
x = x - 1;
System.out.print("-");
Part 7
while (x > 0) {When completed, please put the unshuffled code into a new file called Unshuffled.java.
Exercise: A Third Jigsaw Puzzle - With For Loops!
Make a new Java file called TriangleDrawer2.java (you might want to copy and paste from TriangleDrawer.java). In this file, rewrite the program so that it produces the exact same output, but using for loops and no while loops. If you have having trouble, re-read the parts above describing how to convert a while loop to a for loop.
F. Arrays
Array Definition and Use
An array is an indexed sequence of elements, all the same type. Real-life examples of arrays include the following:
- post office boxes
- book pages
- egg cartons
- chess/checkerboards
We declare an array variable by giving the type of its elements, a pair of square brackets, and the variable name, for example:
int[] values;Note that we don't specify the length of the array in its declaration.
Arrays are basically objects with some special syntax. To initialize an array, we use the new operator as we do with objects; the argument to new is the type of the array, which includes the length. For example, the statement
values = new int[7];stores a reference to a 7-element integer array in the variable values. This initializes the array variable itself. If we want to declare and initialize the array at the same time, we can:
int[] values = new int[7];The elements of the array are indexed from 0 to (array length) - 1 and the element at a particular index can be changed with an assignment statement. For example, to set the second element to 4 we write:
values[1] = 4;For an int array, Java will (by default) set all of the elements to 0. Similarly, double arrays will be filled with 0.0, boolean with false, etc. For arrays of references to non-primitive objects (review Lab 2 if you need a refresher), the array will be initialized with null.
If you know what every value in your array should be at initialization time, you can use this simplified syntax to directly initialize the array to the desired values. Note that you don't have to provide the array length because you're explicitly telling Java how long your array should be.
int[] oneThroughFive = new int[]{1, 2, 3, 4, 5};
//This also works but only if you declare and instantiate in the same line
int[] oneThroughFive = {1, 2, 3, 4, 5};
To access an array element, we first give the name of the array, and then supply an index expression for the element we want in square brackets. For example, if we want to access the kth element of values (0-indexed), we can write,
values[k]If the value of the index expression is negative or greater than/equal to the length of the array, an exception is thrown (negative indexing is not allowed).
Every array has an instance variable named length that stores the number of elements that array can hold. For the values array just defined, values.length is 7. The length variable can't be changed; once we create an array of a given length, we can't shrink or expand that array.
Self-test: Practice with Arrays of Objects
What is printed by the program below?
import java.awt.*;

public class Test {
   public static void main (String[] args) {
     Point[] line1, line2;
     line1 = new Point[2];
     line2 = new Point[2];
     line1[0] = new Point();
     line1[1] = new Point();
     line1[0].x = 1;
     line1[0].y = 3;
     line1[1].x = 7;
     line1[1].y = 9;
     line2[0] = line1[1];
     line2[1] = line1[0];
     line1[0].x = 11;
     line1[1] = line1[0];
     System.out.println(line2[0].x + " " + line2[0].y +
                        " " + line2[1].x + " " + line2[1].y);
   }
}Answer: 7 9 11 3
Self-test: Recognizing Purpose from Code
In the real world, often you will have to deal with code you did not write. Sometimes you will be provided documentation, sometimes you will not. Being able to recognize what purpose code serves is an important skill. Provide a good (read: descriptive) name for each of the following methods. Assume that values contains at least one element.
Don't be worried if you name was slightly different, but make sure that you can figure out what each method is doing before you check. If you misunderstood what the code was for, see if you can make sense of it once you know its name.
private static int _______ (int[] values) {
  int rtn = values[0];
  int k = 1;
  while (k < values.length) {
    if (rtn < values[k]) {
      rtn = values[k];
    }
    k++;
  }
  return rtn;
}Answer: max
private static void _______ (int[] values) {
  int k = 0;
  while (k < values.length/2) {
    int temp = values[k];
    values[k] = values[values.length-1-k];
    values[values.length-1-k] = temp;
    k = k + 1;
  }
}Answer: reverse
private static boolean _______ (int[] values) {
    int k = 0;
    while (k < values.length-1) {
        if (values[k] > values[k+1]) {
            return false;
        }
        k = k + 1;
    }
    return true;
}Answer: isIncreasing (When we have methods that return a boolean we sometimes start the method name with "is")
private static int _______ (int[] values, int a) {
    int k = 0;
    int n = 0;
    while (k < values.length) {
        if (values[k] == a) {
            n++;
        }
        k++;
    }
    return n;
}Answer: count
for Statements with Arrays
for statements work well with arrays. Consider, for example, an array named values. It is very common to see code like the following:
for (int k = 0; k < values.length; k += 1) {
    // do something with values[k]
}
Exercise: An Adding Machine Simulator
Consider a program that simulates an old-fashioned adding machine. The user types integers as input, one per line. Input should be handled as follows:
- A nonzero value should be added into a subtotal.
- A zero value should print the subtotal and reset it to zero.
- Two consecutive zeroes should print the total of all values inputted, then print out every value that was inputted in sequence (not including zeroes) then terminate the program.
Here's an example of how the program should behave.
| user input | printed output |
|---|---|
| 0 | subtotal 0 |
| 5 | |
| 6 | |
| 0 | subtotal 11 |
| -5 | |
| 5 | |
| 0 | subtotal 0 |
| 13 | |
| -8 | |
| 0 | subtotal 5 |
| 0 | total 16 |
| 5 | |
| 6 | |
| -5 | |
| 5 | |
| 13 | |
| -8 |
If your partner has been coding recently, please switch places. Then, complete the framework in AddingMachine.java to produce the simulator program. You can add code anywhere in the program, though you shouldn't have to remove any.
A few more details:
- You can assume that we will never enter more than
MAXIMUM_NUMBER_OF_INPUTSnon-zero values during any run of the program. In real life, you'll never have a guarantee like this, but you haven't been taught the proper Java to handle an arbitrarily long sequence of inputs. - To exit the
mainmethod, execute areturn;statement somewhere inside the method. Because themainmethod is of typevoid, it can't return a value. Therefore, the appropriatereturnstatement doesn't have an argument. This code introduces the
Scannerclass. AScannercan be used to read user input. Here theScanneris created withSystem.inas an argument, which means that it is expecting input from the command line (or from IntelliJ's Console).You can do a variety of things with a
Scanner, but in this exercise you'll find it most useful to use code like this:int k; k = scanner.nextInt();- Here,
scannerreads everything it can from its input and stores the result in an integerk. Becausescanner's input is the command line, the program will actually stop and wait at this part of the code until the user types in something at the command line and hits enter. For example, if the user types100, then the program will store the value100inkbefore continuing on.
Exercise: Insert & Delete
Look at the files ArrayOperations.java and ArrayOperationsTest.java.
Fill in the blanks in the ArrayOperations class. Your methods should pass
the tests in ArrayOperationsTest.
Note: Before trying to program an algorithm, you should usually try a small case by hand. For each of the exercises today, work with a partner to do each algorithm by hand before writing any code.
- The
insertmethod takes three arguments: anintarray, a position in the array, and anintto put into that position. All the subsequent elements in the array are moved over by one position to make room for the new element. The last value in the array is lost.
For example, let values be the array {1, 2, 3, 4, 5}. Calling
insert(values, 2, 7)would result in values becoming {1, 2, 7, 3, 4}.
- The
deletemethod takes two arguments: anintarray and a position in the array. The subsequent elements are moved down one position, and the value 0 is assigned to the last array element.
For example, let values be the array {1, 2, 3, 4, 5}. Calling
delete(values, 2)would result in values becoming {1, 2, 4, 5, 0}.
For now don't worry about the methods being called with incorrect input.
Exercise: It's all Greek to Me
So far all the exercises have involved writing your own code. This is an important skill, but is far from the only thing you need to be a successful programmer. Equally important is debugging code. "SieveOfEratosthenes.template" is a file that has been provided for you. When you call this program from the command line, you provide it a single integer input as such:
java SieveOfEratosthenes 500This program calculates all prime numbers smaller than the input value and prints them out in increasing order. It uses the algorithm known as the Sieve of Eratosthenes, which is one of the fastest prime number finding algorithms there is (even though it's over 2000 years old!). However, the file as it has been given to you is buggy and incomplete (in fact, it won't even compile). You have several tasks ahead of you.
First, read the wikipedia page on the Sieve of Eratosthenes so that you understand how the algorithm works and rename it to SieveOfErathosthenes.java.
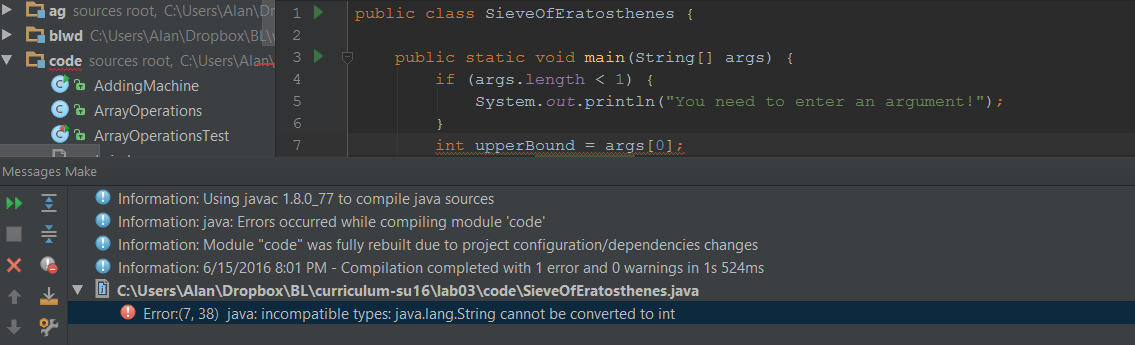
Second, attempt to compile SieveOfEratosthenes.java. The output you should see looks something like this:
    SieveOfEratosthenes.java:7: error: incompatible types
        int upperBound = args[0];
                             ^
  required: int
  found:    String
1 error
Or, in IntelliJ it will show a red squiggly underline and an error message if you try to run it:
Fortunately, just seeing the red squigglies in your code will let you know right away if something you've typed won't compile.
Before anything else, try to understand what the Java compiler is telling you. Once you understand what is going wrong, you'll probably realize you don't know how to fix this problem: DON'T ASK FOR HELP JUST YET. An important part of CS61BL is teaching you how to debug and look for help on your own and with your partner. Once you've realized what the error is, you and your partner should try searching for how to solve this problem online (Google is your friend). (IntelliJ trick for after you figure out how to fix it: press Alt+Enter to bring up options to quick fix, quick-import, or quick-change any code your cursor is on! Abuse it!).
Third, make any changes you think are needed to get SieveOfEratosthenes.java to compile. Once finished, compile and run the file from the command line without arguments like this:
java SieveOfEratosthenesYou'll notice that Java is printing out an error message, but is still crashing with an exception. Make any changes you think are necessary to get SieveOfEratosthenes to return an error message but no exceptions if it is run without arguments. If you need to, feel free to Google java.lang.ArrayIndexOutOfBoundsException to understand what is happening, but that isn't necessary.
Fourth and finally, fix all the bugs in SieveOfEratosthenes.java and complete the unfinished parts so that it works as intended.
Multidimensional Arrays
Having an array of objects is very useful, but often you will want to have an array of arrays of objects. Java does this in a very natural way. We've already learned that to declare an array, we do:
int[] array;Similarly, to declare an array of arrays, we do:
int[][] arrayOfArrays;When constructing an array of arrays, you must declare how many arrays it contains (because this is the actual array you are constructing), but you don't have to declare the length of each array. To declare an array of 10 arrays, you do this:
int[][] arrayOfArrays = new int[10][];To construct the first array in the array of arrays, you could do:
arrayOfArrays[0] = new int[5];And you could access the first index of the first array as:
arrayOfArrays[0][0] = 1;Hopefully this all makes sense. Alternatively, you can fix the length of each array in the array of arrays as the same length like this:
int[][] tenByTenArray = new int[10][10];An array of arrays, when the different sub-arrays can be of different sizes, is called a jagged array. If they are all the same size, it is often convenient to forget altogether that you have an array of arrays, and instead to simply imagine you had a multi-dimensional array. For instance, you could create a 3-dimensional array (to represent points in space, for example) like this:
int[][][] threeDimensionalArray = new int[100][100][100];This 3D array has 100x100x100 = 1,000,000 different values. Multidimensional arrays are extremely useful, and you'll be encountering them a lot.
G. More Control Flow (Optional)
Why is this optional?
The if..else, while and for statements are by far the most commonly used features to manipulate control flow in Java. However, they are not the only ones. While you will only ever be required to know those three features, this section will give you a brief introduction to some other features of Java's control flow syntax that you might find useful if you plan on using Java in the future (the most popular programming language in the world), or are simply interested.
If you are unsure of your grasp of what has already been discussed, or simply don't care, feel free to skip this section (you're finished with Lab 3!). If you want to know a little more about Java, read on!
do...while Statements
do...while statements are just like inverted while statements. The syntax is:
do {
    // body of while-loop
} while (condition);
This operates just like a normal while loop, except the body of the loop is executed, then the condition is checked and if it evaluates to true, the body is executed again, and so on. This inversion means that no matter what (even if the condition is just false) the body is executed at least once.
There is rarely any reason to prefer one over the other, and because of that while loops are much more commonly seen than do...while loops because people are more used to them. However, sometimes using do...while will save you a few lines of code.
switch Statements
While the do...while syntax was an alternative way to structure while loops, switch statements are alternatives to if...else. Consider the following code:
int x = 0;
... //some code that might change x
String amount;
if (x == 0) {
    amount = "zero";
} else if (x == 1) {
    amount = "one";
} else if (x == 2) {
    amount = "two";
} else if (x == 3) {
    amount = "three";
} else if (x == 4) {
    amount = "four";
} else if (x == 5) {
    amount = "five";
} else {
    amount = "greater than 5";
}
System.out.println("X is " + amount);
This is perfectly fine Java syntax, but there is an alternative switch formulation:
int x = 0;
... //some code that might change x
String amount;
switch (x) {
    case 0:  amount = "zero";
        break;
    case 1:  amount = "one";
        break;
    case 2:  amount = "two";
        break;
    case 3:  amount = "three";
        break;
    case 4:  amount = "four";
        break;
    case 5:  amount = "five";
        break;
    default: amount = "greater than 5";
        break;
}
System.out.println("X is " + amount);
The parentheses next to the switch keyword denote the variable that is being considered. A switch statement determines the value of the variable under consideration (here x), and finds the case which corresponds to the value of x, and executes that block of code (up until the next break sign). The default keyword (which is optional), corresponds to an else statement and is executed if no case is found that matches the value of x. If x was 3, the above lines would print:
"X is three"There are more nuances about switch statements, and also about Java enums (which are rarely discussed but related). If you are interested I would recommend reading the Java Tutorial on Switch Statements.
One thing I will briefly touch on is that switch statements are 'fall-through'. This means that once you jump to a case, the code will continue until it hits a break statement, even if you go into other cases. Consider the following code:
int x = 0;
... //some code that might change x
String amount;
switch (x) {
    case 0: amount = "zero";
    case 1: amount = "one";
    case 2: amount = "two";
    case 3: amount = "three";
    case 4: amount = "four";
    case 5: amount = "five";
    default:amount = "greater than 5";
        break;
}
System.out.println("X is " + amount);
If x was 3, the code above would print:
"X is greater than 5"This is because amount is set to "three", then to "four", then to "five", then finally to "greater than 5" before finally hitting a break statement. Switch statements aren't incredibly common, but they are common enough that you might be happy you're familiar with them if you ever seen them (they are also a tiny bit faster than if statements, but unless you're doing serious high-performance computing this won't matter).
Labeled continue/break Statements
This lab already discussed the break and continue keywords, but there is one additional use of them which should be noted (in fact, I think this is probably the most useful information in this section).
Consider the following code, that checks to make sure nonZeroArray lives up to its name and doesn't contain any 0s, all the while counting how many values it looked at before it encountered a 0:
int n = 10;
int[][] nonZeroArray = new int[n][n];
... //some code that puts values into nonZeroArray
int goodValuesSeen = 0;
for (int i = 0; i < n; i++) {
    for (int j = 0; j < n; j++) {
        if (nonZeroArray[i][j] == 0) {
            break;
        }
        goodValuesSeen++;
    }
}
At first glance this might seem like good code, but let us examine it more closely. As stated before, a break statement terminates the first for loop that it is enclosed in. But in this case, that's the inner 'j' for loop, which means the outer 'i' for loop will keep running, which will just reset the inner for with a new value for i, potentially allowing goodValuesSeen to continue increasing beyond its supposed value.
What the coder wants to do is to terminate the outer for loop, but that is impossible with break statements as you know them (you might think two break statements in a row would do it - try thinking about why this is not the case). A solution to this problem might be to include a second break statement and a conditional like this:
int n = 10;
int[][] nonZeroArray = new int[n][n];
... //some code that puts values into nonZeroArray
int goodValuesSeen = 0;
boolean shouldBreakOuterLoop = false;
for (int i = 0; i < n; i++) {
    if (shouldBreakOuterLoop) {
        break;
    }
    for (int j = 0; j < n; j++) {
        if (nonZeroArray[i][j] == 0) {
            shouldBreakOuterLoop = true;
            break;
        }
        goodValuesSeen++;
    }
}
This works, but is needlessly ugly. The better solution is to label the for loops in order to indicate which for loop you want to break. This is done in the following way:
int n = 10;
int[][] nonZeroArray = new int[n][n];
... //some code that puts values into nonZeroArray
int goodValuesSeen = 0;
outerloop:
for (int i = 0; i <= n; i++) {
    innerloop:
    for (int j = 0; j < n; j++) {
        if (nonZeroArray[i][j] == 0) {
            break outerloop;
        }
        goodValuesSeen++;
    }
}
Here, the outer loop is named outerloop and the inner loop is named innerloop. When we want to break, we specify that it is the for loop named outerloop that we want to break. This code will operate as intended.
Labeled break statements (as this is called) can be used with do...while, while and for loops, and labeled continue statements (which work in the same way) can be used with for loops. Generally though, it is considered bad code to use them too freely or in too complex a way, so I would urge caution in using labeled break or continue statements in situations more complicated than doubly or triply enclosed loops as above.
H. Conclusion
Wrap-Up
Today's lab reintroduced a number of concepts in programming (such as loops and conditionals) which you have likely seen before, and explained to you how they work in Java. The exercises gave you practice both with writing your own code from scratch, and with debugging and interpreting code which has been given to you.
If you found the information presented in today's lab interesting, I would recommend reading into the Java documentation on Control Flow and Enums. If you've noticed that Java Arrays have some pretty large weaknesses compared to lists in say, Python, I would recommend reading the Java Documentation for the ArrayList class (which we'll be talking about in a week or two).
If you found the information presented in today's lab difficult, I would recommend reading this tutorial on Java conditionals, and the follow-up tutorials on Java loops and Java Arrays, as well as reading the relevant textbook chapters. In general, nothing in this lab should be new to you (except maybe some Java syntax), so if you're having a lot of trouble, please let a TA know.
Deliverables
Here's a short recap of what you need to do to finish this lab.
- Make sure that you have Intellij fully setup! All future labs and projects should be done in Intellij.
- Read through the review of basic Java syntax (if, else, else if, while, for, break, continue).
- Try out the partner exercises then the self-test questions.
- Create and implement TriangleDrawer.java from the contents in TriangleDrawer.stuff
- Solve the jigsaw puzzle and put it into Unshuffled.java
- Write TriangleDrawer2.java using only for-loops.
- Implement AddingMachine.java which simulates an old-fashioned adding machine.
- Fill the blanks in ArrayOperations.java so that it passes ArrayOperationsTest.java
- Copy SieveOfEratosthenes.template into SieveOfEratosthenes.java and change it so that it correctly implements the Sieve of Eratosthenes algorithm.
- Optionally take a look at additional control statements such as do-while and labeled breaks.