Navigation
- Introduction
- The Puzzle
- Your Tasks
- Quick Overview of Project Structure
- Approaching the Problem
- Version Control, Starter Code, and Submission
A. Introduction
This initial programming assignment is intended as an extended finger exercise, a mini-project rather than a full-scale programming project. The intent is to give you a chance to get familiar with Java and the various tools used in the course.
You'll start with a partial program that is supposed to allow a user to attempt to solve the Cube puzzle (see The Puzzle, and complete it in the style of the existing code.
We will be grading solely on whether you manage to get your program to work (according to our tests) and to hand in the assigned pieces. There is a slight stylistic component: the submission and grading machinery require that your program pass a mechanized style check, which mainly checks for formatting and the presence of comments in the proper places. Please consult the style rules and usage instructions for more information. To ensure that your program conforms to our style rules, you can use the CS 61B plugin by following these instructions.
B. The Puzzle
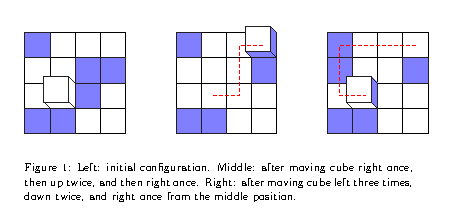
In the Cube puzzle, you are presented with an initially blank cube sitting on one cell of a square grid. A face of the cube has the same size as a cell of the grid. Six of the grid's cells are painted blue; the rest are blank, along with all the faces of the cube. You may roll the cube one space vertically or horizontally. Each time you do so, the face of the cube that ends up on the bottom (touching the board) trades colors with the cell it now occupies.
For example, the board might start out as in the diagram on the left and after several moves end up as depicted in the diagram on the right. As you can see, the upper-left corner square does not change color, even though the cube passes over it, because the face of the cube that touches that square is already painted.
C. Your tasks
The starter code that you'll get from the repository contains a skeleton
implementation of the game logic and the representation of the cube. You can run the project in IntelliJ. If for some odd reason, you are using the command line, then run using java -ea cube.Main from the proj1 directory.
For now, it simply displays a blank cube on the bottom left square of a blank 4x4 board.
(The -ea option just tells the Java interpreter to check any
assert statements you may have added to your code; by default it ignores
assertions. In IntelliJ, you can add the -ea option by going to Run -> Edit Configurations, and putting the option in VM Options)
Modify the source files CubeModel.java and Main.java as indicated
by // FIXME comments to make the puzzle
behave properly. The GUI provided with the skeleton knows how to depict the
state of a puzzle, as long as the methods of class cube.CubeModel behave
properly. Your job is to see that they do.
D. Quick Overview of Project Structure
The skeleton we provide you is a form of the
Model-View-Controller (MVC) architecture. One class, cube.CubeModel is the model: it
embodies the current state of the puzzle and contains all the logic for moving
the cube and passing colors from the board to the cube and back. The
classes cube.CubeGUI and cube.CubeBoardWidget together serve as a
a view, which consults the model
and displays it. The class cube.Main is the controller,
which directs changes in the model, responding to user commands entered
via mouse by cube.CubeGUI.
The CubeModel class knows nothing of the view or the controller. Instead,
it uses a design tactic known as the observer pattern, using a pair
of classes from Java library. CubeModel extends
the java.util.Observable library class. Any
class that implements the java.util.Observer interface may be registered
to "observe" an Observable object through that object's
addObserver method. The "observed" object can then notify its observers
(using methods .setChanged and .notifyObservers) of any changes to its
state, without having to know what objects (if any) are currently observing it.
The "observers" in turn may receive these notifications by implementing
java.util.Observer.update. In this project, the CubeBoardWidget class
observes the CubeModel to know when it is changed and the view needs to be
updated.
Using the observer design pattern is a way of realizing separation of concerns, confining design decisions to as small a portion of code as possible. See the Javadoc manual pages for the Observable class and the Observer interface for more details about Java's version of the pattern.
Similarly, the Main class observes the CubeGUI class, which notifies its
observers of any mouse clicks or menu selections that it receives.
The Main class responds to these commands, updating the board appropriately
(which in turn causes the view to get updated). The class also creates
and connects together the major components of the program (view and model).
E. Approaching the Problem
First, this is largely a code-reading and documentation-reading exercise. Do not start programming until you have done the necessary reading:
- Start with
Main.javato see how the main pieces of the program get put together and how commands are transferred betweenCubeGUIand the the cube model. - Read
CubeModel.javato see what its API (Application Programmer Interface) is and what parts you must fill in. - Read
CubeBoardWidget.javato see how it uses the cube model's methods to find out what to draw. - Read
CubeModelTestto see our unit tests for a correctly functioning model. - Determine what information
CubeModelmust maintain to be able to implement all of its methods properly (that is, decide on a representation for the puzzle.) Declare the necessary instance variables inCubeModel. - Implement some of the easier methods to check your representation:
The default (parameterless) constructor for
CubeModel, and methods such asside,cubeRow,cubeCol,moves,isPaintedSquare, andisPaintedFace. ThecheckCons0unit test inCubeModelTestshould now pass. - Implement
allFacesPainted. - Now implement the
initializemethods (which should allow thecheckinit4unit test to pass.) - Implement
Main.initPuzzle, which is supposed to set up the puzzle in a random configuration. - Implement
move, which is where the bulk of the work is.
In other words, don't try to do everything at once. Proceed incrementally. As you do, by the way, be sure to commit your changes, so that each commit corresponds to a feature or method implemented or a bug fixed. If you do so, backing out of changes becomes easier (Git, in fact, allows you to revert a single change you made at some time in the past, leaving everything you've done since then untouched. But this is only possible if you've been diligent to commit each distinct step in your progress.)
We've done all the GUI stuff already (the view and most controller parts
of the MVC approach), so that the bulk of your work is on the model part
(cube.CubeModel). Should you be curious about the parts that are written
for you, you might want to consult a few other pieces of documentation while
looking at them:
- Read the ucb package docs to see what the classes in
ucb.gui2are all about. - Read the Graphics and the Graphics2D documentation to see how to actually draw things on the screen.
- Read the MouseEvent documentation to see what's in an event--an object that contains information about a user interaction.
F. Version Control, Starter Code, and Submission
As usual, first make sure that everything in your repository is properly updated and checked in. Before you start, the command
$ cd  ~/123       #Or whatever your class ID is and wherever your repo is.
$ git status
should report that the directory is clean and that there are no untracked files that should be added and committed. Never start a new project without doing this.
You can get the starter code by using the following procedures:
$ git pull skeleton masterYour will now have a proj1 directory in your repository, initially
containing the skeleton code. The same command
$ git pull skeleton masterwill merge in any changes we make to the skeleton after you've started (we try to avoid this, but it does happen).
We've said this before, but since we'll be moving into larger projects, it bears repeating: It is important that you commit work to your repository at frequent intervals. Version control is a powerful tool for saving yourself when you mess something up or your dog eats your project, but you must use it regularly if it is to be of any use. Feel free to commit every 15 minutes; Git only saves what has changed, even though it acts as if it takes a snapshot of your entire project.
The command git status will tell you what you have modified,
removed, or possibly added since the last commit. It will also tell you
how much you have not yet sent to your central repository. You needn't just
assume that things are as you expect; git status will tell you whether
you've committed and pushed everything.
If you are switching between using a clone of your central repository on the instructional computers and another at home (or on your laptop), be careful to synchronize your work. When you are done working on one system, be sure push your work to the central (i.e. remote) repository:
$ git status              # To see what needs to be added or committed.
$ git commit -am "..."    # If needed to get everything committed.
$ git push origin master
When you start working on the other system, you then do
$ git status                        # To make sure you didn't accidentally
                                    # leave stuff uncommitted or untracked.
$ git pull origin master --rebase   # Get changes from your central
                                    # repo.
As usual, submit your project by pushing to your remote repository:
$ git push origin masterBe sure to respond to all prompts and to make sure the messages you get indicate that the push was successful. Don't just "say the magic words" and assume that everything's OK.
Acknowledgements
This project was created by Paul Hilfinger.