
Introduction
Learning Goals
The goal of this project is to give you a crash course in Java. Since CS 61BL is not intended to be a course about Java, we will be moving quickly, learning fundamental aspects of the Java language in just two weeks.
Before starting this project, we are assuming that you either have prior Java experience, or have done the first few labs and also (ideally) completed Java introduction. In addition, Chapter 1.1 and Chapter 1.2 of our online textbook can also be of help if you’d like a refresher on the material, or if you find yourself stuck anywhere.
The main purpose of this project is to help you build some comfort with the material in these first few weeks of the course, so it’s not necessary to have a deep understanding of everything just yet.
Unlike later projects, this assignment has a great deal of scaffolding. Future assignments will require significantly more independence. For this project, we recommend that you work in pairs with a partner from your lab section.
Overview
Your task for this project is to write a program simulating the motion of N objects in a plane, accounting for the gravitational forces mutually affecting each object as demonstrated by Sir Isaac Newton’s Law of Universal Gravitation.
Ultimately, you will be creating a program NBody.java that draws an animation of bodies floating around in space tugging on each other with the power of gravity.
If you run into problems, be sure to check out the FAQ section before posting to Piazza. We’ll keep this section updated as questions arise during the assignment. Always try googling before asking questions on Piazza. Knowing how to find what you want on Google is a valuable skill. However, know when to give up! If you start getting frustrated with your search attempts, then turn to Piazza.
Getting Started
Before proceeding, make sure you have completed Lab 1 and any required setup if using your own computer.
Partnerships
If you’d like to work with your partner, you have the option of either using your usual GitHub repository, or creating a new team repository repo. A team repository is only necessary if you wish to share code between partners. You can still submit as a partnership even with your personal repositories. All that’s necessary is to make sure that your partner has been added as a group member on Gradescope.
In either case, you will need to submit the partner registration form so that your submission will not be flagged by the cheating detection software.
If you’d like a team repository, one partner should first create a new team repo, and then the other partner should visit the team repo page join it. This team repository will be shared with both partners’ GitHub accounts.
Note that changing team repository partners requires instructor assistance!
Get the project skeleton
Now, make sure you have the latest copy of the skeleton files.
git pull skeleton master
Merging Git histories
If the folder you’re pulling into already has an older copy of the skeleton repository (from lab 1, for example), this will cause a so-called merge. The text editor you configured from lab 1 will automatically open asking you to provide a message on why you are merging.
If everything from lab 1 went correctly and the text editor you expected was what opened up, save and close the file like you would any other file.
If an unexpected, in-terminal text editor opened up, don’t panic. We need to first identify which editor it is. Sometimes, your terminal’s title bar will tell you what program is currently running, but other times, we’ll need to rely on what the editor looks like to figure it out. (Sorry—there’s no better way to do it than that!)
Depending on the settings on the computer you’re using, you will possibly find yourself in one of three terminal-based text editors:
- nano
- See the Gentoo Wiki.
- vim
- See this StackOverflow post.
- emacs
- If you’re not in nano or vim, you’re probably in emacs. See this clever post from Emacs Doctor.
Once you’ve successfully merged, you should see an nbody directory appear with files that match the skeleton repository.
Note that if you did not already have a copy of the skeleton repo in your current folder, you will not be asked for a merge message.
If you somehow end up having a merge conflict, consult the git weird technical failure scenarios.
If you get some sort of error, stop and either figure it out by carefully reading the git guide or seek help from a lab assistant. You’ll potentially save yourself a lot of trouble vs. guess-and-check with git commands. If you find yourself trying to use commands you Google like force push: don’t.
The Planet Class and Constructor
You’ll start by creating a Planet class. In your favorite text editor, create a file called Planet.java. Remember that your .java files should have the same name as the class it contains.
All of the numbers for this project will be doubles. We’ll go over what exactly a double is later in the course, but for now, think of it is a real number, so double x = 3.5.
Instance Variables
Begin by creating a basic version of the Planet class with the following 6 instance variables:
double xxPos- The planet’s current x position
double yyPos- The planet’s current y position
double xxVel- The planet’s current velocity in the x direction
double yyVel- The planet’s current velocity in the y direction
double mass- The planet’s mass
String imgFileName- The name of the file that corresponds to the image that depicts the planet (for example,
jupiter.gif)
Your instance variables must be named exactly as above. The reason we call them by double letters, e.g.
xxPosrather thanxPosis to reduce the chance of typos. In past semesters, students have accidentally pressed x when they meant y, and this has caused significant debugging hassle.
After adding the 6 instance variables above, let’s add the constructors!
Constructors
The signature of the first constructor should be:
public Planet(double xP, double yP, double xV, double yV, double m, String img)
Note: We have given parameter names which are different than the corresponding instance variable name. If you’d like to make the parameter names the same as the instance variable names for aesthetic reasons, make sure to use the
thiskeyword appropriately.
The second constructor should take in a Planet object and initialize an identical Planet object (i.e. a copy). The signature of the second constructor should be:
public Planet(Planet p)
All methods must be declared using the public keyword, and be non-static.
Your Planet class should not have a main method because we’ll never run the Planet class directly (i.e. we will never do java Planet).
Once you have filled in the constructors, you can test it out by compiling your Planet.java file and the TestPlanetConstructor.java file we have provided.
You can compile with the command:
javac Planet.java TestPlanetConstructor.java
You can run our provided test with the command:
java TestPlanetConstructor
If you pass this test, you’re ready to move on to the next step. Do not proceed until you have passed this test.
Understanding the Physics
Let’s take a step back now and look at the physics behind our simulations. Our Planet objects will obey the laws of Newtonian physics. In particular, they will be subject to:
- Pairwise Force
- Newton’s law of universal gravitation asserts that the strength of the gravitational force between two particles is given by the product of their masses divided by the square of the distance between them, scaled by the gravitational constant,
.
The gravitational force exerted on a particle is along the straight line between them. (We are ignoring here strange effects like the curvature of space.) Since we are using Cartesian coordinates to represent the position of a particle, it is convenient to break up the force into its and -components (, ). The relevant equations are shown below. We have not derived these equations, and you should just trust us.
Look at the image below and make sure you understand what each variable represents!
Note that force is a vector (i.e., it has direction). In particular, be aware that and are signed (positive or negative).
- Net Force
- The principle of superposition says that the net force acting on a particle in the - or -direction is the sum of the pairwise forces acting on the particle in that direction.
In addition, all planets have
- Acceleration
- Newton’s second law of motion says that the accelerations in the - and -directions are
Check Your Understanding
Consider a small example consisting of two celestial objects: Saturn and the Sun.
Suppose the Sun is at coordinates and Saturn is at coordinates . Assume that the Sun’s mass is and Saturn’s mass is . Here’s a diagram of this simple solar system:
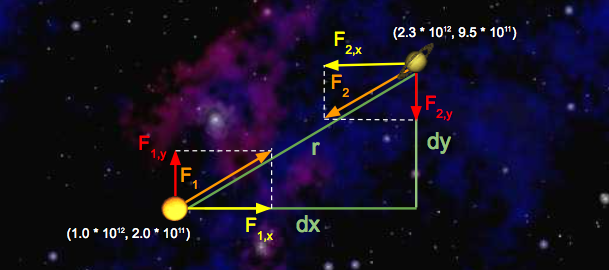
Let’s run through some sample calculations. First let’s compute , the force that Saturn exerts on the Sun. We’ll begin by calculating , which we’ve already expressed above in terms of and .
Since we’re calculating the force exerted by Saturn, is Saturn’s -position minus Sun’s -position, which is . Similarly, is .
So, . Solving for gives us . Now that we have , computation of is straightforward:
Note that the magnitudes of the forces that Saturn and the Sun exert on one another are equal; that is, . Now that we’ve computed the pairwise force on the Sun, let’s compute the and -components of this force, denoted with and , respectively. Recall that is meters and is meters. So,
Note that the sign of and is important! Here, and were both positive, resulting in positive values for and . This makes sense if you look at the diagram: Saturn will exert a force that pulls the Sun to the right (positive ) and up (positive ).
Next, let’s compute the x and y-components of the force that the Sun exerts on Saturn. The values of and are negated here, because we’re now measuring the displacement of the Sun relative to Saturn. Again, you can verify that the signs should be negative by looking at the diagram: the Sun will pull Saturn to the left (negative ) and down (negative ).
Let’s add Neptune to the mix and calculate the net force on Saturn. Here’s a diagram illustrating the forces being exerted on Saturn in this new system:
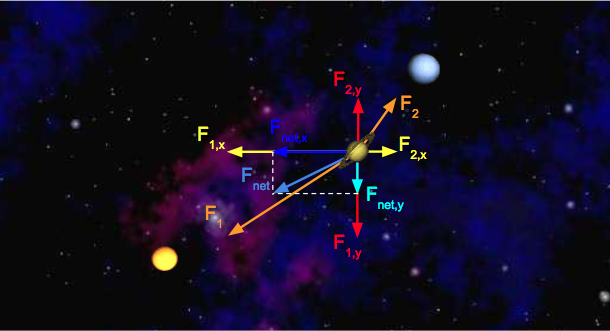
We can calculate the -component of the net force on Saturn by summing the -components of all pairwise forces. Likewise, can be calculated by summing the -components of all pairwise forces. Assume the forces exerted on Saturn by the Sun are the same as above, and that and .
Double Check Your Understanding
Suppose there are three bodies in space as follows:
- Samh
- Aegir
- Rocinante
Calculate and exerted on Samh. To check your answer,
Implementing the Planet Class
In our program, we’ll have instances of Planet class do the job of calculating all the numbers we learned about in the previous example. We’ll write helper methods, one by one, until our Planet class is complete.
calcDistance
Start by adding a method called calcDistance that calculates the distance between two Planets. This method will take in a single Planet and should return a double equal to the distance between the supplied planet and the planet that is doing the calculation, like
samh.calcDistance(rocinante);
It is up to you this time to figure out the signature of the method. Once you have completed this method, recompile and run the next unit test to see if your code is correct by typing the following into your terminal:
javac Planet.java TestCalcDistance.java
java TestCalcDistance
Hint: In Java, there is no built in operator that does squaring or exponentiation. We recommend simply multiplying a symbol by itself instead of using
Math.pow, since the latter will result in slower code.
calcForceExertedBy
The next method that you will implement is calcForceExertedBy. The calcForceExertedBy method takes in a planet, and returns a double describing the force exerted on this planet by the given planet. You should be calling the calcDistance method in this method.
For example samh.calcForceExertedBy(rocinante) for the numbers in Double Check Your Understanding return .
Once you’ve finished calcForceExertedBy, re-compile and run the next unit test by typing the following into the terminal:
javac Planet.java TestCalcForceExertedBy.java
java TestCalcForceExertedBy
Hint: It is good practice to declare any constants as a
static finalvariable in your class, and to use that variable anytime you wish to use the constant.Hint 2: Java supports scientific notation. For example, we can write
double someNumber = 1.03e-7.
calcForceExertedByX and calcForceExertedByY
The next two methods that you should write are calcForceExertedByX and calcForceExertedByY. Unlike the calcForceExertedBy method, which returns the total force, these two methods describe the force exerted in the X and Y directions, respectively. Remember to check your signs! Once you’ve finished, you can recompile and run the next unit test by following the code below. As a sanity check, samh.calcForceExertedByX(rocinante) in Double Check Your Understanding should return .
Do not use
Math.absto fix sign issues with these methods. This will cause issues later when drawing planets.
javac Planet.java TestCalcForceExertedByXY.java
java TestCalcForceExertedByXY
calcNetForceExertedByX and calcNetForceExertedByY
Write methods calcNetForceExertedByX and calcNetForceExertedByY that each take in an array of Planets and calculate the net X and net Y force exerted by all planets in that array upon the current Planet. For example, consider the code snippet below:
Planet[] allPlanets = {samh, rocinante, aegir};
samh.calcNetForceExertedByX(allPlanets);
samh.calcNetForceExertedByY(allPlanets);
The two calls here would return the values given in Double Check Your Understanding.
As you implement these methods, remember that Planets cannot exert gravitational forces on themselves! (Otherwise, the universe could possibly collapse in on itself, destroying everything including you.)
To avoid this problem, ignore any planet in the array that is equal to the current planet. To compare two planets, use the .equals method, as shown below:
samh.equals(samh)
When you are done go ahead and run:
javac Planet.java TestCalcNetForceExertedByXY.java
java TestCalcNetForceExertedByXY
If you’re tired of the verbosity of the for loops so far, read about the enhanced for loop from the Java introduction.
update
Next, you’ll add a method that determines how much the forces exerted on the planet will cause that planet to accelerate, and the resulting change in the planet’s velocity and position in a small period of time . For example, samh.update(0.005, 10, 3) would adjust the velocity and position if an -force of and a -force of were applied for .
You must compute the movement of the Planet using the following steps:
- Calculate the acceleration using the provided and -forces.
- Calculate the new velocity by using the acceleration and current velocity. Recall that acceleration describes the change in velocity per unit time, so the new velocity is .
- Calculate the new position by using the velocity computed in step 2 and the current position. The new position is .
Let’s try an example!
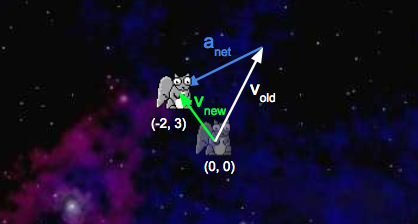
Consider a squirrel initially at position with a of and a of . is and is . Here’s a diagram of this system:
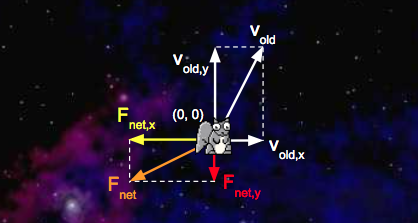
We’d like to update with a time step of . First, we’ll calculate the squirrel’s net acceleration:
With the addition of the acceleration vectors we just calculated, our system now looks like this:
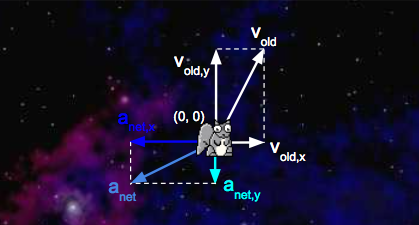
Second, we’ll calculate the squirrel’s new velocity:
Third, we’ll calculate the new position of the squirrel:
Here’s a diagram of the updated system:
For math/physics experts: You may be tempted to write a more accurate simulation where the force gradually increases over the specified time window. Don’t! Your simulation must follow exactly the rules above.
Write a method update(dt, fX, fY) that uses the steps above to update the planet’s position and velocity instance variables (this method does not need to return anything).
Once you’re done, recompile and test your method.
javac Planet.java TestUpdate.java
java TestUpdate
Once you’ve done this, you’ve finished implementing the physics. Hoorah! You’re halfway there.
(Optional) Testing Your Planet
As the semester progresses, we’ll be giving you fewer and fewer tests, and it will be your responsibility to write your own tests. Writing tests is a good way to improve your workflow and be more efficient.
Go ahead and try writing your own test for the Planet class. Make a TestPlanet.java file and write a test that creates two planets and prints out the pairwise force between them. This is optional and we will not be grading this part of the assignment.
Take a look at the provided test files for examples. In a later lab, we’ll also explore unit testing, which will allow us to write tests more quickly using less code.
The NBody Simulator
NBody is a class that will actually run your simulation. This class will not have constructor. The goal of this class is to simulate a universe specified in one of the data files. For example, if we look inside data/planets.txt (using the command line more command), we see the following:
$ more planets.txt
5
2.50e+11
1.4960e+11  0.0000e+00  0.0000e+00  2.9800e+04  5.9740e+24    earth.gif
2.2790e+11  0.0000e+00  0.0000e+00  2.4100e+04  6.4190e+23     mars.gif
5.7900e+10  0.0000e+00  0.0000e+00  4.7900e+04  3.3020e+23  mercury.gif
0.0000e+00  0.0000e+00  0.0000e+00  0.0000e+00  1.9890e+30      sun.gif
1.0820e+11  0.0000e+00  0.0000e+00  3.5000e+04  4.8690e+24    venus.gif
The input format is a text file that contains the information for a particular universe (in SI units).
- The first value is an integer
Nwhich represents the number of planets. - The second value is a real number
Rwhich represents the radius of the universe, used to determine the scaling of the drawing window. - Finally, there are
Nrows, and each row contains 6 values. The first two values are the and -coordinates of the initial position; the next pair of values are the and -components of the initial velocity; the fifth value is the mass; the last value is a String that is the name of an image file used to display the planets. Image files can be found in theimagesdirectory.
The file above contains data for our own solar system (up to Mars).
Input and Output
One of the major themes for this course is dealing with complexity. In the real world, our data is often too complex to input directly into the code: in this project, for example, we store astronomical data in separate text files.
Part of the challenge of this project is dealing with input and output (I/O). In this course, we’ll have to work with two kinds of I/O.
- Files
- Computers store files which can be read and processed by programs we write in Java. The In class can process data stored in a file.
- Program arguments
- Data can be passed directly to a program by means of program arguments. We’ll see later in this project that we can run the NBody simulation with the following command.
java NBody 157788000.0 25000.0 data/planets.txtThis starts up the Java evaluator and calls the
mainmethod, passing in the following arguments asargs.{"NBody", "157788000.0", "25000.0", "data/planets.txt"}
readRadius
Your first method is readRadius. Given a file name, it should return a double corresponding to the radius of the universe in that file.
For example, readRadius("./data/planets.txt") should return 2.50e+11.
To help you understand the In class, we’ve provided a few examples for you. The first one is called BasicInDemo.java, which you can find in the examples folder that came with the skeleton. Take a look at the code, and take a look at the input file BasicInDemo_input_file.txt. This program should output: The file contained 5, 9.0, ketchup, brass, and 5.0.
There’s a slightly more complicated example called InDemo.java, which you can also find in the examples folder. While this demo does not perfectly match what you’ll be doing in this project, every method that you need is somewhere in this file. You’re also welcome to search the web for other examples (though it might be tricky to find since the class name In is such a common English word).
Do not use
System.exit(0)in your code, despite the example using it. This will cause the autograder to exit, and you will not obtain a score.
Alternately, you can consult the documentation for the In class though you might find it a bit intimidating.
We encourage you (and your partner, if applicable) to do your best to figure out this part of the assignment on your own. In the long run, you’ll need to gain the skills to independently figure out this sort of thing. However, if you start getting frustrated, don’t hesitate to ask for help!
You can test this method using the supplied TestReadRadius.
javac NBody.java TestReadRadius.java
java TestReadRadius
readPlanets
Your next method is readPlanets. Given a file name, it should return an array of Planets corresponding to the planets in the file.
For example, readPlanets("./data/planets.txt") should return an array of five planets. You will find the readInt(), readDouble(), and readString() methods in the In class to be useful.
You can test this method using the supplied TestReadPlanets.
javac Planet.java NBody.java TestReadPlanets.java
java TestReadPlanets
Drawing the Initial Universe State
Next, build the functionality to draw the universe in its starting position. You’ll do this in four steps. Because all code for this part of the assignment is in main, this part of the assignment will not have automated tests to check each little piece.
Collecting All Needed Input
Create a main method in the NBody class. Write code so that your NBody class performs the following steps:
- Store the 0th and 1st command line arguments as doubles named
Tanddt. Hint: the arguments come in as Strings. You will have to search online in order to learn how to convert the Strings to doubles! - Store the 2nd command line argument as a String named
filename. - Read in the planets and the universe radius from the file described by
filenameusing your methods from earlier in this assignment.
Drawing the Background
After your main method has read everything from the files, it’s time to get drawing. First, set the scale so that it matches the radius of the universe. Then draw the image starfield.jpg as the background. To do these, you’ll need to figure out how to use the StdDraw library.
See StdDrawDemo.java in the examples folder for a demonstration of StdDraw. This example, like InDemo.java, does not perfectly match what you’re doing.
In addition, make sure to check out the StdDraw section of this mini-tutorial and if you’re feeling bold, the full StdDraw documentation. This will probably take some trial and error. This may seem slightly frustrating, but it’s good practice!
Hint: You may notice that putting
starfield.jpgas a parameter intoStdDraw.picture()results in a blank screen. This is because ourstarfield.jpgis inside theimagesfolder. Thus, you will need to use the full path, i.e.images/starfield.jpgin order to get your image. This applies to any other images you may use in the future.
Drawing One Planet
Next, we’ll want a planet to be able to draw itself at its appropriate position. To do this, take a brief detour back to the Planet.java file.
Add one last method to the Planet class, draw, that uses the StdDraw API mentioned above to draw the Planet’s image at the Planet’s position. The draw method should return nothing and take in no parameters.
Drawing All of the Planets
Return to the main method in NBody.java and use the draw method you just wrote to draw each one of the planets in the planets array you created.
Be sure to do this after drawing the starfield.jpg file so that the planets don’t get covered up by the background.
Test that your main method works by compiling and running.
javac NBody.java
java NBody 157788000.0 25000.0 data/planets.txt
You should see the sun and four planets sitting motionless. You are almost done.
Creating an Animation
Everything you’ve done so far is leading up to this moment. With only a bit more code, we’ll get something very cool.
To create our simulation, we will discretize time (please do not mention this to the late Stephen Hawking).
The idea is that at every discrete interval, we will be doing our calculations and once we have done our calculations for that time step, we will then update the values of our Planets and then redraw the universe. We’ll want to make a few additions to the main method to make it happen.
First, enable double buffering by calling enableDoubleBuffering(). This is a graphics technique to prevent flickering in the animation. This should be just a single method call, so you shouldn’t do anything complicated here. You can see an example in StdDrawDemo.java. Here’s the offical documentation that explains it in a few sentences. Know that if you don’t call this function, any attempt at smooth animation will look bad and flickery. (Remove it and see what happens!)
When double buffering is enabled by calling
enableDoubleBuffering(), all drawing takes place on the offscreen canvas. The offscreen canvas is not displayed. Only when you callshow()does your drawing get copied from the offscreen canvas to the onscreen canvas, where it is displayed in the standard drawing window. You can think of double buffering as collecting all of the lines, points, shapes, and text that you tell it to draw, and then drawing them all simultaneously, upon request.
Then, create a time variable and set it to 0. Set up a loop to loop until this time variable is T.
Finally, for each time through the loop:
- Create an
xForcesarray andyForcesarray. - Calculate the net and forces for each planet, storing these in the
xForcesandyForcesarrays respectively. - Call
updateon each of the planets. This will update each planet’s position, velocity, and acceleration. - Draw the background image.
- Draw all of the planets.
- Show the offscreen buffer (see the
showmethod of StdDraw). - Pause the animation for 10 milliseconds (see the
pausemethod of StdDraw). You may need to tweak this on your computer. - Increase your time variable by
dt.
For each time through the main loop, do not make any calls to
updateuntil all forces have been calculated and safely stored inxForcesandyForces. For example, don’t callplanets[0].update()until after the entirexForcesandyForcesarrays are done!The difference is subtle, but the autograder will be upset if you call
planets[0].updatebefore you calculatexForces[1]andyForces[1].
Compile and test your program.
javac NBody.java
java NBody 157788000.0 25000.0 data/planets.txt
Make sure to also try out some of the other simulations, which can all be found in the data directory. Some of them are very cool.
Printing the Universe
When the simulation is over, i.e. when you’ve reached time T, you should print out the final state of the universe in the same format as the input, like
5
2.50e11
1.4925e+11 -1.0467e+10  2.0872e+03  2.9723e+04  5.9740e+24    earth.gif
-1.1055e+11 -1.9868e+11  2.1060e+04 -1.1827e+04  6.4190e+23    mars.gif
-1.1708e+10 -5.7384e+10  4.6276e+04 -9.9541e+03  3.3020e+23 mercury.gif
2.1709e+05  3.0029e+07  4.5087e-02  5.1823e-02  1.9890e+30      sun.gif
6.9283e+10  8.2658e+10 -2.6894e+04  2.2585e+04  4.8690e+24    venus.gif
You are welcome to try to figure this out on your own, but if you’d prefer not to, the solution is right below:
StdOut.printf("%d\n", planets.length);
StdOut.printf("%.2e\n", radius);
for (int i = 0; i < planets.length; i += 1) {
    StdOut.printf("%11.4e %11.4e %11.4e %11.4e %11.4e %12s\n",
                  planets[i].xxPos, planets[i].yyPos, planets[i].xxVel,
                  planets[i].yyVel, planets[i].mass, planets[i].imgFileName);
}
This isn’t all that exciting (which is why we’ve provided a solution), but we’ll need this method to work correctly to autograde your assignment.
Submission
Submit to Gradescope. If you pass all the tests, you get all the points. Hoorah!
You may submit as many times as you’d like. If you have multiple submissions, select the one you wish for us to grade by pressing activate. If you are working with a partner, be sure to add them on Gradescope. After you make your submission, click “Add Group Member” (above your score).
Any image or sound files you add to your NBody folder will not be saved to your Git repository. We’ve set up a file called
.gitignorethat will restricts you to only adding.javaand.txtfiles.This is to keep your repository small so that the autograder moves quickly. We ask that you do not force-add other types of files to your repository, especially if they are large.
Trying Out Other Universes
There are many more universes provided in the skeleton other than planets.txt. You can find them in the data folder, like
java NBody 20000000 20000 ./data/suninterference.txt
Try them out and see if you can find any favorites.
Extra for Experience
Adding Audio
For a finishing touch, play the theme to 2001: A Space Odyssey using StdAudio and the file 2001.mid. Feel free to add your own audio files and create your own soundtracks! You may find the StdAudio section of this mini-tutorial helpful.
There is no extra credit for adding sound. For some reason in more recent versions of Java, StdAudio has occasionally failed to work. We’ll try to help, but we’ve had a few cases where we were unable to get the sound file to play.
Going Above and Beyond
For those of you who finish early and want to try something wild, crazy, and new, create new files NBodyExtreme.java and PlanetExtreme.java. You may also add additional classes as needed. Please include “Extreme” at the end of the filenames for clarity.
In the Extreme version of your NBody simulator, you should do something fundamentally new. There are a number of other interesting possibilities:
- Support elastic (or inelastic) collisions.
- Add the ability to programmatically generate planet images (rather than relying on input image files).
- Add the ability to control a spacecraft that is subject to the gravitational forces of the objects in the solar system.
No tips are provided here in the spec. If you want to know how to do any of the things listed above (or something else of your own imagining), try using search engines to learn how to do the thing you want to do.
In addition, there will be no extra credit for NBodyExtreme.
Frequently Asked Questions
- I’m passing all the local tests, but failing even easy tests like
testReadRadiusin the autograder.- Make sure you’re actually using the string argument that
testReadRadiustakes as input. Your code should work for any valid data file, not justplanets.txt. - The test demands 133.5, and I’m giving 133.49, but it still fails!
- Sorry, our sanity check tests have flaws. But you should ensure that your value for is exactly as defined in the spec, and not anything else. Don’t make it more accurate!
- When I run the simulation, my planets start rotating, but then quickly
- accelerate and disappear off of the bottom left of the screen.
- Look at the way you’re calculating the force exerted on a particular planet in one time step. Make sure that the force doesn’t include forces that were exerted in past time steps.
Also, make sure you did not use
Math.abswhen calculatingcalcForceExertedByXandcalcForceExertedByY. Also ensure that you are using doubles to keep track of summed forces. - Why’d you name the class Planet? The Sun isn’t a Planet.
- You got us. We could have used Body, but we didn’t. Maybe next time?
- What is a constructor? How do I write one?
- A constructor is a block of code that runs when a class is instantiated with the
newkeyword. Constructors serve the purpose of initializing a new object’s fields. Consider an example below:public class Dog { String _name; String _breed; int _age; public Dog(String name, String breed, int age) { _name = name; _breed = breed; _age = age; } }The
Dogclass has three non-static fields. Each instance of theDogclass can have a name, a breed, and an age. Our simple constructor, which takes three arguments, initializes these fields for all newDogobjects. - I’m having trouble with the second Planet constructor, the one that takes in
- another Planet as its only argument.
- Let’s walk through an example of how a constructor works. Suppose you use the
Dogconstructor above to create a newDog:Dog fido = new Dog("Fido", "Poodle", 1);When this line of code gets executed, Java first creates a new
Dogobject that’s empty. In essence, Java is creating a “box” for theDog, and that box is big enough to hold a box for each of theDog’s declared instance variables. This all happens before the constructor is executed.At this point, here’s how you can think about what our new fluffy friend
fidolooks like (note that this is a simplification! We’ll learn about a more correct view of this when we learn about Objects and pointers later this semester):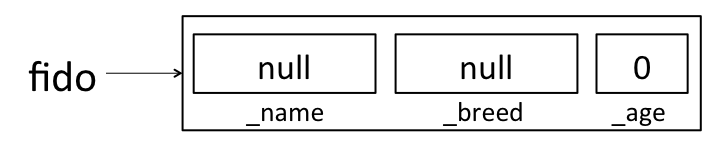
Java will put some default values in each instance variable. We’ll learn more about where these defaults come from (and what
nullmeans) later this semester. For now, just remember that there’s space for all of the instance variables, but those instance variables haven’t been assigned meaningful values yet. If you ever want to see this in action, you can add some print statements to your constructor:public Dog(String name, String breed, int age) { System.out.println("_name: " + _name + ", _breed: " + _breed + ", _age: " + _age); _name = name; _breed = breed; _age = age; }If this constructor had been used to create
fidoabove, it would have printed:_name: null, _breed: null, _age: 0OK, back to making
fido. Now that the JVM has made some “boxes” forfido, it calls theDogconstructor function that we wrote. At this point, the constructor executes just like any other function would. In the first line of the constructor,_nameis assigned the valuename, so thatfidolooks like: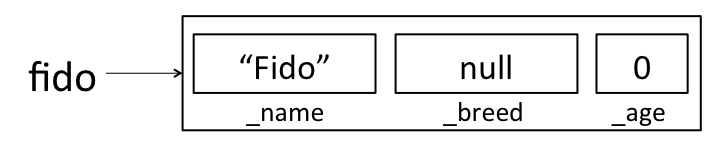
When the constructor completes,
fidolooks like: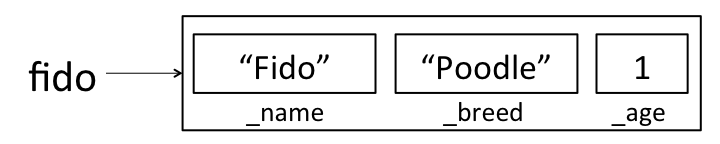
Now, suppose you want to create a new
Dogconstructor that handles cross-breeding. You want the new constructor to accept a name, an age, and two breeds, and create a newDogthat is a mixture of the two breeds. Your first guess for how to make this constructor might look something like this:public Dog(String name, String breed1, String breed2, int age) { Dog dog = new Dog(name, breed1 + breed2, age); }However, if you try to create a new
Dogusing this constructor:Dog tommy = new Dog("Tommy", "Poodle", "Golden Retriever", 1);This won’t do what you want! As above, the first thing that happens is that the JVM creates empty “boxes” for each of
tommy’s instance variables: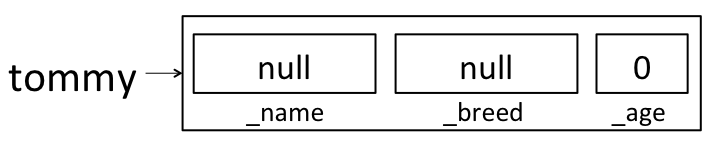
But then when the 4-argument constructor got called, it created a second
Dogand assigned it to the variabledog. It didn’t change any oftommy’s instance variables. Here’s how the world looks after the line in our new constructor finishes: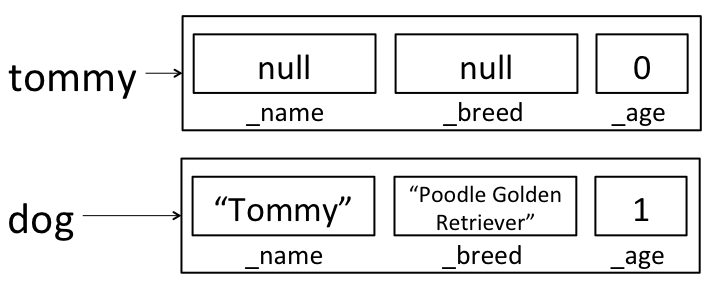
dogisn’t visible outside of the constructor method, so when the constructor completes,dogwill be destroyed by the garbage collector (more on this later!) and all we’ll have is the still un-initializedtommyvariable.Here’s a cross-breed constructor that works in the way we’d like:
public Dog(String name, String breed1, String breed2, int age) {
    this(name, breed1 + breed2, age);
}
Here, we’re calling the old 3-argument constructor on
this; rather than creating a newDog, we’re using the 3-argument constructor to fill in all of the instance variables on this dog. After calling this new constructor to createtommy,tommywill correctly be initialized to: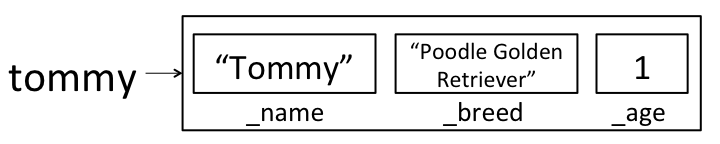
We could have also written a new constructor that assigned each instance variable directly, rather than calling the existing constructor:
public Dog(String name, String breed1, String breed2, int age) { _name = name; _breed = breed1 + breed2; _age = age; } - I’m getting an “unmappable character” error when compiling, and there are weird
- blocky characters in the error message.
- This is a system locale issue that primarily affects Windows systems. Try one of the following fixes.
-
Compile with the correct encoding flags.
javac -encoding UTF8 NBody.javajavac -encoding ISO-8859-1 NBody.java -
Change your system locale to US English. There are guides online with screenshots of how to do this for your specific version of Windows.
-
Acknowledgements
This assignment is a major revision by Josh Hug, Matthew Chow, and Daniel Nguyen of an assignment created by Robert Sedgewick and Kevin Wayne from Princeton University.