
Before You Begin
You should continue working with your partner which you should have committed to by Monday’s lab. You should work out of your
su20-p***repository.
Pull the skeleton code from GitHub as usual. Open IntelliJ and remember to click on Import Project and select the lab06 directory in your su20-p*** repository.
Linked Lists
In today’s lab, we’re going to continue our discussion of linked lists by introducing a new way of organizing programs through encapsulation. By hiding our linked list behind an abstraction barrier, it will no longer be naked and will be more user-friendly.
We will first define a few terms.
- Module
- A set of methods that work together as a whole to perform some task or set of related tasks.
- Encapsulated
- A module is said to be encapsulated if its implementation is completely hidden, and it can be accessed only through a documented interface.
Enhancement 1: Encapsulation
The implementation of IntList that we learned about in Lab 5 is impractical to use at scale. In it, the notion of a node in the list and the list itself are not separate. This means that someone who wants to use the IntList class would need to spend a lot of time adding null checks and handling errors that might come as a result of accidentally or intentionally modifying the item or next of a list. By giving users direct control to the IntList data structure’s internals, in some ways, we’ve actually made it harder to reason about the correctness of a program.
We want to separate the idea of the list as an entity from an entry in the list, much like an abstraction barrier. We’ll see that this design philosophy of encapsulation will come up over and over again for each of the data structures we study in the coming weeks.
Let’s update our lab 5 IntList with encapsulation, which we will now call a SLList (Singly Linked List). Note that in order to emphasize the encapsulation in box-and-pointer diagrams, we will be breaking the normal box-and-pointer rule that we don’t put Objects inside other Objects.
Note that throughout the lab, some of the images do not depict the
sizevariable for simplicity. This variable is an instance variable for allSLLists even if it is not shown in our illustrations.
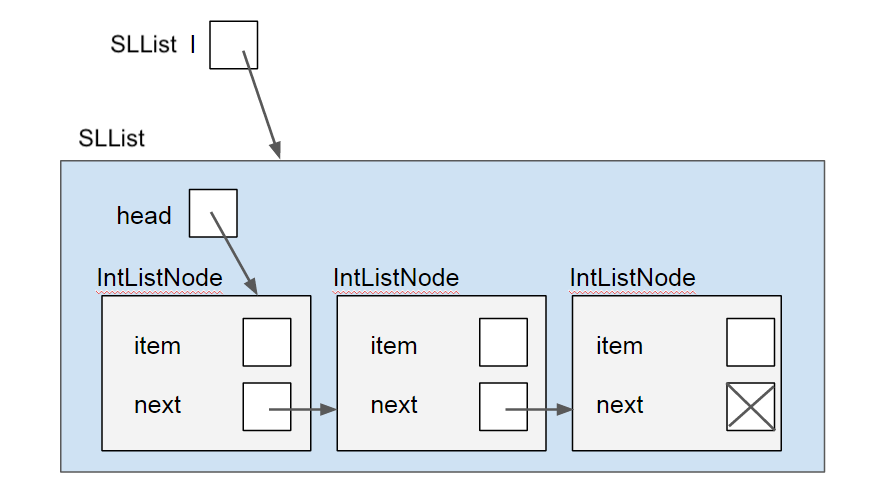
All operations on the list are handled through an instance of an SLList object, which keeps a single instance variable head in order to track the first node in the linked list. The SLList object operates directly on the IntListNodes that make up the SLList. Note that IntListNode does not need any methods (other than some utility methods such as toString() and equals(), which you will use later). The main effect of using encapsulation, by using a reference to the head of a list, is allowing users that wants to interact with the SLList to know nothing about the internal representation of the list or how the operations will take place. Instead, the users could simply operate on list as a whole and the SLList representation itself will take care of the operations, including any null checks, size checks, or further operations.
Enhancement 2: Sentinel
Although encapsulation shields users of our data structure from having to deal with cumbersome null checks, we as the implementors of our linked list class still have to handle them. However, we can eliminate null checks and simplify our code greatly with usage of a sentinel node instead of a just the head pointer. The sentinel node always exists (even when our list is empty), and does not represent an actual node in the list. Its next field represents the front of the list, unless the list is empty. The sentinel’s item is some meaningless value (in this example, we have chosen 42, but it doesn’t matter what its value is; a sentinel’s item should never be accessed). The last node in the list should have its next pointing back at the sentinel, and an empty list is represented by just a sentinel node whose next points back to itself. In a box-and-pointer diagram, a empty singly-linked list with a sentinel looks like this:
![]()
and a 2-item singly-linked list with a sentinel looks like this:
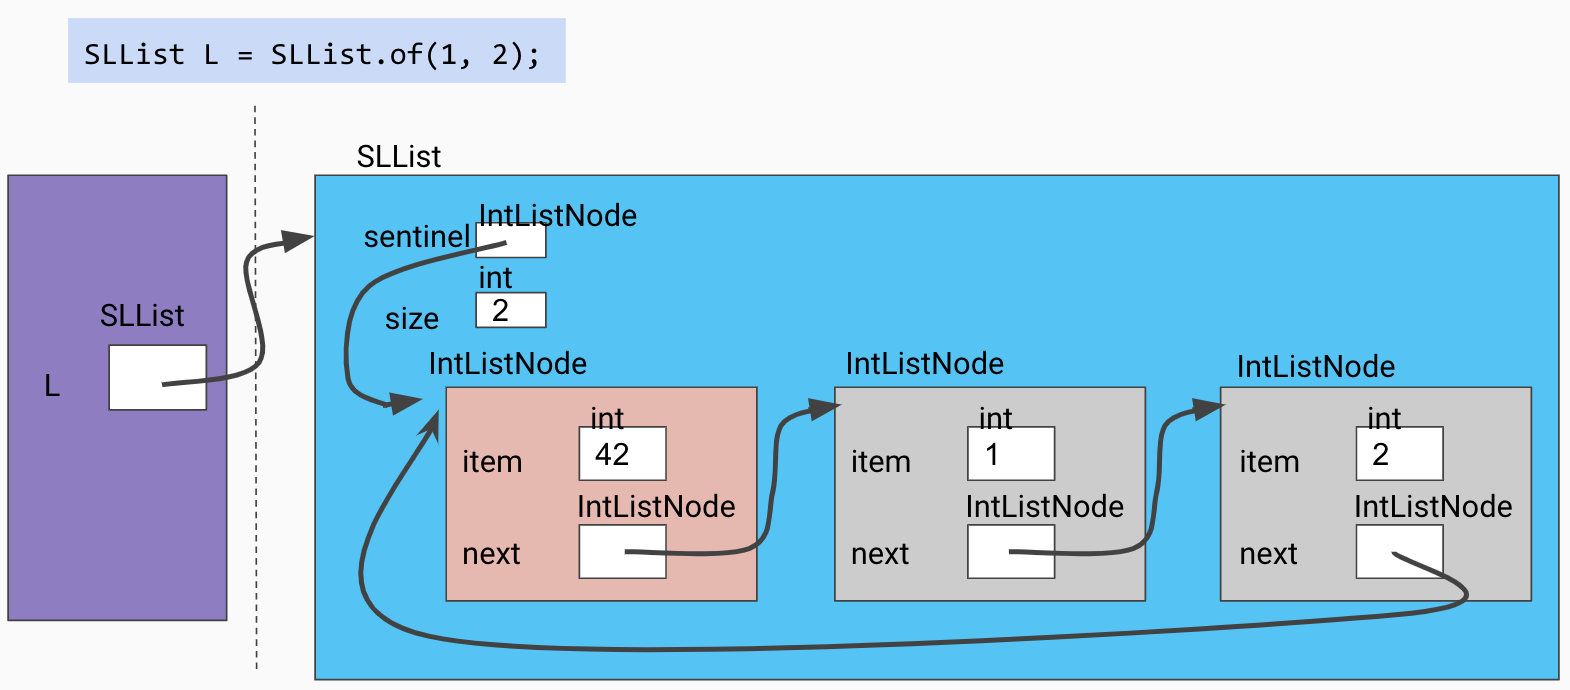
This has many benefits. When iterating through the list, we do not need to worry about reaching a null pointer at any point; when our moving pointer reaches the sentinel, it’s the end of the list. When inserting and removing nodes, we don’t need to manually handle being near the end or beginning or being the first or last element inserted or removed of the list; the code can be written with disregard for null-checking edge cases and it will still work properly because of the sentinel!
In code, an implementation might look like this:
public class SLList {

    /**
     * IntListNode is a nested class that represents a single node in the
     * SLList, storing an item and a reference to the next IntListNode.
     */
    private static class IntListNode {
        /**
         * The access modifiers inside a private nested class are irrelevant:
         * both the inner class and the outer class can access these instance
         * variables and methods.
         */
        public int item;
        public IntListNode next;

        public IntListNode(int item, IntListNode next) {
            this.item = item;
            this.next = next;
        }
    }

    /**
    *  sentinel is a dummy node that points to the first real node. That is,
    *  sentinel.item is a dummy value, while sentinel.next.item is our true
    *  first item.
    */
    private IntListNode sentinel;
    private int size;

    /* ... more methods to operate on ... */
}
The inner class is declared
privateto enforce our abstraction barrier, but what does thestaticmodifier do? Thestaticmodifier prevents the inner class from accessing instance variables or methods of the outer class. This saves a bit of memory and helps prevent mistakes by making sure we don’t modify anything we shouldn’t.
toString and equals
Just like yesterday, we will want a toString method so that our linked lists will be displayed in a more readable format when using the debugger or if using print lines, and we will also want an equals method so that our calls to assertEquals in our tests will verify whether two lists contain the same numbers. Overriding equals() allows us to define how two objects should be considered equal. Recall that checking equality of two objects a and b with a == b defines equality as whether or not a and b are the same reference. Here is an illustration of this difference:

These implementations have been provided for you this time. Take a brief look at them in your skeleton file to understand their implementations.
Exercise: add
As a bit of practice working with these improved lists, implement the add method in SLList.java, which adds the int x to the list at the specified int index. Be sure to look at and utilize the given completed methods.
In the case that index is greater than or equal to the current size of the list, x should just be added to the end of the list. For example, inserting into index 10 of an empty list should result in a list of size 1 with the inserted item in position 0.
public void add(int index, int x) {
    // TODO
}
Check your solution with the tests provided in SLListTest.java.
Exercise: reverse
Over the next few steps, we’re going to be completing the method reverse in SLList using our current SLList implementation.
/* Reverses a linked list destructively and assigns sentinel.next to the head of the reversed
linked list.*/
public void reverse() {
    // TODO
}
We will assume the restriction that the reversal is to be done in place, destructively, without creating any new nodes.
However, don’t implement the method just yet!
Testing reverse
Make sure that you’re familiar with how to test with JUnit from the section on Testing in the last lab.
Once again, we’re going to write the test before we write reverse, as part of our ongoing crusade of test-driven development (TDD).
Especially for tricky problems like this, thinking about test cases before writing code can help us write better code more quickly. This foresight hopefully will lead to a better outcome when compared to rushing ahead and trying to solve the problem without first having considered all the different scenarios.
Add JUnit tests in SLListTest.java to cover at least the following three situations:
- General case: That the function returns a reversed list (for lists of size \(\ge 2\)).
- Base case: That the function “reverses” a list of size 1 by completing without erroring.
- Base case: That the function “reverses” a list of size 0 by completing without erroring.
Implementing reverse
public void reverse() {
    // TODO
}
Try running the test you just wrote; it should fail. This is a good sign because it means our tests are working as expected.
Implement reverse recursively, and rerun the tests until all of them pass. A helper method that accepts an IntListNode will be helpful.
Hint: This is a challenging problem. The following diagrams show the progression of reversing a linked list recursively using a helper method called reverseHelper.
Initial call to helper function 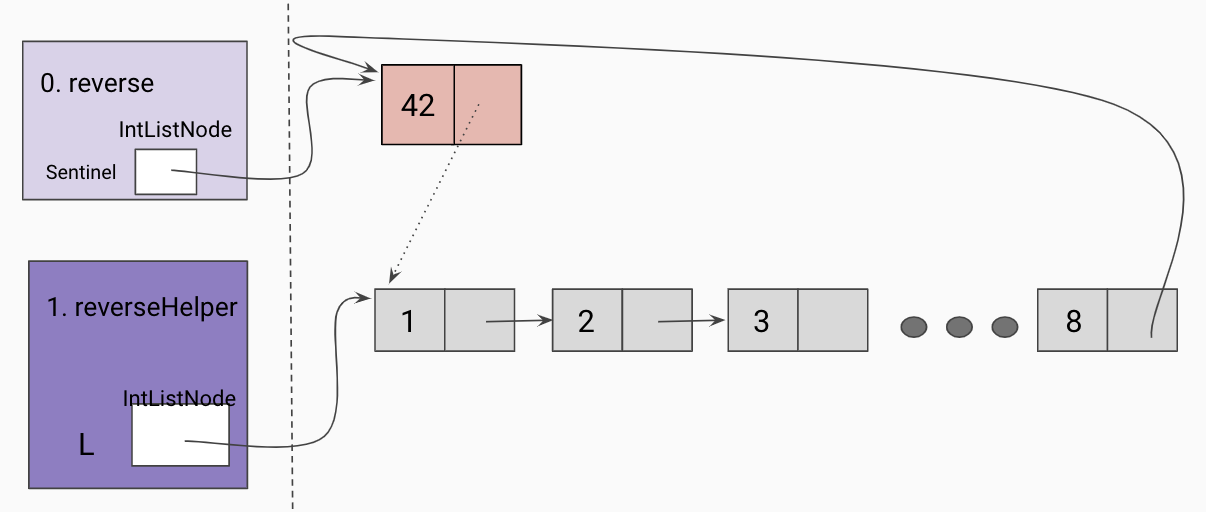
Given a reference to the true first node in our linked list, we will take the recursive leap of faith on the rest of the linked list as shown below. 
Hit a base case(the end of the list) 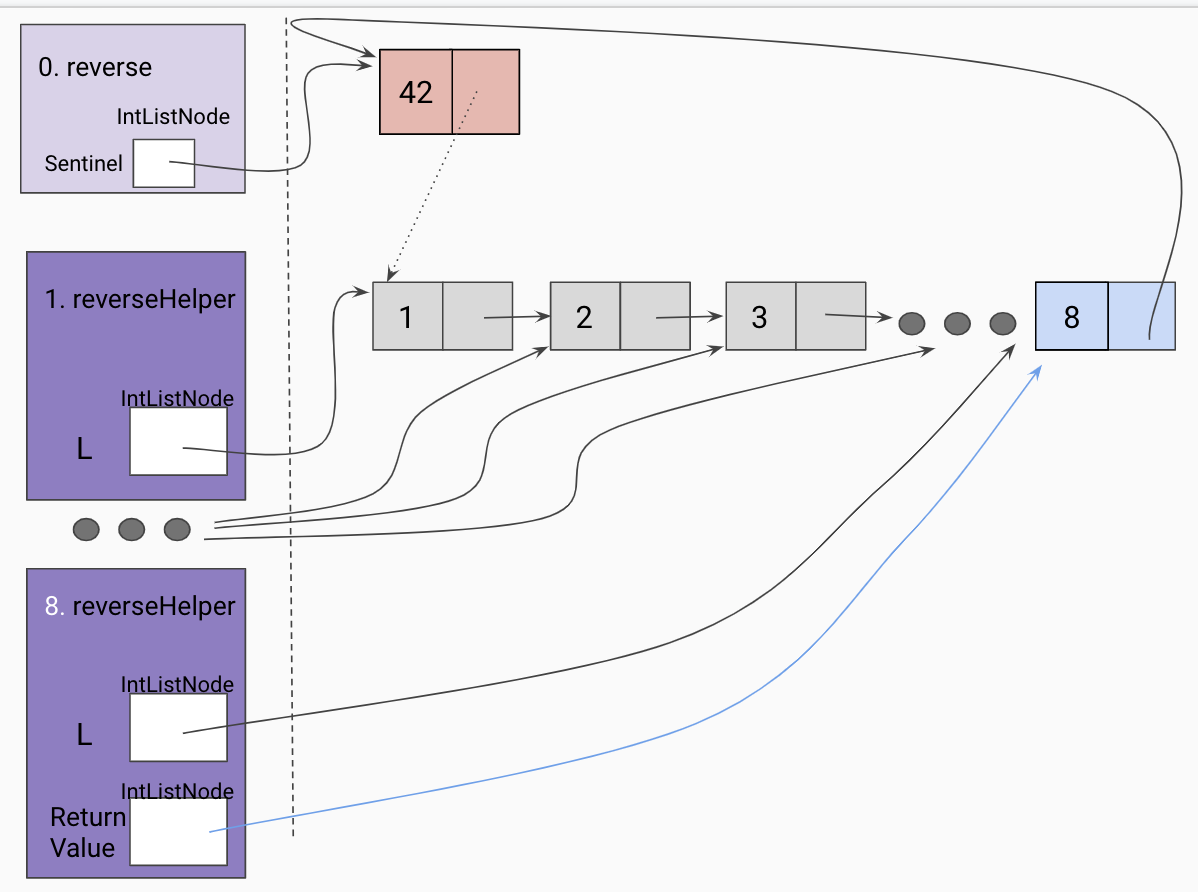
Trusting our recursive leap of faith, we assign a temp variable to the returned value of our recursive call, which should have reversed the current frame’s L tail. 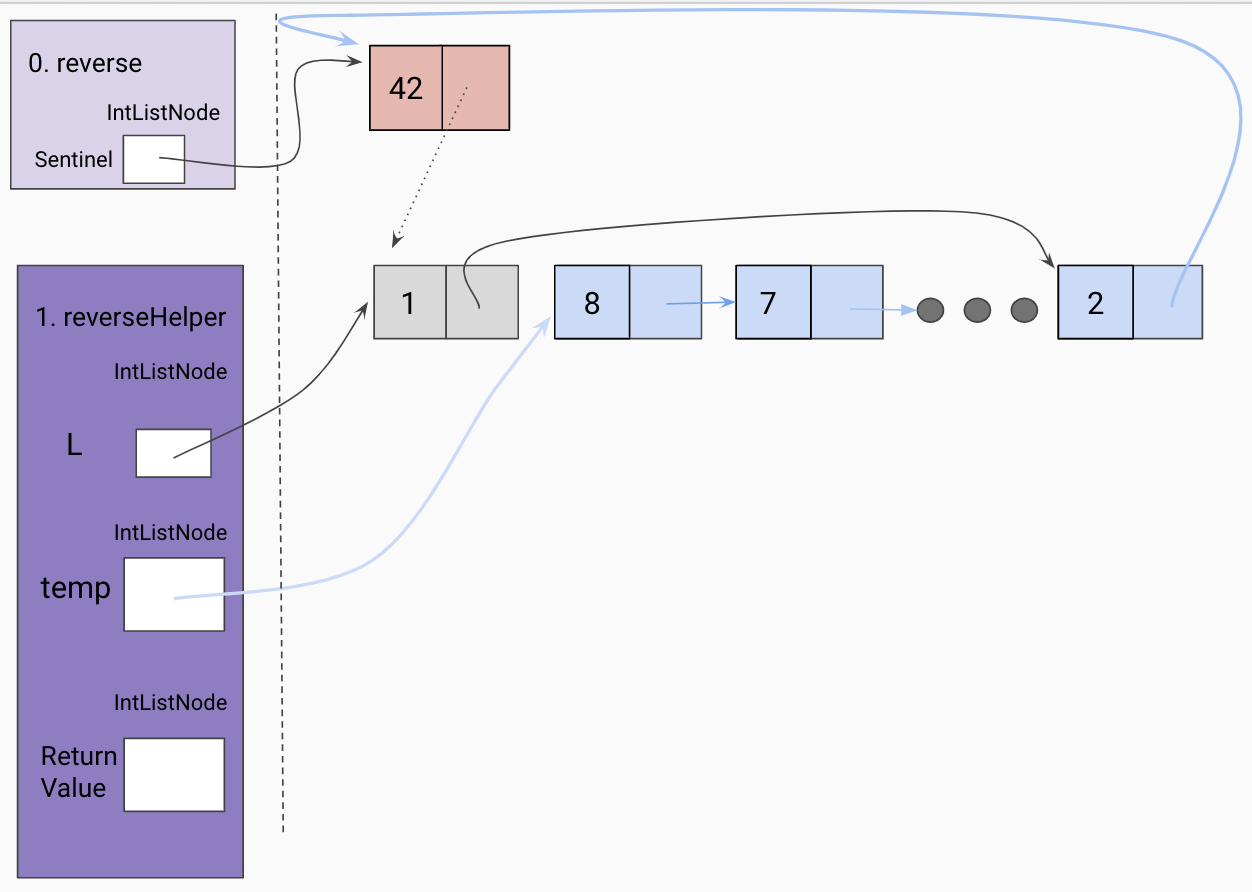
Set the end of the returned list to the current frame’s L. 
Since the current frame is the “end” of our the reversed linked list so far, we set the current frame’s L tail to be the sentinel. 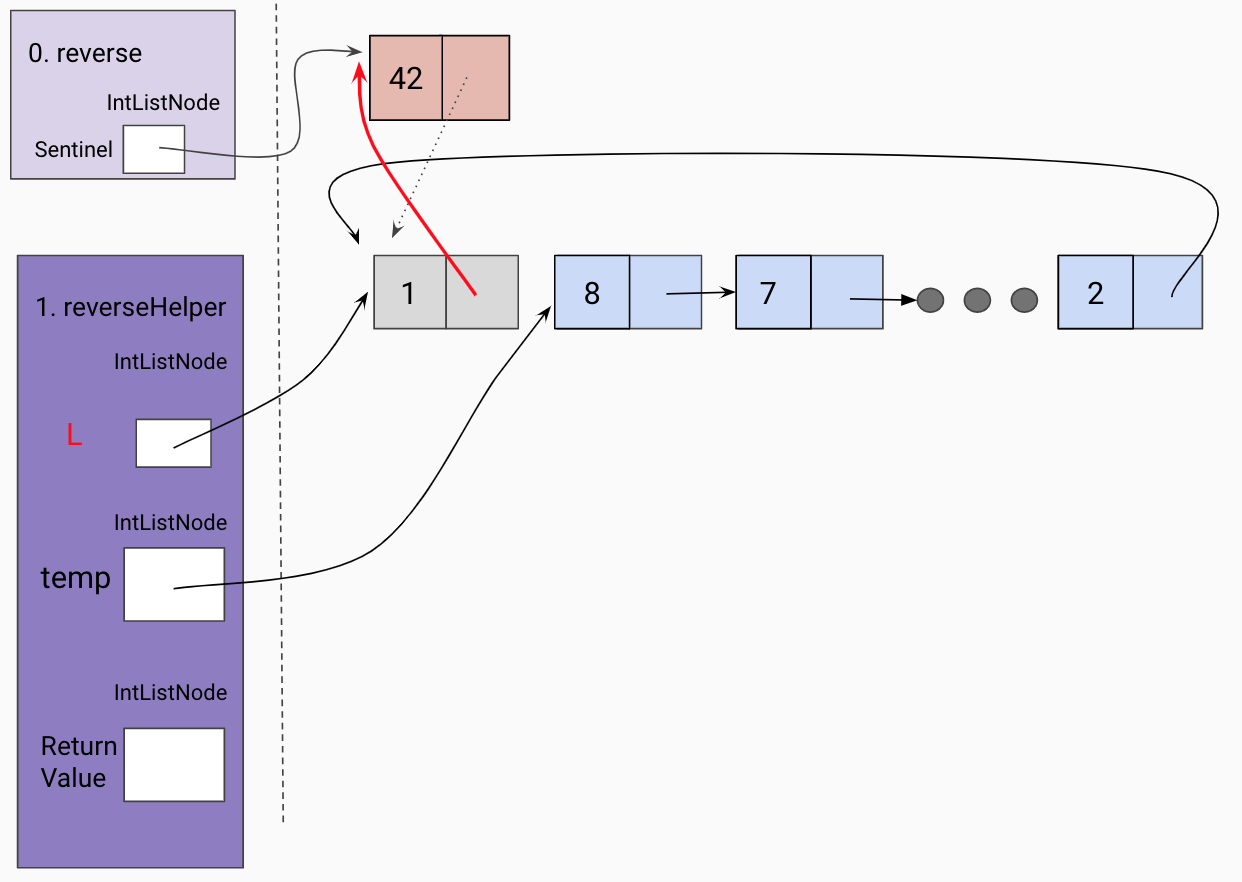
Return the front of the reversed list. 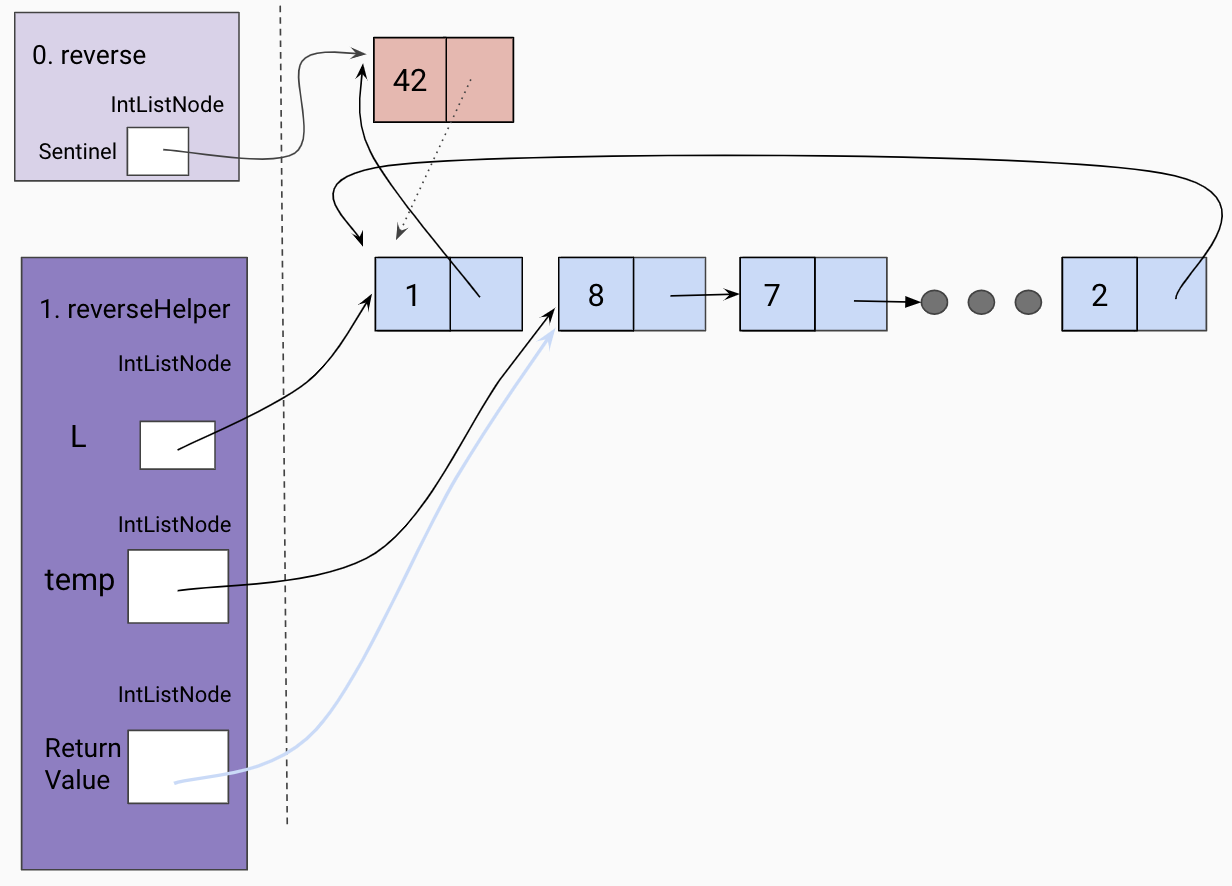
Update sentinel to point to the front of the reversed linked list. 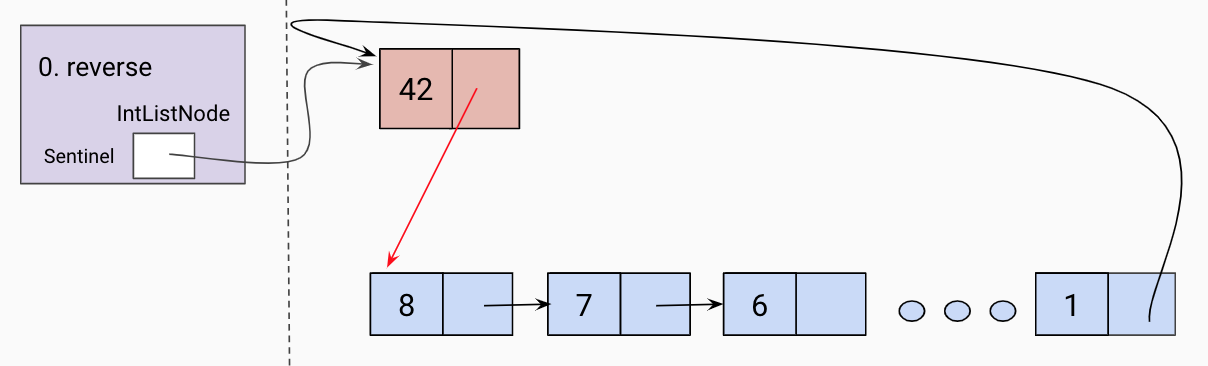
Now you hopefully are feeling more comfortable writing your own JUnit code! How are you liking it? Does it build more confidence than just writing code and not testing it? Some people find the rush of TDD addictive. You basically set up a little game for yourself to solve. Some people hate it. Your mileage may vary. Whether you personally enjoy the TDD flow or not, writing tests will be one of the most important skills you learn here at Berkeley, and getting test-infected will save you and your future colleagues an enormous amount of time and misery.
If you find the concept of test-driven development interesting, or just want to learn more about testing philosophy and the conversation around TDD, here are a couple interesting leisure readings:
Enhancement 3: Doubly-Linked
There are some major issues, both efficiency-wise and code-simplicity-wise with the linked list implementations we’ve been working with so far:
- It’s easy to insert into the front of the list, but requires a lot more work to insert into the back of the list.
- If we want to remove a node in our linked list, even if we have a reference to the node we want to remove, we have to traverse until we find the node before it in order to remove it.
The solution to these problems is to use a doubly-linked list. Each node keeps track of the node after and before itself. If we aren’t using a sentinel, then instead of just a head pointer, the list object maintains both a head and tail pointer, to the front and back of the list respectively. It looks like this:
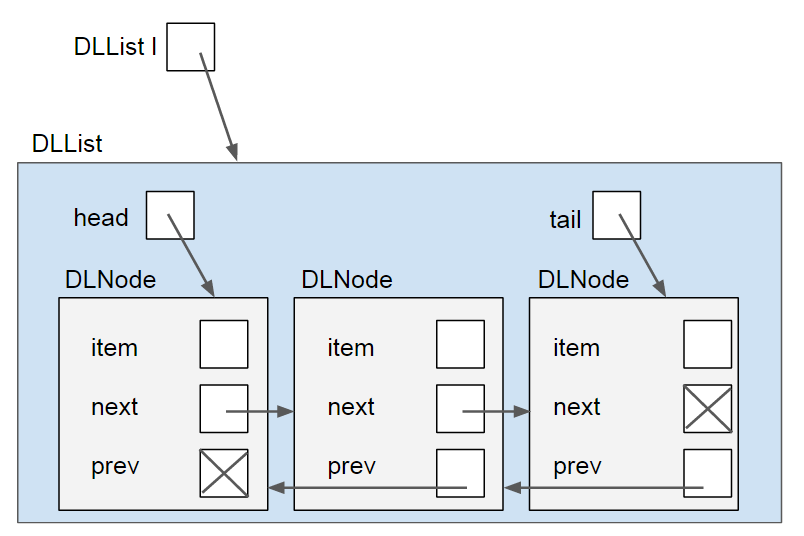
This adds a bit of complexity to the operations, but allows for constant time insertion to the front and back, and allows the user to traverse the list either forwards or backwards. Additionally, this allows the list to delete any nodes, even in the middle of the list, in constant time without traversing to the middle as long as it has a reference to the node that needs to be deleted.
The notion of a constant time operation is something you might have already been introduced to in a previous class like CS 61A. We will be covering this in much more detail once we get to the asymptotics analysis lab, but will provide a quick refresher here.
We will consider a constant time operation to be some piece of code or method call, whose runtime does not depend on the size of the inputs to the function. For insertion, imagine that the size of the input refers to the length of the list. A constant time insertion would thus mean that, regardless of the length of this list, the runtime of an insertion at the front or back of the list would take the same amount of time.
Think about how a doubly-linked list will compare to that of a singly-linked list, and discuss with your partner how the doubly-linked list improves these runtimes. Make sure you both understand this concept before continuing.
If we are using a sentinel, then it will look like this:
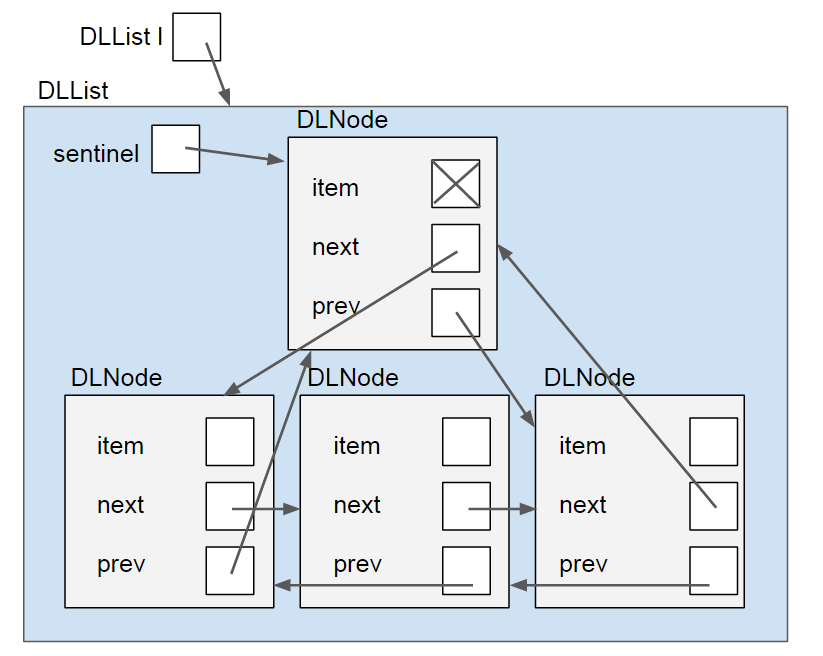
Note that the sentinel’s item is marked with an “X”, again because that value is irrelevant. If our list is of non-primitive items, then we can make it null. If it is of primitive items (like the ints we’ve been using, then it can just be any arbitrary value (since primitives cannot be null)).
With all of these enhancements, the encapsulated doubly-linked list with a sentinel node is typically used in practice as the linked list representation, like in Java’s own standard library class, java.util.LinkedList.
Invariants
An invariant is a fact about a data structure that is guaranteed to be true (assuming there are no bugs in your code). This gives us a convenient checklist every time we add a feature to our data structure. Users are also guaranteed certain properties that they trust will be maintained. For example, an SLList with a sentinel node has at least the following invariants:
- The sentinel reference always points to a sentinel node.
- The front item (if it exists), is always at sentinel.next.item.
- The size variable is always the total number of items in the list.
- The last node’s next always points back at the sentinel node.
Be sure that any invariant broken while performing an operation on a data structure is restored by the end of the function, so that subsequent function calls can rest assured that they are acting on a valid data structure and that all of the instance variables hold the proper values.
Enhancement 4: Generic Lists
Our final alteration will be somewhat more minor than the other structural changes, but this will have a powerful impact on how generalizable our code is. So far we have considered our lists to be of some fixed type (SLLists contained ints). What if we want to use a list to store doubles instead? What if we then want to extend it further to be a list of String objects? Up until now we would have had to create a new copy of the class for each of these data types.
The solution to this is to use something called generics. The basic principle is that instead of writing many classes which are specific to one type of data (e.g. ints, doubles, Strings, etc.), we will write one class which has a generic type. This generic type can be thought of as a placeholder type that will be filled in by a real type when we go to use the class. This is illustrated further with the example of how to generalize a DLList (doubly-linked list) by rewriting it with generics.
- Generic DLList
- How can we modify our
DLListso that it can be a list of whatever objects we choose? The class definition forDLListwith integers looks like this:public class DLList { public void addLast(int x) { ... } // more methods here }We will change this to:
public class DLList<T> {
    public void addLast(T x) { ... }
    // more methods here
}
where
Tis a placeholder object type. Notice the angle bracket syntax. Also note that we don’t have to useT; any variable name is fine. In ourDLList, our item is now of typeT, and our methods now takeTinstances as parameters. We can also rename ourIntNodeclass toTNodefor accuracy. - Using Generic DLList
- Recall that to create a
DLList, we originally typed:DLList list = new DLList(10);Before we did not need to specify the type for the
DLListsince it was alwaysint. If we now want to create aDLListholdingStringobjects (or any other type of objects), then we must specify what the placeholderTshould be filled in with. An example of what that looks like :DLList<String> list = new DLList<>("cs61bl"); list.addLast("rocks!")On list creation, the compiler replaces all instances of
TwithString! Through the rest of the labs in the course we will continue to work with generics, as for most data structures, they will be more useful if we can use them with many types of data!
Recap
Yesterday, we worked with a “naked” IntList, which was difficult to use because knowledge of implementation details were necessary in order for its use.
Today, we solved this problem through encapsulation. By nesting our node class inside another class, we can setup an abstraction barrier to shield our users from the details, and we can provide utility functions to allow users to operate naively upon our data structure.
To eliminate the need to have if statements that protect us from NullPointerExceptions, we can use a sentinel.
For efficiency purposes, we can introduce backwards prev links as well to make it doubly-linked.
Finally, we generalized the code to work with any type of data through the use of generics.
Deliverables
SLList.javaSLListTest.java
If you have any time remaining after you submit this lab, spend some time implementing your
LinkedListDequefor Project 1 with your partner while you’re still in lab! You should now have all of the necessary skills to tackle the project. In tomorrows lecture we will review and connect some of these ideas, but the core skills have been covered in this and the other preceding labs.