
FAQ #
The FAQ for Lab 2 is located here.
Getting Started #
Make sure you’re familiar with conditionals and loops from the Java Crash Course optional assignment before beginning this lab!
For this lab, we recommend using IntelliJ, but you may also use a simple text editor, such as TextEdit, Sublime, Atom, etc.
At the beginning of every lab, we’ll ask that you first get the latest starter code from the skeleton. Run the following command in your terminal from your su22-*** directory, where you initialized a Git repository yesterday.
git pull skeleton main
If you’re getting an error about reconciling divergent branches, run git config --global pull.rebase false before pulling from the skeleton.
This command asks git to pull (i.e. download) our code from the remote repository containing the desired code, which we added yesterday and we called it skeleton. Main indicates that we are accessing the main branch of that remote repository.
Everyone in this class is able to pull code from the same “skeleton” remote repository, and the staff is able to push the skeleton code there for you. You can imagine it like a big Google Drive, where the staff is able to make new files, and you’re able to download them from some remote location to your own computer.
Learning Goals #
This lab will focus on Java primitives and objects. Our goals for this lab will be as follows.
- Learn the different Java primitives and when to use them.
- Learn how to define classes and use reference-typed variables.
- Learn how to work with box-and-pointer diagrams to identify common usage errors.
Primitives #
As you may have noticed, when initializing a variable in Java you must put the type next to it. Notice that this is different than Python, where you can simply assign any arbitrary variable name to a data type.
int number = 10;
The above line tells Java that the variable number is an integer that holds the value 10. Types represent things such as integers and decimals and are fundamental to the operation of a language. In Java, there are a predefined set of primitive types.
-
boolean : a
booleanrepresents the two possible values oftrueandfalse. -
byte : a
byterepresents an 8-bit signed integer. -
short : a
shortrepresents a 16-bit signed integer. -
int : an
intrepresents a 32-bit signed integer. This is the most commonly used integer type and can hold values between -2,147,483,648 to 2,147,483,647 inclusive. -
long : a
longrepresents a 64-bit signed integer. Sometimes when we need to express large integral numbers we will use this as it ranges from -9,223,372,036,854,775,808 to 9,223,372,036,854,775,807. -
float : a
floatrepresents a 32-bit single precision floating point number. Floating point numbers can approximate a range real numbers including integers, decimals, and special values like infinity. Floating point numbers can only represent a finite number of the infinitely many numbers in existence. Anything that cannot be represented is encoded as “NaN”, which stands for “Not a Number”. -
double : a
doublerepresents a 64-bit double precision floating point number. Most of our decimal numbers will use this type as it provides greater precision. -
char : a
charrepresents an ascii letter (like the English alphabet).
These words are reserved in Java. That is we cannot use int and double in any other context besides declaring a variable of that type. Note that all primitives begin with a lowercase letter.
Declaring a primitive is very simple. For example, if we wanted to declare a double, we can write the following.
double pi = 3.14;
Certain primitives require an extra letter after the initial value. For example, to declare a long or a float, we write the following. Notice the L and the f that signify the end of the value.
long num = 9223372036854775807L;
float num2 = 42.0f;
Finally, we can declare a char using a single-quoted literal. For example, if we want to initialize variable a to the letter “a”, we would write the following.
char a = 'a';
We need not always initialize the value of a primitive. Sometimes, we don’t care about the value at that point in time, and only need a variable to use in later code. We do so by declaring the following:
char a;
double d;
Note that primitives have default values - we’ll talk about this later.
So declaring an object is like telling Java you have a variable of a certain type. Java sets aside a little container of memory that can perfectly hold that type. Once you’ve declared an object, initializing an object is when you actually put a value inside that little container of memory. We can imagine that these little magic memory boxes can only contain objects of a certain type. So if you declare a variable of type int, and then try to initialize its value to false, your code won’t compile because false is not an int!
Objects #
Java is an object-oriented language. This means that everything we want to represent in Java is defined in terms of objects.
Objects are bundles of code that define the state and behavior of the construct we wish to represent. Suppose we wish to represent a potato. A potato’s state can be described by its variety and age, and it also has behaviors such as grow and flower.
Now suppose Zephyr and Jedi both have potatoes; Zephyr has a Yukon Gold and Jedi has a Red Pontiac. Even though Zephyr and Jedi have different varieties of potatoes, they are both still potatoes. They each have an age, color and variety. Critically, we can describe an entire group of Potatoes with a set of common descriptors.
In Java we define an Object via its Class. Zephyr’s Yukon Gold and Jedi’s Red Pontiac would then be called instances of the Potato class. Let’s see how we can implement a Potato class in Java.
Example #
For this section, we will be using Potato code found below. This can be found in lab02/Potato.java.
public class Potato {

    /* An instance variable representing the potato's species. */
    private String variety;
    /* An instance variable representing the potato's age. */
    private int age;

    /** A constructor that returns a very young russet burbank potato. */
    public Potato() {
        this.variety = "Russet Burbank";
        this.age = 0;
    }

    /** A constructor that allows you to specify its variety and age. */
    public Potato(String variety, int age) {
        this.variety = variety;
        this.age = age;
    }

    /** A getter method that returns the potato's type. */
    public String getVariety() {
        return this.variety;
    }

    /** A getter method that returns the potato's age. */
    public int getAge() {
        return this.age;
    }

    /** A setter method that sets the potato's age to AGE. */
    public void setAge(int age) {
        this.age = age;
    }

    /** A method that grows the potato. Note it increases its age by 1. */
    public void grow() {
        System.out.println("Photosynthesis!");
        this.age = this.age + 1;
    }

    /** Did you know potatoes can flower? No? Neither did I... */
    public void flower() {
        System.out.println("I am now a beautiful potato");
    }
}
We will also be looking at lab02/Potato1.java later on!
Defining a Class #
Let’s see how to define our Potato class. To define a Java class, create a new .java file and encompass the class’s code with the following header
class Potato {
    /** Potato code goes here! */
}
There are two things to keep in mind when writing Java classes.
-
Java requires the class name to be the same as the file name. This is why the
Potatoclass is written inPotato.java. -
By convention, the name of a class always begin with a capital letter and is generally named using camel case (ex:
ThisIsCamelCase)
Constructors #
Now to initialize a Potato object, we must call its constructor. The constructor is a special method that creates and returns a new instance of your class. This method is where we will initialize all the variables associated with the class’s instance. Unlike other methods, there is no return type in the constructor’s signature, and it must have the same name as the class itself.
It’s possible to define a constructor that takes in no arguments.
public Potato() {
    this.variety = "Russet Burbank";
    this.age = 0;
}
Here the constructor returns a Potato that is a baby (age set to 0) russet potato (variety set to "Russet Burbank") because, as we all know, provided no guidance, the potato obviously becomes a baby russet potato.
We can also specify arguments in our constructor.
public Potato(String variety, int age) {
    this.variety = variety;
    this.age = age;
}
This constructor returns a Potato with its variety and age set to the values given as arguments. Now we can construct potatoes such as Zephyr’s 3 year old Yukon Gold potato.
We will discuss how to declare objects in more detail during the Boxes and Pointer Diagrams section.
Caveat: if no constructors are defined in the object file, then the Java compiler will provide a default constructor that accepts no argument. However, if a constructor is defined, then the compiler will not provide a default constructor. Read more about it here.
Instance Variables #
Instance variables allow us to represent the state of an object and can be both primitives or objects. The “has a” test is an easy way to see if something should be an instance variable of an object. For example, a potato has an age and variety. Thus, within our Potato class, we see that there are two instance variables: variety and age.
/* An instance variable representing the potato's species. */
private String variety;
/* An instance variable representing the potato's age. */
private int age;
As with any variables we must declare what type it is. The String keyword tells us variety is a string object and int tells us the age is an integer primitive.
Instance variables have default values that correspond to the type of the variable. If instance variables are not initialized in the constructor or elsewhere with a value, they will initially contain the default. These defaults will correspond to a zero value. 0 for int, float, double, etc. false for boolean, and null for Object types. However, it is not good practice to rely on default values, as it makes it harder to understand your code. Instead, you should explicitly initialize your instance variables.
We can (usually) access the age and variety of the Potato via dot notation. This is similar to Python’s dot notation, which you may have encountered in CS 61A.
Potato zephyrsPotato = new Potato("Yukon Gold", 3); // Zephyr's potato!
zephyrsPotato.variety; // returns the variety of Zephyr's potato
zephyrsPotato.age; // returns the age of Zephyr's potato
Notice that we had to first instantiate a new Potato object before we could access variety or age. The order of the variables that we pass into the new Potato call must match the order of the parameters of the constructor. Remember that instance variables are particular to the object. Thus we need to create an object first in order to have variety and age. Also notice that we have both declared and instantiated zephyrsPotato within the same line to make our code a little more compact. Doing something like
Potato zephyrsPotato;
zephyrsPotato = new Potato("Yukon Gold", 3);
is practically the same. You may want to declare a variable before instantiating it if the initial assignment of the variable should not be set (e.g. we don’t know that Zephyr’s potato is currently 3 years old).
When writing object code within its class, we can also employ the this keyword. Its usage is similar to that of self in Python.
this.variety; // returns the current instance's variety
this.age; // returns the current instance's age
One notable difference, however, is that this cannot be reassigned whereas self in Python can be reassigned.
Outside of the Potato class, we can’t use this to refer to zephyrsPotato since we only use this to refer to the current instance while inside the class. Instead, we’re trying to refer specifically to zephyrsPotato.
Now we say “sort of” because we also have a private keyword placed in front of the variety and age declaration. This means we cannot access the variety and age via dot notation outside of Potato.java. We will see more about why we may want to do this in the Getter and Setter Method section later on.
Finally, it’s important to stress that even though all instances of Potato will have the variables variety and age, their values will be specific to each instance of Potato - hence the name instance variable.
Instance Methods #
To facilitate behavior, we can define instance methods. For example, Potato has defined in it the grow() method.
/** A method that grows the potato. Note it increases its age by 1. */
public void grow() {
    System.out.println("Photosynthesis!");
    this.age = this.age + 1;
}
Like instance variables, we can access instance methods using dot notation as well.
zephyrsPotato.grow(); // Zephyr's potato grows!
We also have a few special instance methods prefixed by the words “get” and “set”. These are aptly named getters and setters, which we’ll learn more about below!
Getter and Setter Methods #
As we have seen, the private keyword limits our ability to access instance variables directly. This is called an access modifier and we will be discussing them in more detail later on in the course.
For now, just know that in general it is good practice to make instance variables private. One consequence of making our instance variables private is that we must now define instance methods to access them.
This is where we introduce getter and setter methods. Within Potato we have these methods.
/** A getter method that returns the potato's type. */
public String getVariety() {
    return this.variety;
}

/** A getter method that returns the potato's age. */
public int getAge() {
    return this.age;
}
The above two blocks are called getter methods since they get the value of their respective instance variables for programs outside of Potato.java. Of course, due to advancements in genetic modification technology, it is also possible to set the age of our potato.
/** A setter method that sets the potato's age to AGE. */
public void setAge(int age) {
    this.age = age;
}
This is called a setter method as it allows us to set the value of an instance variable.
Interestingly enough, we don’t have a setter method for the variety instance variable. This is because until we develop the technology to support spud-transmutation (#PotatoDreams), Zephyr’s Yukon Gold potato will forever remain a Yukon Gold potato.
Of course, this is important in an application sense because now external programs cannot maliciously change the identity of a potato. Take a look at Potato1.java
/* An instance variable representing the potato's species. */
public String variety;
/* An instance variable representing the potato's age. */
public int age;
The variety and age are public, meaning we can write a program to change the identity of Zephyr’s potato.
/* zephyrsPotato is an instance with variety = "Yukon Gold" */
zephyrsPotato.variety = "Red Pontiac"; // A POTATO IMPOSTER!
The practice of using getters and setters is called information hiding and it prevents external programs from unintentionally (or intentionally!) changing the value of our instance variables.
In an exercise below, we will be considering a bank account. Without a doubt, we will want the balance of our bank account to be private, so that other programs cannot simply set account.balance = 0;.
Box and Pointer Diagrams #
For another explanation, you may read Section 2.1 from the CS 61B textbook, starting from the section titled “The Mystery of the Walrus” and stopping just before “The Law of the Broken Futon”.
Throughout this class it will be extraordinarily helpful to draw pictures of the variables in our program to help us with debugging by visualizing the state and changes of objects throughout the code. The diagrams we’ll teach you to use in this class are often referred to as box and pointer diagrams, which are similar to the Environment Diagrams you saw in CS 61A.
Let’s start off with something simple. When we declare a primitive, we draw a box for it, and label the box with the type of primitive, and the name of the variable. Here, primitives will be in red boxes. For example,
int x;
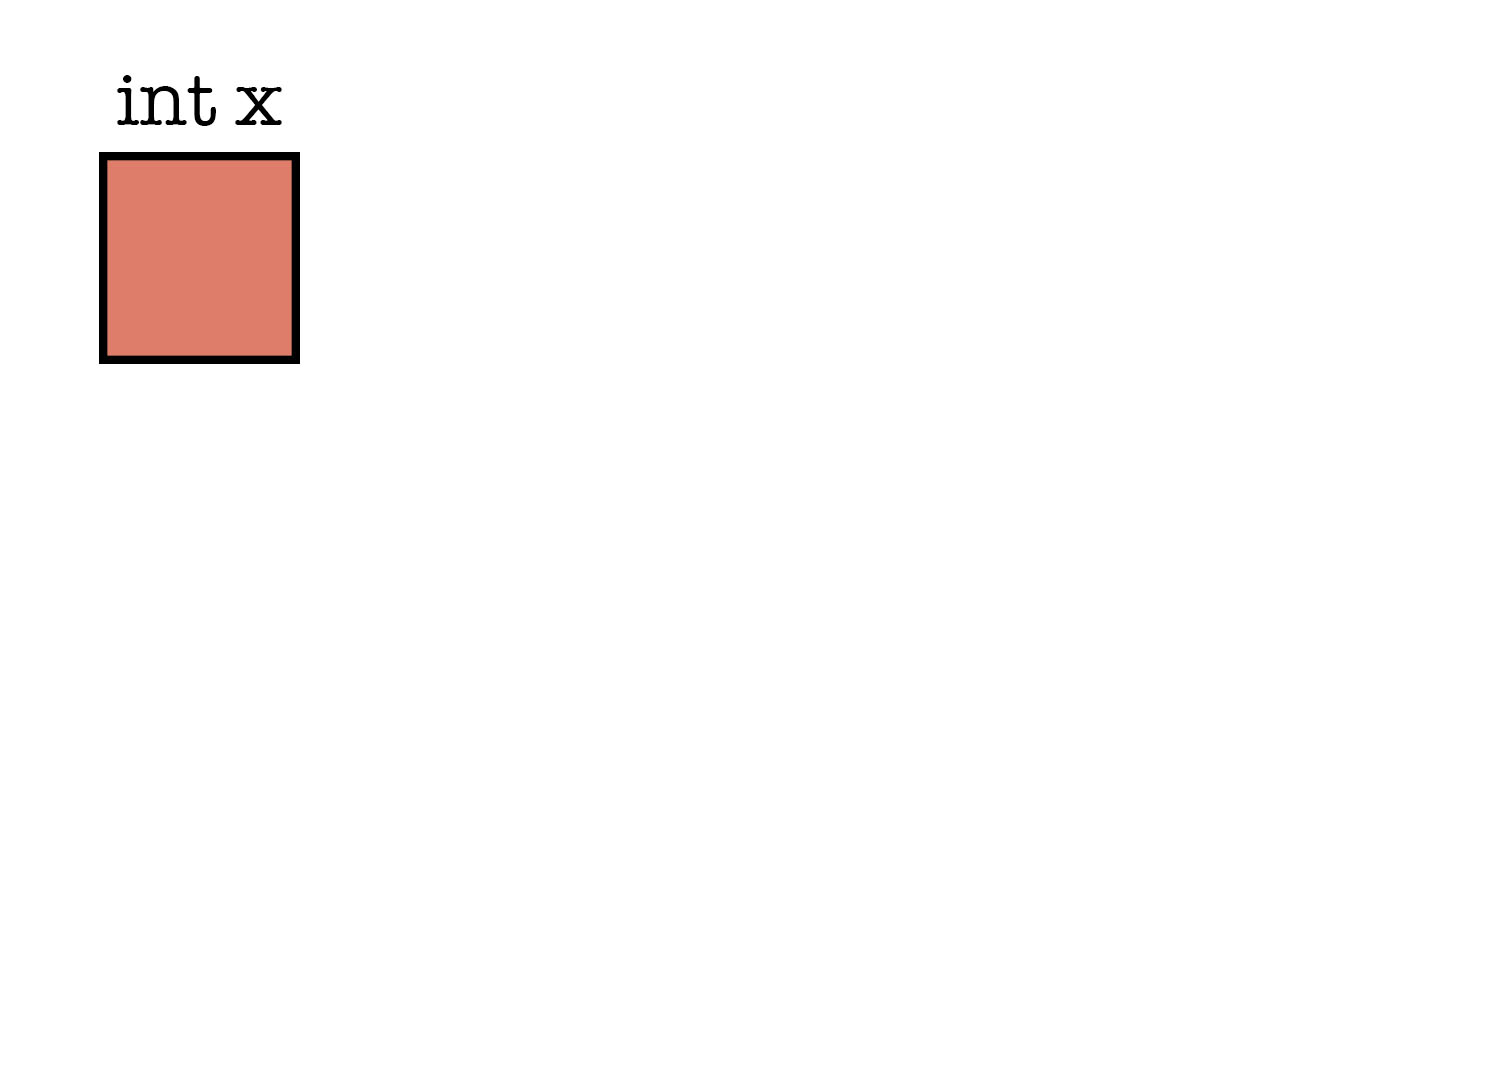
(We could also have drawn a 0 in the box.) When we assign a value to the primitive, we fill in the box with the value of the primitive.
x = 3;

Variables can also refer to objects. For example, a variable can refer to a Potato instance. We can declare a Potato object the same way as we declare an int.
Potato p;
This variable is called a reference, because it will refer to an object. When we first declare the reference but don’t assign an object to it like in the code above, we say the reference contains nothing, or null. This also occurs when an instance variable is not assigned a value in the constructor. Here’s how we draw it:
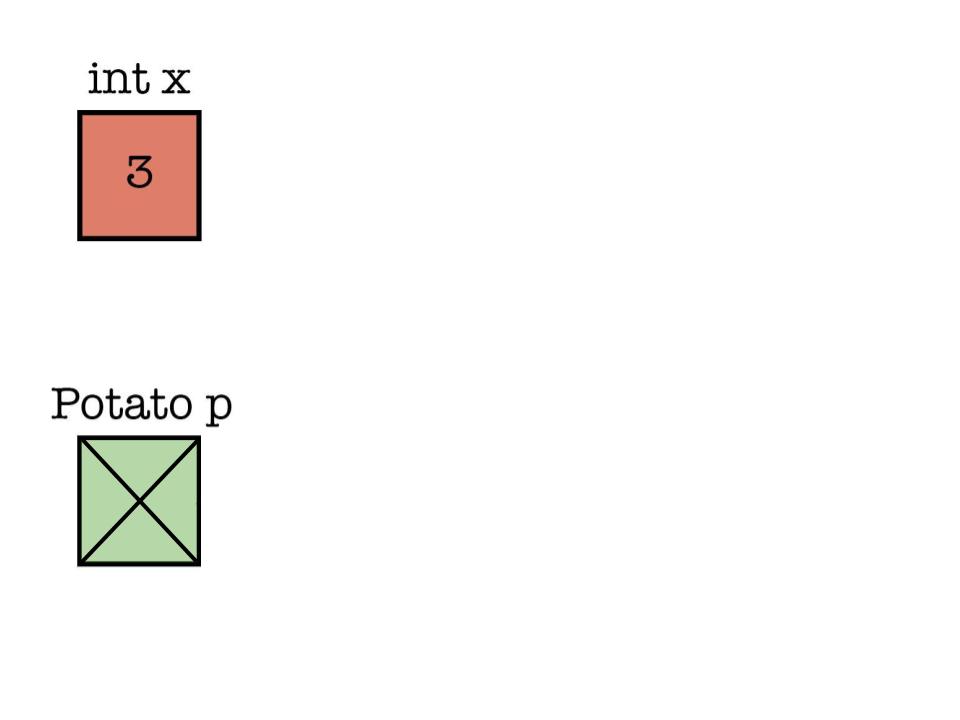
Here we’re drawing references in green to emphasize that they are different from primitives.
Now let’s assign a reference to the Potato object by calling its constructor. This instantiates, or creates, a new instance of the Potato class. Instantiating an object via its constructor always requires the new keyword.
p = new Potato();
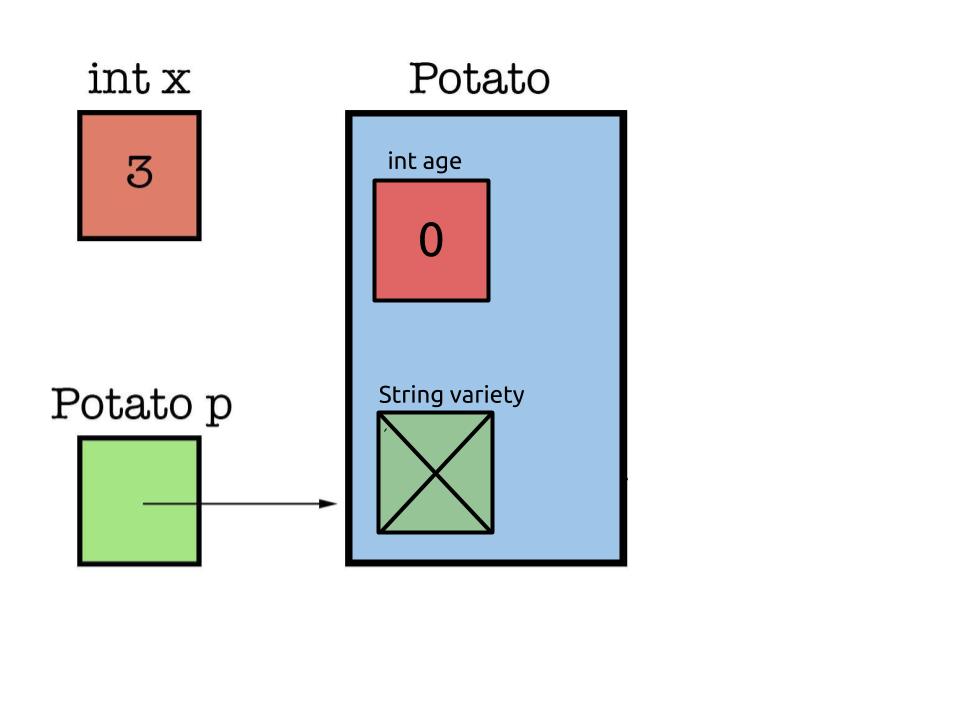
Here an object is drawn in blue, to emphasize that it is different from a primitive and a reference. We can now store primitives within the object as instance variables!
One critical thing about the object: unlike the primitive integer, 3, drawn inside the box for x, the Potato object is not drawn inside the variable p. Instead p simply contains an arrow that points to the Potato object. This is why p is called a reference or pointer because it just refers to the object but does not contain it. The true value of the variable p is a pointer to a Potato object rather than the Potato object itself. A pointer is essentially just a location in memory where the actual Potato object is stored.
This is a very, very important distinction!
Of course, when we call the no argument constructor, it will initialize the variety to "Russet Burbank" and the age to 0. Our diagram looks like the following.
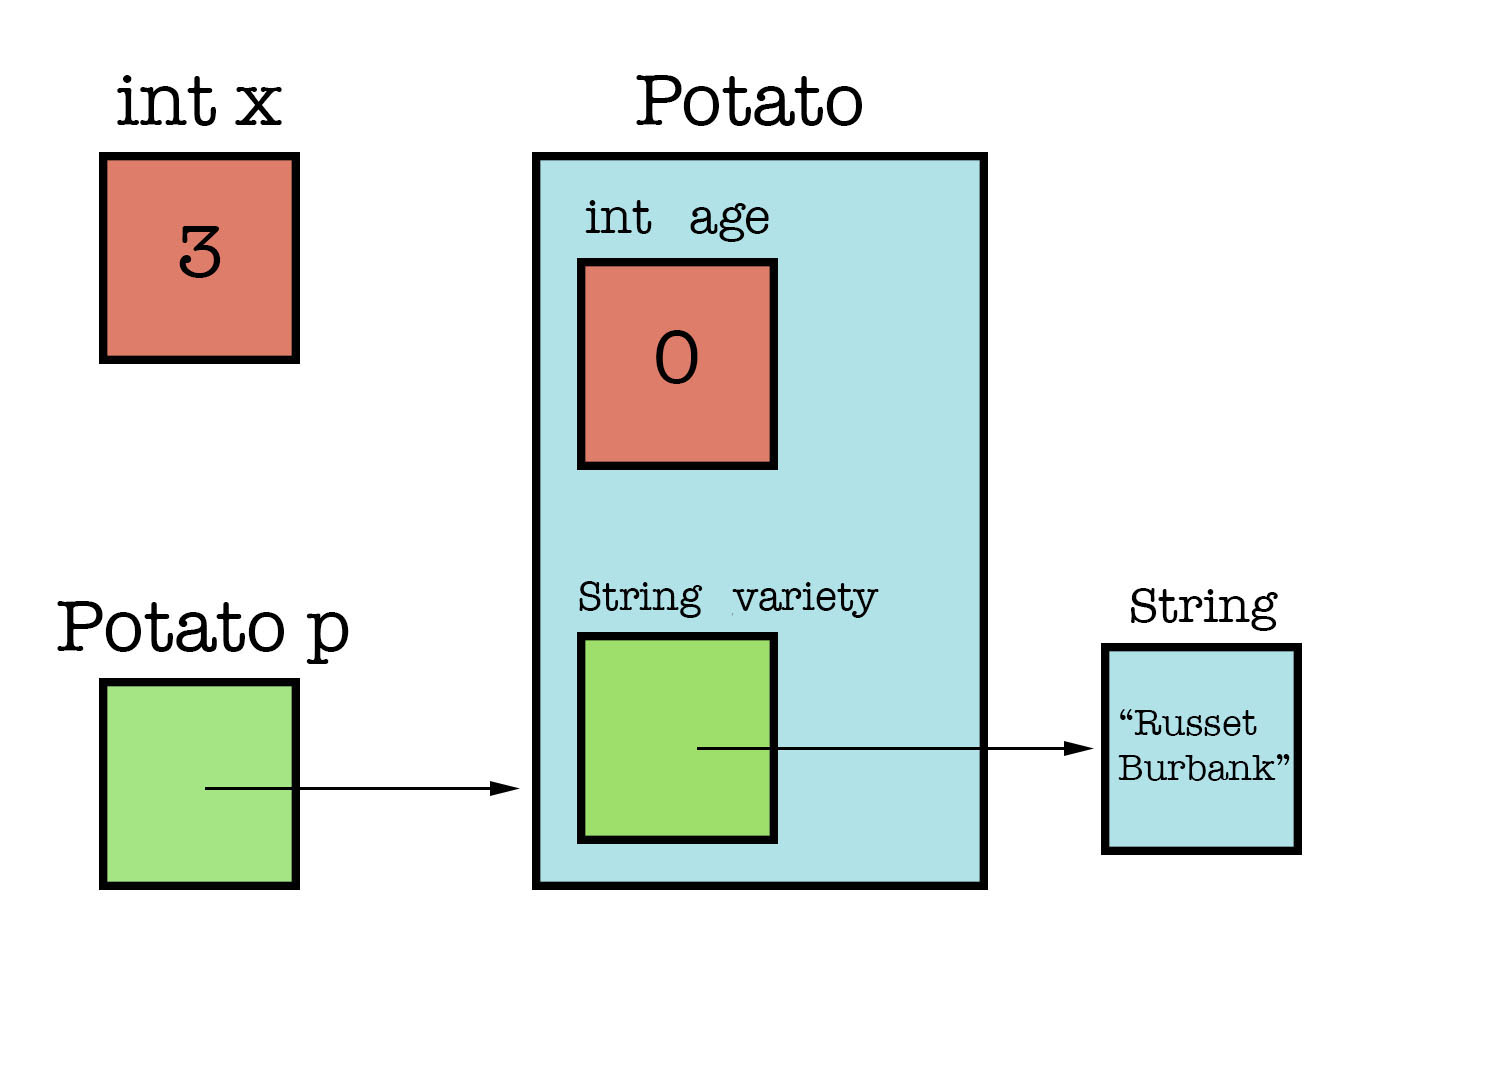
Is this what you expected?
Remember that a String in Java is an object, not a primitive. As a result, the String instance variable representing the variety of the potato must contain a pointer to the actual String object containing the name we’ve chosen.
Discussion: Intuition for Drawing Objects #
Discuss with your partner to see if you can come up with intuition as to why these diagrams are drawn the way they are:
- Why does it make sense that objects are not stored inside variables, but are only referred to them?
- Why does it make sense that objects are not drawn inside other objects?
- Why isn’t the blue object box labeled with the name of the variable?
There aren’t necessarily correct answers to these questions, so just see if you can come up with explanations that make sense to you.
Stack and Heap #
When we create objects, the Java Virtual Machine (JVM) allocates space on the heap. The heap is where all objects and arrays live. However, method calls and local parameters are stored on the stack. Each time a method is called, the JVM allocates a stack frame, which stores the parameters and local variables for that method.
At times, we may only care about the heap and the state of the objects that we create. Other times, it will be useful to keep track of the stack frames as well.
Let’s consider the following code:
public static void main(String[] args) {
    Potato p = new Potato();
    int newAge = 20
    p.setAge(newAge);
}
When the setAge() method is called, the stack and heap looks like below. For now, don’t worry about what a String[] is, we’ll cover that in a later lab.
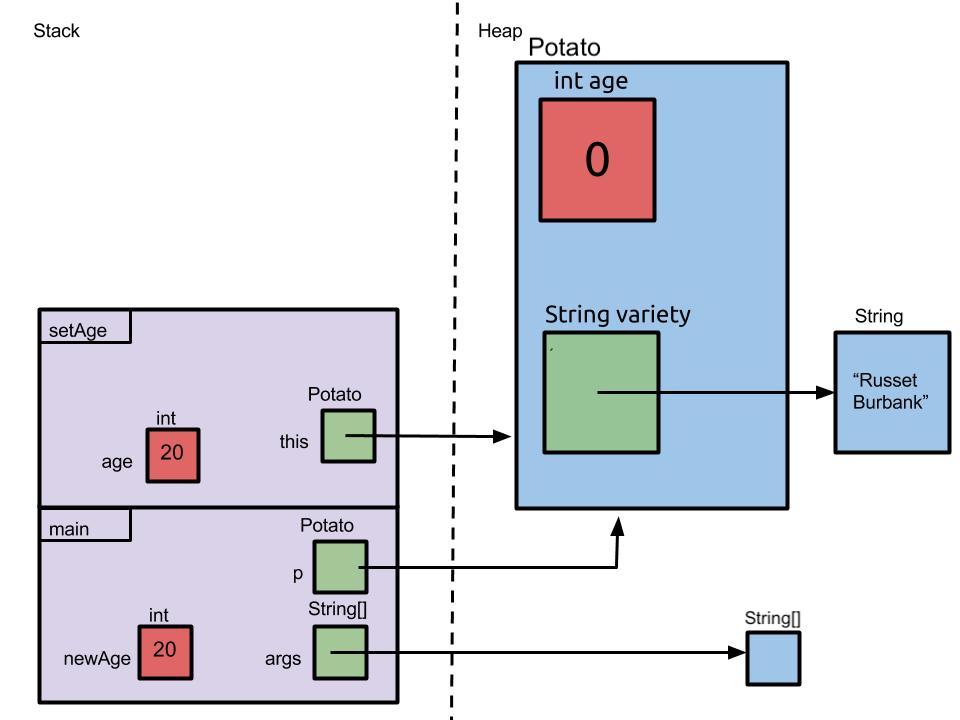
The method that is currently executing (at any given point in time) lies on the top of the stack. All other stack frames are waiting for the top frame to return and be popped off the stack so they can resume execution. When a stack frame is popped, all of its local variables are lost.
One thing that you may notice is that Java is pass-by-value. Methods are passed in copies of the actual parameters. The original parameters cannot be changed by the method. The copies lie in the stack frame.
Consider the following code and the stack and heap diagram, right before tryToIncrement returns.
public static void tryToIncrement(int x) {
    x += 1;
}

public static void main(String[] args) {
    int x = 10;
    tryToIncrement(x);
}
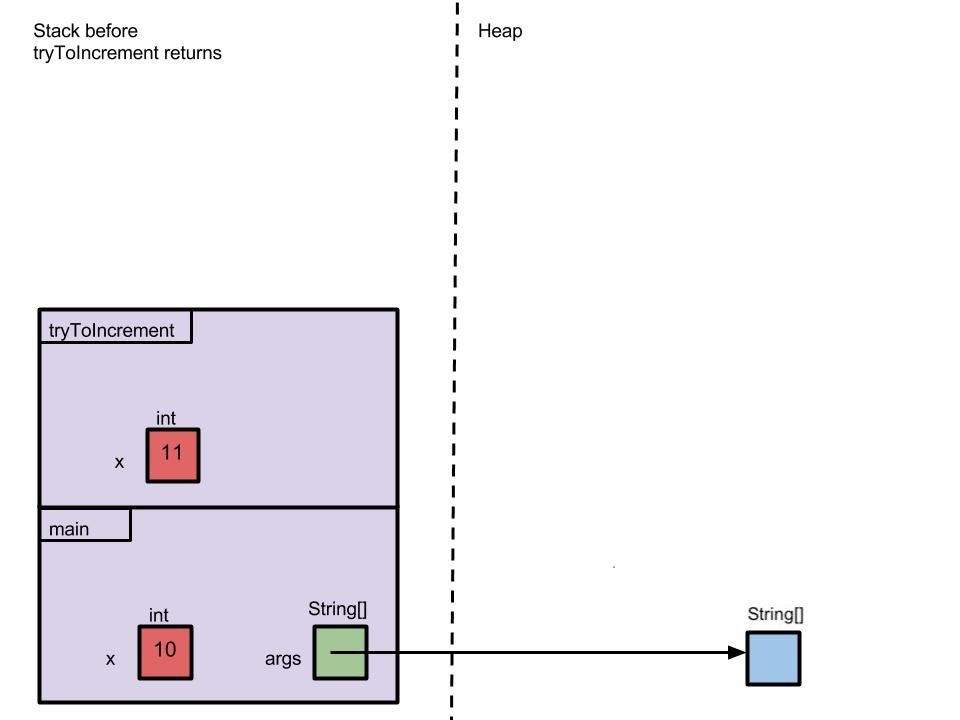
Perhaps here is where it becomes apparent that the value for references is not the object it references. When we pass in an object, what is copied is not the object itself, but the reference to the object.
public static void refresh(Potato p) {
    p.age = 0;
}

public static void main(String[] args) {
    Potato potat = new Potato("Red La Soda", 5);
    refresh(potat);
}
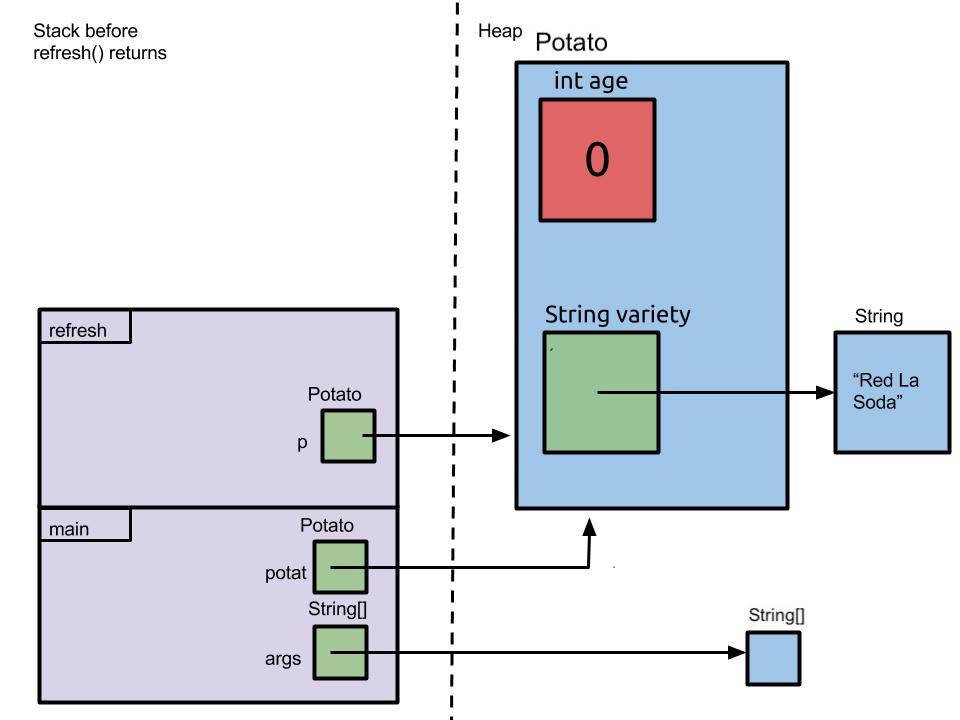
What is copied over into the parameter of the refresh method is not a copy of the Potato object, but a copy of the reference (the arrow) to the Potato Object.
The True Meaning of this #
Did you notice that there was something different between when we called the setAge method and when we called the refresh method? Go back to the stack and heap diagrams and discuss with your partner the difference. Look at the code segments and think about why that may be.
setAge is an instance method, which means that it must always be called through dot notation on an object. Instance methods always have a this variable, which references the object that the method was called on. In contrast, refresh is a static method (marked with the static keyword). Static methods do not have a this reference in their frame; they belong to the class rather than to an instance of the class.
We call being inside a static method during execution being in a static context. You cannot directly reference instance variables from a static context. Instead, you must do so through an object reference (due to the lack of a this reference). Note that static methods can be called from a static context (like in main) and do not need to be called with an instance associated with them.
Exercise: Account Management #
If you haven’t gotten the latest skeleton files, do so now by running the following command from your su22-s*** Git repository.
git pull skeleton main
The next several exercises involve modifications to an Account class, which models a bank account. The file you will be working with is Account.java.
The provided testing file is AccountTest.java. Compile the test by running javac Account.java and javac AccountTest.java from the lab02 directory in your repo. Execute the test by running java AccountTest. Be sure to compile after every change you make to your code. Note that the testing code provided is not entirely comprehensive. It serves as a sanity check to validate your attempts. Feel free to read through the file and add more calls within print statements to expand your testing suite. This is a good habit to get into for this course.
The Account class allows deposits and withdrawals. Instead of warning about a balance that’s too low, however, it merely disallows a withdrawal request for more money than the account contains.
Task: Modifying Withdrawal Behavior #
The withdraw method is currently defined as a void method. Modify it to return a boolean: true if the withdrawal succeeds (along with actually performing the withdrawal) and false if it fails.
Task: Merging Accounts #
Define a merge method. This method should transfer all of the money from the argument account to the current account. In other words, the argument account balance should be zeroed while the current account’s balance increases by the argument’s old balance. We’ve provided a skeleton of the method in Account.java.
Task: Overdraft Protection #
A convenient feature of some bank accounts is overdraft protection: rather than bouncing a check when the balance would go negative, the bank will deduct the necessary funds from a second account. One might imagine such a setup for a student account, provided the student’s parents are willing to cover any overdrafts (!). Another use is to have a checking account that is tied to a savings account where the savings account covers overdrafts on the checking account. In our system, we’ll be keeping things simple with only one type of account so we don’t have to worry about student or savings accounts.
Implement and test overdraft protection for Account objects by completing the following steps.
- Add a
parentAccountinstance variable to theAccountclass; this is the account that will provide the overdraft protection, and it may have overdraft protection of its own. - Add a two-argument constructor. The first argument will be the initial balance as in the existing code. The second argument will be an
Accountreference with which to initialize the instance variable you defined in step 1. - In the one-argument constructor, set the parent account to
null. We’d like to emphasize the fact that there is no parent if the one-argument constructor is used by explicitly settingparentAccounttonull. - Modify the
withdrawmethod so that if the requested withdrawal can’t be covered by this account, the difference is withdrawn from the parent account. This may trigger overdraft protection for the parent account, and then its parent, and so on. The number of accounts connected in this way may be unlimited. If the account doesn’t have a parent or if the parent (and its parents and so forth) can’t cover the withdrawal, thewithdrawmethod should merely print an error message as before and not change any account balances.
Note: it is important to check if the parent account is null before executing any changes to the account.
Here’s an example of the desired behavior, with the Account object zephyr providing overdraft protection for the Account object max. Recall this means the parentAccount of max is zephyr.
Suppose, in each scenario below, max has 100 as his balance while zephyr has 500 as their balance.
maxattempts to withdraw 50maxthen has 50 remaining in his balance, whilezephyrstill has 500.maxattempts to withdraw 200maxthen has 0 remaining in his balance, whilezephyrneeded to cover 100 formax, leaving 400 as their balance.maxattempts to withdraw 700- return false without changing either balance as the withdrawal is denied due to insufficient funds.
To test your code, try copy and pasting the Account class into the online Java Visualizer. Make sure to add a main method with a few example cases like the ones provided above.
Account zephyr = new Account(500);
Account max = new Account(100, zephyr);
max.withdraw(50);
Discussion: Merging Revisited #
One proposed solution for merging accounts is the following:
public void merge(Account other) {
    this.balance = this.balance + other.balance;
    other = new Account(0);
}
This doesn’t work. Explain why not.
Exercise: Pursuit Curves #
You will now create a class representing a pursuit curve.
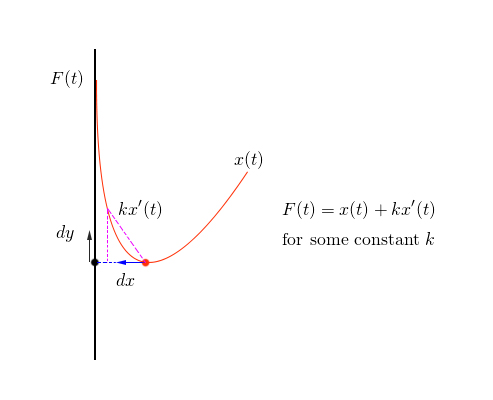
Pursuit curves provide a powerful way to render curves on a computer. The traditional method for drawing a path is to analytically define it via some algebraic formula like \(y(t) = t^2\) and trace it point-wise. Consider an alternative where we define two points: the pursuer and the pursued.
Now suppose the pursued point (in black) follows some fixed path \(F(t)\). Then the pursuer (in red) will seek the pursued in the following manner.
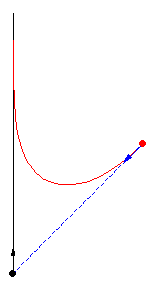
We notice that the pursuer always follows the pursued along its tangent, which gives some serious first order differential equation vibes. Letting the pursuer’s path be given by \(x(t)\), then the closed form solution for its path is given by the following equation.
Of course, we won’t require you to solve a differential equation. In fact, let’s see what your task will be!
Task: Implementing Pursuit Curves #
Implement a simpler version of pursuit curves in order to create a cool visual by filling out lab02/Path.java. An additional file lab02/PathHarness.java is provided containing code that will render your code in Path.java using Java’s graphics framework.
Also, testing code has been provided in lab02/PathTest.java. Compile by running javac Point.java, javac Path.java, javac PathHarness.java, and javac PathTest.java and execute by running java PathTest.
Note, if you have completed Account.java, you can compile using the command javac *.java. This will compile all java files.
As with previous tests, these tests are not entirely comprehensive. Feel free to add whatever testing code you desire.
Path.java will represent the path traveled by the pursuer. You will need to keep track of the following two points:
-
currwill represent where the path currently ends. This will be a Point object. -
nextwill represent where the path (and thus,curr) will travel to next. This will also be a Point object.
Next, you will need to define a constructor that, given an x and y coordinate, sets next to the starting point (x, y). The constructor may look something like this.
public Path(double x, double y) {
    // more code goes here!
}
When the Path object is first constructed, curr can be set to a Point instance with any coordinate so long as it is not null. Try playing around with initial curr values to see what you can get!
Finally, you will need to implement the following instance methods.
| method name | return type | functionality |
|---|---|---|
getCurrX() | double | Returns the x-coordinate of curr |
getCurrY() | double | Returns the y-coordinate of curr |
getNextX() | double | Returns the x-coordinate of next |
getNextY() | double | Returns the y-coordinate of next |
getCurrentPoint() | Point | Returns curr |
setCurrentPoint(Point point) | void | Sets curr to point |
iterate(double dx, double dy) | void | Sets curr to next and updates the position of next to be curr with movement defined by dx and dy. |
A note on iterate(double dx, double dy). If you were to implement a pursuit curve in full generality, then this is where you would solve a differential equation. But again, we won’t have you do that. Instead we’re giving you \(dx\) and \(dy\) which will tell you how the path travels on each call to iterate.
To summarize your task:
-
Keep track of
currandnext. -
Implement a constructor taking in a
double xanddouble y. -
Implement the methods listed in the table above.
Here are some tips to keep you on the right track!
-
As
currandnextare bothPointobjects, we’ve provided a class definingPoint. Make sure to read through and understand what each method and constructor does! -
When defining
iterate(double dx, double dy)you may find that yourcurrandnextare not being set to what they are coded to be. Think about object references and try drawing a box-and-pointer diagram.
If you want to learn more about pursuit curves, Wolfram’s MathWorld provides a very interesting read.
static #
There’s something that we’ve been kind of waving off up until now: the static keyword. In Java, static fields belong to the class instead of a particular instance. We call these static fields or class variables. During execution, only one instance of a static field exists throughout, no matter how many instances of the class are created. You can think of them as living in their own special space, away from each instance. Static fields can be referenced the same as instance variables from within a instance method. They can also be directly referenced as ClassName.staticVariable, or by the instance reference (although this is not recommended for style). For example, in the Dog class if we wanted to access a static field genus, we could either write:
Dog fido = new Dog();
System.out.println(Dog.genus);     // ok
System.out.println(fido.genus);    // ok
Recall that methods can also be static. This just means the method does not belong to a specific instance, like instance methods do. We can call them in a similar way, using either the class name or an instance.
.toString and .equals #
You may have also noticed the .toString and .equals methods in the Point class, which have been copied here for your convenience. Both of these are special methods which you will use often throughout the rest of this class.
public class Point {
    public double x;
    public double y;

    public String toString() {
        return "(" + this.x + ", " + this.y + ")";
    }
}
The toString method is used by Java to determine how to represent an object as a string, like when printing objects to display to the user. In the example below, we create a new point at the origin, \((0, 0)\). When calling System.out.println, Java needs to figure out what exactly to print, so it invokes the toString method which returns (0.0, 0.0). Then, that string is displayed to the screen.
Point p = new Point();
System.out.println(p);  // (0.0, 0.0)
Likewise, the equals method is used whenever a user calls equals. We might define equality between two points as follows.
public class Point {
    public double x;
    public double y;

    public boolean equals(Object o) {
        Point other = (Point) o;
        return (this.x == other.x) && (this.y == other.y);
    }
}
It is very important to understand the difference between the equality and identity of objects. If you have not already, read over the Identity and Equality section of the Java guide Many tricky bugs can arise from this if you misuse these two related but different concepts.
Conclusion #
Coding is not easy! Keeping track of what references point to what, modifying code (which you first have to understand), and systematically finding bugs are definitely not skills that develop overnight. Make sure to practice! You can get your partner or another classmate involved and generate variants of the lab exercises to provide extra practice.
The exercises on complicated uses of references are easy to produce and can be verified online using tools such as Java Visualizer or by simply running your code through IntelliJ.
The internet is also a great source for more coding practice. Here’s a short list of websites where you can find problems:
- Advent of Code
- /r/dailyprogrammer
- Project Euler (Warning: mathy)
- Leetcode (very common interview prep)
Many problems you see will rely on things we haven’t learned yet. If you see a problem that you don’t know how to do, don’t panic! We will cover many data structures to solve these sorts of problems later.
For coding, practice is crucial so make sure to do so! Finally, if you or anyone you know is struggling, let a TA know and we’ll be more than happy to help.
Deliverables #
To quickly recap what you need to do for this lab:
- Read through the lab and learn about Java objects and the Golden Rule of Equals. Make sure you understand how to draw box-and-pointer diagrams.
- Build good collaboration habits as you work through the provided discussion questions and exercises.
- In
lab02/Account.javaedit the behavior of withdrawal to return a boolean then implement account merging and overdraft protection. (Exercise: Modifying Withdrawal Behavior) - Implement
lab02/Path.java, which keeps track ofcurrPointandnextPointand implements the methodsgetCurrX(),getCurrY(),getNextX(),getNextY(),getCurrentPoint(),setCurrentPoint(Point point), anditerate(dx, dy). (Exercise: Pursuit Curves) - Complete the quiz on Gradescope and turn it in by 6pm on Friday.
Submission #
- Save your java files in your text editor, and in your terminal, navigate to your
su22-***directory using thecdcommand. - Once there,
git add <filename>for all files to stage them,git commit -m "finished lab 2"to make your commit, and then send it to your remote usinggit push origin main. - Go to the Gradescope assignment for lab2 and select your repository and branch to submit. Add your partner to your submission so you both receive credit.