A. Intro
If you have not done so, pull the latest updates from the course skeleton and create a new IntelliJ project out of the lab08 folder.
Learning Goals for Today
In the first part of the lab, you're introduced to JUnit. JUnit provides a way to write repeatable tests, which substantially reduces the tedium of testing. Many of your lab submissions for the rest of the course will include a JUnit testing file.
We provide some guidelines for designing test cases, and give you some practice applying them. Properties of good organization that you've learned in earlier program activities apply to JUnit as well.
JUnit also makes easy an approach to programming called test-driven development (TDD), in which you design test cases before the code they are testing. TDD is popular in industry. We will encourage it in the remainder of CS 61BL, starting by leading you through the steps of the construction of a class representing measurements (feet, yards, inches).
For the second part of lab, we'll consider what happens when an error occurs, say, an out-of-bounds array access is made. The program may be allowed to crash. Java also, however, allows a programmer to intercept the crash and take alternate action. The mechanism that enables this ability is called an exception.
An exception can be thrown—passed to another part of the program to handle—or caught—handled on its own. We'll consider examples of each kind of use in the upcoming lab exercises.
After learning about exceptions, you'll learn about consistency checking, a new technique to help you debug.
B. Testing with JUnit
JUnit is a testing framework that's integrated into the IntelliJ programming environment. It provides a convenient way to structure and evaluate your program tests. You'll see a JUnit test in the next step.
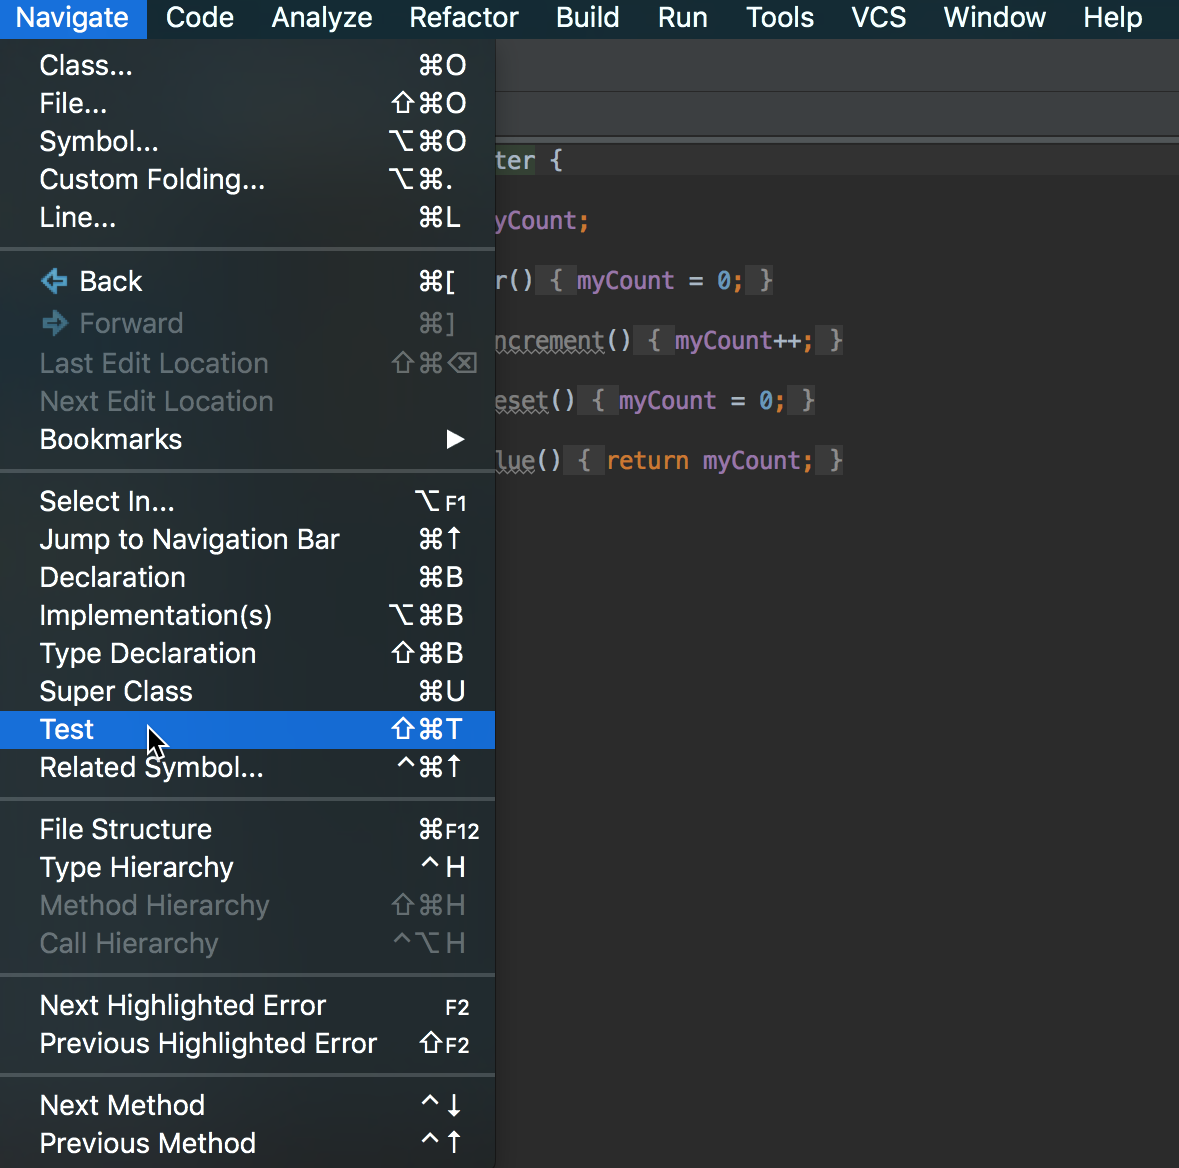
To set up a testing file for the class you're currently working on in IntelliJ, select Test from the Navigate menu. When you do this, IntelliJ will ask you about adding the JUnit library to your build path; answer yes to this. It will then set up a test class whose name is the name of your class with "Test" appended.
IntelliJ then presents you with a stub for your test class. You should now start defining void methods whose names start with "test" and describe what is being tested. They will call a number of assertion methods provided in JUnit.
Here are the most useful methods provided by JUnit:
| void assertTrue (boolean condition); | If assertTrue's condition evalues to false, then the test fails. |
| void assertTrue (String errmsg, boolean condition); | Like assertTrue, but if it fails, it prints an error message. |
| void assertNull (Object obj); | If assertNull's argument isn't null, the test fails. An error message may also be supplied. |
| void assertNotNull(Object obj); | Fails for a null argument. An error message may be supplied. |
| void assertEquals (Object expected, Object actual); | assertEquals suceeds when expect.equals(actual). For primitives, it checks expected == actual. An error message may also be supplied. |
| void fail(); | If this code is run, the test fails. An error message may be supplied. |
Perhaps you have been accustomed to testing your code using print statements. You don't do that here; the various test... methods you write will communicate their results to you by the success or failure of the assertions.
Once you type in your test methods, run your test class. JUnit will give you a list of the assertions that fail, or a green bar if they all pass.
JUnit Example
Suppose we have written a toString method for a Line class and want to test that it works correctly. The constructor for this class has the signature Line(int x1, int y1, int x2, int y2). We expect a Line object to print out in the form (x1, y1), (x2, y2). Here's an example method using JUnit that could test this functionality,
void testToString(){
    Line l = new Line(8, 6, 4, 2);
    assertEquals("(8, 6), (4, 2)", l.toString());
}
Setting up JUnit Tutorial
The goal here is to get you and your partner experience running JUnit. You might want to skim over the tutorial to see the big picture before you get started.
- Navigate to the Counter.java file.
Make a new JUnit Test Case
- Click on the class name in the Counter.java file and select "Navigate" -> "Test"
- Alternatively, use CTRL+Shift+T (CMD+Shift+T on a Mac)
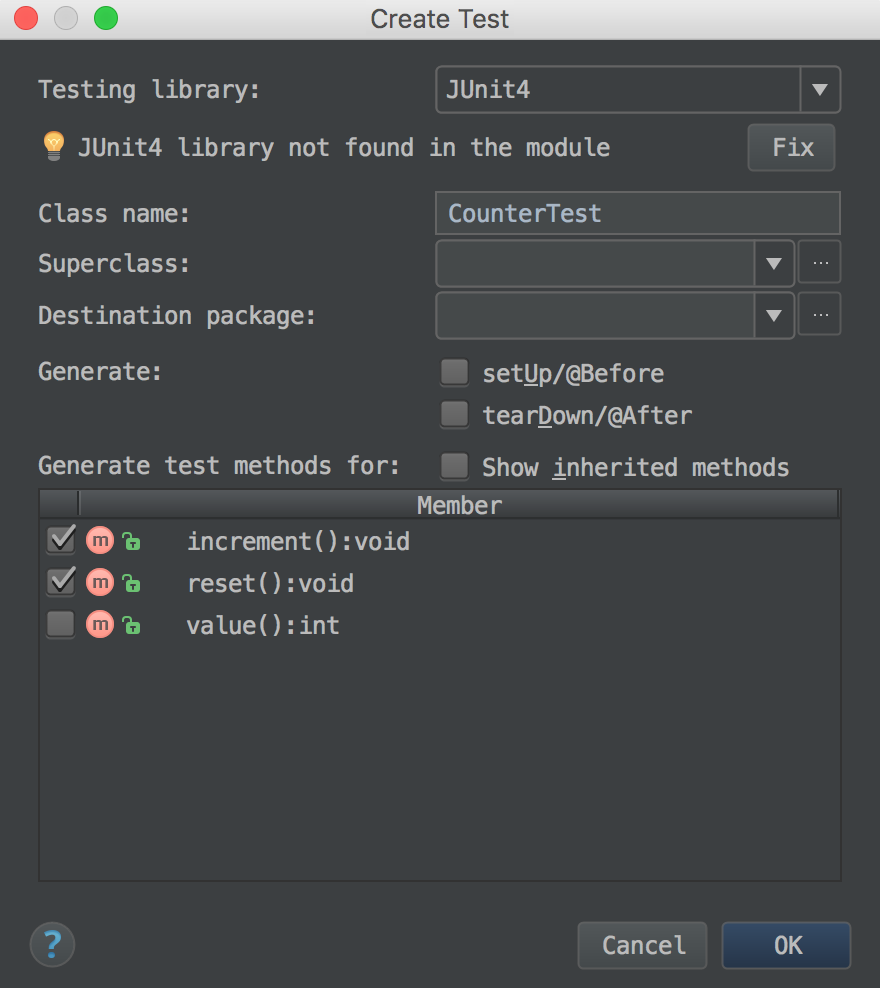
- Click "Create New Test..."
- Name the JUnit Test Case "CounterTest". Select "JUnit 4" as the testing libary and check the boxes for the increment() and reset() functions.
- If you get the error "JUnit4 library not found in the module", click the Fix button next to it.
- You should see a file similar to the following:
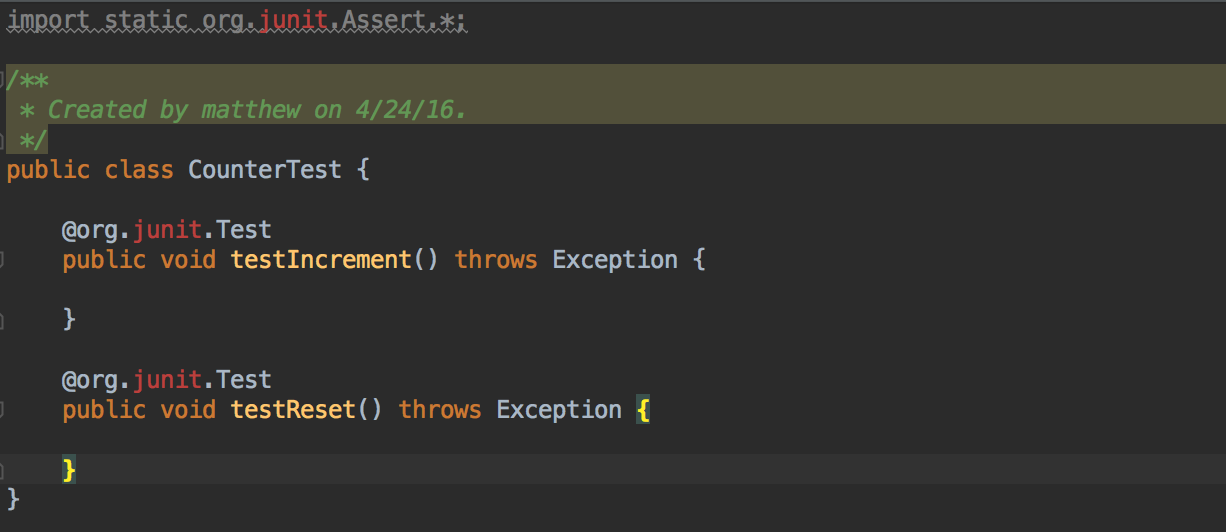
- To resolve the errors, simply click on one of the red highlighted words and use the ALT+ENTER. Click "Add 'JUnit4' to classpath", and select "Use 'JUnit4' from IntelliJ IDEA distribution".
- Edit your CounterTest.java to look like the class definition below.
CounterTest.java
import static org.junit.Assert.*;

public class CounterTest {

    @org.junit.Test
    public void testConstructor() {
        Counter c = new Counter();
        assertTrue(c.value() == 0);
    }

    @org.junit.Test
    public void testIncrement() throws Exception {
        Counter c = new Counter();
        c.increment();
        assertTrue(c.value()  == 1);
        c.increment();
        assertTrue(c.value() == 2);
    }

    @org.junit.Test
    public void testReset() throws Exception {
        Counter c = new Counter();
        c.increment();
        c.reset();
        assertTrue(c.value() == 0);
    }
}
Run your JUnit Test Case
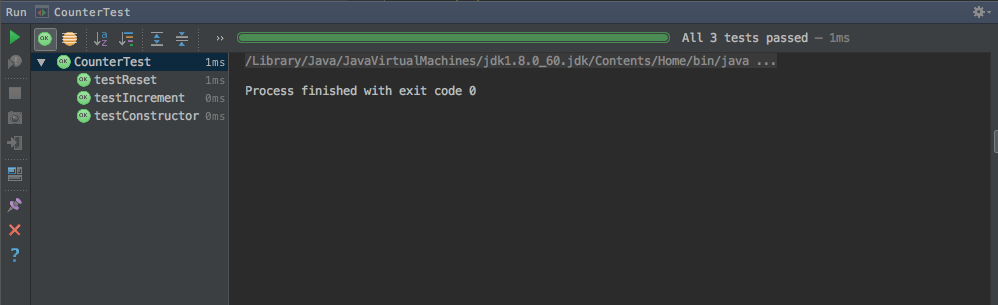
- Use "Build" -> "Make module 'lab08'" to compile the files, and then use "Run" -> "Run 'CounterTest'"
- You will see a green bar appear to show that you have no errors.
- Alternatively, you can also run junit tests from the command line. Assuming that your classpath is set up properly, you can run
java org.junit.runner.JUnitCore <TestClass>after compiling the tests.
Break something in your JUnit Test Case
- Introduce an error into one of the
CounterTestmethods, asserting for example that the value of a freshly-built counter object is 7. Run the JUnit test again. Observe the error messages that result.
- Introduce an error into one of the
C. Testing Principles
Mod N Counters Defined
Now that you've learned how to use JUnit, let's learn some testing principles. We're going to use the example of class that implements a Mod N counter to demonstrate good testing principles. But first, let's explain what a Mod N counter is.
A Mod N counter is a counter that counts up to a specified amount (the N), and then cycles back to zero.
For example, if we had a Mod 4 counter, it would count like this: 0, 1, 2, 3, 0, 1, 2, 3, 0, ...
The ModNCounter class is similar to the Counter class, but notice that in order to keep track of the value of N it will need an an extra instance variable—a good name for it is myN. myN is initialized with a one-argument constructor whose argument is the intended myN value. Thus the code,
ModNCounter c = new ModNCounter (2);
System.out.println (c.value ( ));
c.increment ( );
System.out.println (c.value ( ));
c.increment ( );
System.out.println (c.value ( ));
c.increment ( );
should print 0, then 1, then 0.
Exercise: Renaming a Class in IntelliJ
To write the ModNCounter class, we're going to modify the Counter class from earlier. Here's how to do this quickly using IntelliJ. First go to Counter.java, the program you just tested. Double-click the word "Counter" in the class header; it should now be selected. Right-click "Counter" and select "Refactor"—>"Rename" and type "ModNCounter" in the little box that appears. The effect of this change is to change any reference to Counter to ModNCounter, not only in Counter.java but also in CounterTest.java.
When you do this, a dialogue like the one below will pop up. Select to rename CounterTest as well.
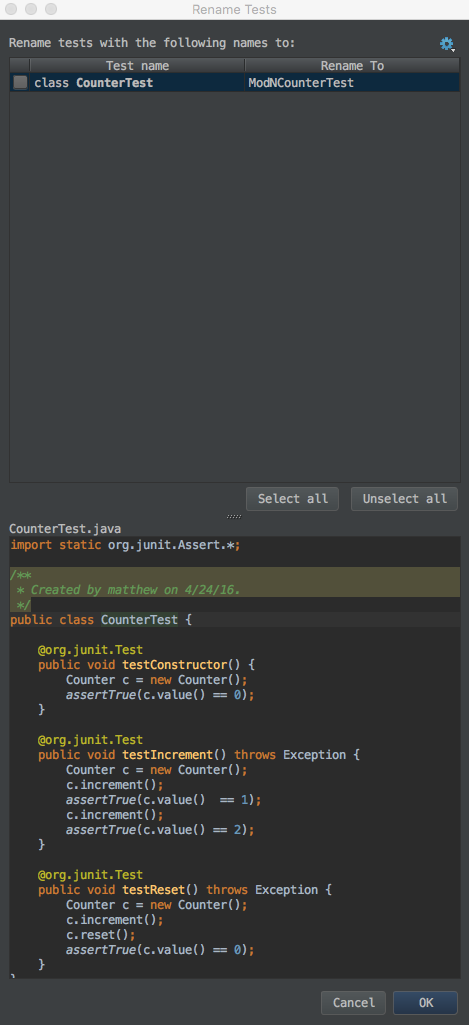
You should notice that the name of the file Counter.java is now ModNCounter.java and the name of the file CounterTest.java is now ModNCounterTest.java. In addition, all references to these classes have been changed appropriately.
Remember this operation! It's pretty common to want to rename an identifier (a variable or a class name) at some point. IntelliJ makes this easy by renaming not only the definition of the identifier but also everywhere it's used.
Don't make any other changes to ModNCounter.java just yet.
Test-driven Development
Test-driven development is a development process that involves designing test cases for program features before designing the code that implements those features. The work flow is:
- Write test cases that demonstrate everything you want your program to be able to do
- Write as little code as possible so that all the tests are passed
- Clean up the code as necessary. Recheck that all tests still pass.
Repeat these three steps in a loop, once for each new feature you add to a program.
Exercise: Test-driven Development for ModNCounter
Here's a walkthrough of how to do test-driven development for creating ModNCounter:
- Decide what you're going to change in your program: In
ModNCounterTest.java, supply an argument for each of the constructor calls, because you know you will have to initialize aModNCounterwith a value ofN. - Write code in JUnit to test the change: Add code in
testIncrementthat checks (using assertions) that wraparound of the cycling counter works correctly. - Eliminate compilation errors: In
ModNCounter.java, add an argument to the constructor. Both files should now be free of compile-time errors. Don't make any other changes inModNCounter.java. We don't want it to work just yet. Run ModNCounterTest as a JUnit test case. All tests should pass except the wraparound check. - Write code to make the tests pass: Now go fix the
incrementmethod and run the JUnit test again. If all goes well, your updated code should pass all the tests.
So you've done some test-driven development. First, you supplied test cases in the ModNCounterTest class. Then you changed as little code as possible in ModNCounter to remove compile-time errors. Then you provided the code to pass the tests.
Exercise: More Testing
From the standpoint of test-driven development, this activity is backward. It starts with an already implemented class, and then designs the testing code. The purpose of this exercise is just to give you more practice with JUnit.
Copy over the Account class from lab 2 into your current lab project. If neither you nor your partner have completed lab 2, you will need to complete at least the Account class. Then create a new JUnit test case for it with the following methods:
testInitshould check that the balance of a newly created account is the amount provided to the constructor.testInvalidArgsshould make sure that the result of supplying a negative number todepositandwithdrawdoesn't change the account's balance.testOverdraftshould make sure that an attempt to withdraw more money than the account contains doesn't change the account's balance.testDepositshould make sure that the account balance reflects the result of a legal call to deposit.testWithdrawshould make sure that the account balance reflects the result of a legal call towithdraw.
Work on the test cases until they all succeed.
Discussion: System.out.println() vs. JUnit
What is one reason or situation where using JUnit for debugging and testing is better than using System.out.println()?
Testing Principle 1
One testing principle you can imagine is that test values should exercise every statement in the program, since any statement that's not tested may contain a bug. Our tests of the Account class basically did that, covering the three cases in withdraw and the two cases in deposit. As in the testing of Account, exercising all statements may require more than one run of a program.
Recall the leap year program from an earlier exercise:
if (year % 400 == 0) {
    System.out.println ("leap year");
} else if (year % 100 == 0) {
    System.out.println ("not leap year");
} else if (year % 4 == 0) {
    System.out.println ("leap year");
} else {
    System.out.println ("not leap year");
}
The code contains four cases, exactly one of which is executed for any particular value of year. Thus we must test this code with at least one year value per case, so at least four values of year are needed for testing:
- a year that's divisible by 400;
- a year that's divisible by 100 but not by 400;
- a year that's divisible by 4 but not by 100;
- a year that's not divisible by 4.
Principle 1 by itself is insufficient, however. Here's an example;
isLeapYear = false;
if (year % 4 == 0) {
    isLeapYear = true;
}
if (year % 100 == 0) {
    isLeapYear = false;
}
if (year % 400 == 0) {
    isLeapYear = true;
}
A year value of 2000 causes all the statements in this program segment to be executed. However, there is a bug in this code it will not catch (see next slide).
Self-test: When Testing Principle 1 is not Enough
Here's the code again with line numbers.
00: isLeapYear = false;
01: if (year % 4 == 0) {
02:     isLeapYear = true;
03: }
04: if (year % 100 == 0) {
05:     isLeapYear = false;
06: }
07: if (year % 400 == 0) {
08:     isLeapYear = true;
09: }
A single test value that exercises every statement in this code is insufficient to reveal all bugs in the code.
Below are proposed replacement lines for the program. Which changes would make this program wrong for some values, but not for the test value 2000? Check all that apply.
|
00: isLeapYear = true; // was false
|
Correct!
|
|
|
02: isLeapYear = false; // was true
|
Correct!
|
|
|
05: isLeapYear = true; // was false
|
Correct!
|
|
|
08: isLeapYear = false; //was true
|
Incorrect.
|
How many test cases do you need in general if you have three if statements as in the code above?
|
1
|
Incorrect. You have to test different cases!
|
|
|
3
|
Incorrect. It's not enough to test each
if
individually: the combination of all three of them can lead to different effects
|
|
|
4
|
Incorrect.
|
|
|
8
|
Correct! This is all possible combinations of outcomes that can occur
|
|
|
10
|
Incorrect. There aren't 10 different cases that can happen.
|
Testing Princple 2
To augment principle 1, we'll say we need to test various paths through the program. For example, suppose our program had two consecutive if statements:
if ( ... ) {
    ...
}
if ( ... ) {
    ...
}
There are two possibilities for each test, success or failure. Thus there are four paths through the two statements, corresponding to the four possibilities
- success, success
- success, failure
- failure, success
- failure, failure
This explains why one test was insufficient to exercise all the code in
isLeapYear = false;
if (year % 4 == 0) {
    isLeapYear = true;
}
if (year % 100 == 0) {
    isLeapYear = false;
}
if (year % 400 == 0) {
    isLeapYear = true;
}
From the previous discussion, it looks like we need eight tests, corresponding to the eight paths through the three tests. They are listed below.
year % 4 == 0, year % 100 == 0, and year % 400 == 0 (which just means that year % 400 == 0)
year % 4 == 0, year % 100 == 0, and year % 400 != 0
year % 4 == 0, year % 100 != 0, and year % 400 == 0 (not possible)
year % 4 == 0, year % 100 != 0, and year % 400 != 0
year % 4 != 0, year % 100 == 0, and year % 400 == 0 (not possible)
year % 4 != 0, year % 100 == 0, and year % 400 != 0 (not possible)
year % 4 != 0, year % 100 != 0, and year % 400 == 0 (not possible)
year % 4 != 0, year % 100 != 0, and year % 400 != 0 (equivalently, year % 4 != 0)
Notice that some of the tests are logically impossible, and so we don't need to use them. This leaves the four tests we needed to write.
Self-test: Are we Missing a Case?
Consider the code segment below, where good should become true if exactly two of the variables (a, b, c) are zero.
if (a == 0) {
    if (b == 0) {
        if (c == 0) {
            good = false;
        } else {
            good = true;
        }
    } else if (c == 0) {
        good = true;
    } else {
        good = false;
    }
} else if (b != 0) {
    good = false;
} else if (c == 0) {
    good = true;
} else {
    good = false;
}
There are only seven assignment statements. Shouldn't we expect eight, because there are eight possible settings of three variables? Was a case missed?
|
Yes
|
Incorrect. Is one of the assignment statements handling multiple cases?
|
|
|
No
|
Correct! The case
else if (b != 0)
handles the case where
a=1, b=1, c=0
AND
a=1, b=1, c=1
.
|
A Principle for Testing Loops
A loop can vastly increase the number of logical paths through the code, making it impractical to test all paths. Here are some guidelines for testing loops, drawn from Program Development in Java by Barbara Liskov and John Guttag, a book used in previous CS 61B offerings.
- For loops with a fixed amount of iteration, we use two iterations. We choose to go through the loop twice rather than once because failing to reinitialize after the first time through a loop is a common programming error. We also make certain to include among our tests all possible ways to terminate the loop.
- For loops with a variable amount of iteration, we include zero, one, and two iterations, and in addition, we include test cases for all possible ways to terminate the loop. [The zero iteration case] is another situation that is likely to be a source of program error.
Liskov and Guttag go on to say: This approximation to path-complete testing is, of course, far from fail-safe. Like engineers' induction "One, two, three—that's good enough for me," it frequently uncovers errors but offers no guarantees.
Black-box Testing
All the test principles discussed so far focused on testing features of the code. Since they assume that we can see into the program, these techniques are collectively referred to as glass-box testing, as if our code is transparent.
Another testing approach is called black-box testing. It involves generating test cases based only on the problem specification, not on the code itself. There are several big advantages of this approach:
- The test generation is not biased by knowledge of the code. For instance, a program author might mistakenly conclude that a given situation is logically impossible and fail to include tests for that situation; a black-box tester would be less likely to fall into this trap.
- Since black-box tests are generated from the problem specification, they can be used without change when the program implementation is modified.
- The results of a black-box test should make sense to someone unfamiliar with the code.
- Black-box tests can be easily designed before the program is written, so they go hand-in-hand with test-driven development.
Principles for Black-box Testing
In black-box testing as in glass-box testing, we try to test all possibilities of the specification. These include typical cases as well as boundary cases, which represent situations that are extreme in some way, e.g. where a value is as large or as small as possible.
There are often a variety of features whose "boundaries" should be considered. For example, in the DateConverter program, boundary cases would include not only dates in the first and last months of the year, but also the first and last dates of each month.
Discussion: Boundary Cases
Consider the problem of printing the days of a month in calendar format, given the number of days in the month and an integer that says what day the month starts on. For instance, given 30 as the number of days in the month and 3 (Wednesday) as the starting day, the output should be
          1  2  3  4

 5  6  7  8  9 10 11

12 13 14 15 16 17 18

19 20 21 22 23 24 25

26 27 28 29 30
Devise as many boundary cases as you can.
Parting Advice on Testing
We'll encounter many more testing techniques later in the course. Here are some last bits of advice for now.
- Write tests as if you were testing your worst enemy's code. You're generally too familiar with your own code and might read a given line as containing what you meant to write rather than what you did write. Don't fall into the trap of hoping not to find bugs in your own code.
- Test your program with values that are as simple as possible. If the program is supposed to work for a set of 1000 data values, make sure it works on a set of 3 values first.
- Wrapping a loop around your code may allow you to test it with multiple values in a single run.
- Make sure you know how your program is supposed to behave on a given set of test data. Often lazy programmers try a test and just scan through it thinking that it "looks right". Often such a programmer is embarrassed later to note that they computed a product cost that's greater than the national debt or a quantity that's greater than the number of atoms in the universe.
- Make sure to cover both the common cases and the extreme, edge cases. Forgetting one or the other (or both!) can cause you to miss critical bugs in your code.
Examples of careless selection of test data may have come up in your testing of the date converter program. Here's how we would have tested that program.
- We start with dates in January: 1 and 31. (These values give us as much or more information as values between 2 and 30.)
- We continue with the corresponding dates in February, computing the expected answers from January's dates. February 1 is just January 31 + 1 = 32; February 29 is 32 + 28 more days = 60.
- We design March's test values from February's, April's from March's, and so on through December. December 31 should be day number 366, so that provides a check on our arithmetic.
Exercise: Testing a Measurement Class
Now, you're going to be writing the code and a JUnit Test Case (a whole file of tests) for the Measurement class. We have provided "stubs" for each of the methods in Measurement.java. Stubs show the header of the method. You will both be writing the code for these methods and, we hope, doing test-driven development (write the tests first).
- Create a new JUnit Test Case for
Measurement.java. - Write enough tests to test all methods provided in
Measurement.java.
Your work will be graded on two criteria:
- the percentage of the bugs you catch in our buggy versions of
Measurement.java; - the correctness of your
Measurement.java
As mentioned in lab and lecture, all your instance variables should be private. You are not to change the public interface of the Measurement class; e.g. don't add any additional public accessor methods. You are allowed to add anything that's private.
FAQ:
Q: Do we need to handle negative numbers?
A: No. The Measurement class doesn't need to do sensible things when passed negative numbers as arguments.
Q: Do we need to worry about integer overflow?
A: No. (Although you could imagine someone's Measurement class handling this correctly.)
Q: Do we need to worry about null arguments?
A: Not this time. You may assume that minus and plus are only passed non-null arguments. (They are the only two methods that take in objects.)
Q: Should the methods modify the current Measurement object or create a new Measurement object to be returned?
A: minus, plus, and multiple should all create a new Measurement object.
D. Testing Conclusion
Summary
Arrays, the first of today's topics, came to Java from C and C++. It turns out than rather using arrays themselves, most needs for an array in Java are satisfied with using a class called ArrayList (a member of Java's class library), which is an expansion on the array we learned today. We will be studying ArrayList as the basis for implementation of the various "collection classes" that we'll soon encounter.
Properties of good organization that you've learned in earlier program activity apply to JUnit as well. Here are some examples:
- test small cases before larger ones and simple before difficult cases;
- if you can, test all possible values;
- test boundary values;
- include tests that will fail as well as tests that will pass;
- use helper methods to make your code more understandable.
We think test-driven development is a big win, and we will be encouraging you to use it when building your programs. At the very least, you have to like the frequent green bars!
If you're not feeling rock solid on the stuff we've done so far, check out http://codingbat.com/java to get some extra practice writing java programs.
E. Exceptions
Error Handling
So far in this course, we have not dealt much with error handling. You were allowed to assume that the arguments given to methods were formatted or structured appropriately. However, this is not always the case due to program bugs and incorrect user input:
- bugs in your programs might create inconsistent structures or erroneous method calls (e.g. division by zero, indexing out of bounds, dereferencing a null pointer)
- users cannot be trusted to give valid input (e.g. non-numeric input where a number is required or search failures where a command or keyword was misspelled)
We assume in the following discussion that we can detect the occurrence of an error and at least print an error message about it.
A big challenge in dealing with the error is to provide information about it at the right level of detail. For instance, consider the error of running off the end of an array or list. If the contents of a list are inconsistent with the number of elements supposedly contained in the list, a "reference through a null pointer" or "index out of bounds" error may result. The programmer may wish to pass information about the error back to the calling method with the hope that the caller can provide more appropriate and useful information about the root cause of the error and perhaps be able to deal with the error.
Here are some options for handling errors in this situation:
- Don't pass any information to the caller at all. Print an error message and halt the program.
- Detect the error and set some global error indicator to indicate its cause.
- Require the method where the error occurs as well as all methods that directly or indirectly call it, to pass back (or take back) an extra argument object that can be set to indicate the error.
All these options have flaws, which you will now discuss with your classmates.
Discussion: Comparison of Error-Handling Approaches
Here are three approaches to error handling:
- Don't try to pass back any information to the caller at all. Just print an error message and halt the program.
- Detect the error and set some global error indicator to indicate its cause.
- Require the method where the error occurs, along with every method that, directly or indirectly, calls it, to pass back as its value or to take an extra argument object that can be set to indicate the error.
Which seems most reasonable? Defend your answer. If none, justify why all the options are bad.
Exceptions
There is a fourth option for handling errors, called an exception. Provided by Java and other modern programming languages, an exception signals that an error of some sort has occurred. Java allows both the signaling of an error and selective handling of the error. Methods called between the signaling method and the handling method need not be aware of the possibility of the error.
An exception is thrown by the code that detects the exceptional situation, and caught by the code that handles the problem. These two definitions are helpful in discussing exceptions.
When a method A throws an exception, that exception must be dealt with by whatever method B called method A. Method B can choose to either catch the exception and handle it, or it can choose to throw the exception again, passing it on to the method that called it.
Think of a hot potato. When a method generates an exception, it doesn't want to deal with it, so it throws the exception to the next method. That method must do something when it receives the exception. It can either handle it, or throw it to the next method. Methods keep throwing the exception until one is willing to catch it. If no methods end up catching an exception, then the Java program will look to to more drastic exception handlers, which may do things like exit the program and print a stack trace to the user. Before, we've called this behavior "crashing" the program.
There is a wide spectrum of "exceptional" situations. There may be catastrophic situations like the computer powering off. On the other hand, there are situations that might not even correspond to errors, like encountering the end of an input file. In between are errors varying in severity.
Exceptions in Java
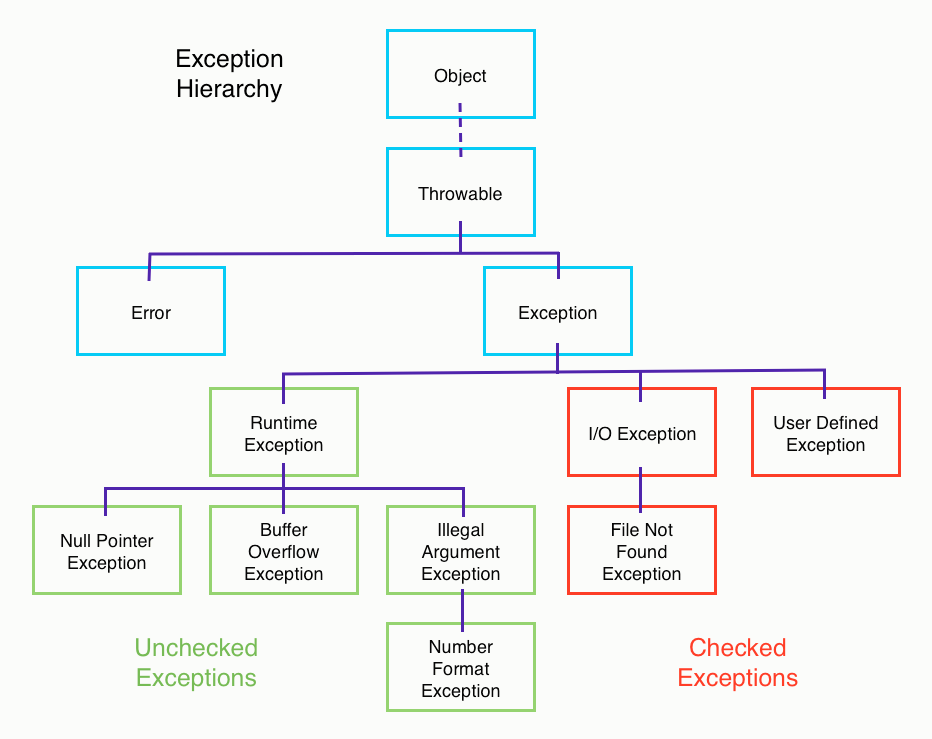
Java's exception facility classifies all these into two categories:
- checked exceptions: exceptions that a method must explicitly handle or hand off to its caller
- unchecked exceptions: exceptions that a method need not worry about
The requirement for handling checked exceptions may encourage programmers into thinking about potential sources of error, with the result that more errors are detailed and handled correctly.
Exceptions are just Objects and are part of the regular class hierarchy as shown below.
All exceptions in Java are subclasses of the Exception class.
An exception is thrown when the exceptional event occurs. Normally, an exception stops the program. One may, however, choose to catch the exception and process it in such a way that the program can continue executing.
Catching Exceptions in Java
Catching an exception means handling whatever exceptional condition has arisen.
This is done by surrounding code that might produce exceptional conditions
with a try catch block as follows:
try {
    // code that might produce the exception
} catch (<Exception Class Name> variableName) {
    // code to handle the exceptional situation
}
An example of where an exception is particularly useful is dealing with user
input. The AddingMachine program we saw in an earlier activity successively
read integers from the input. Users tend to be imperfect; they might mistype
the input. Thus, we need to be careful to make sure that they actually enter
a number to be added. The Scanner class helps with this as its nextInt
method throws an exception if the token being read isn't an integer.
Scanner intScan = new Scanner(System.in);
int k;
try {
    k = intScan.nextInt ( );
} catch (NoSuchElementException e) {
    // ran out of input
} catch (InputMismatchException e) {
    // token isn't an integer
}
Observe that the "tried" code can be simpler since it is coded as if nothing will go wrong. You can catch multiple exceptions, as in the code above, and handle them separately by supplying multiple catch blocks (ordered from most specific to least specific).
An extension to the try catch block construct that often comes in handy is
the finally block. A finally block comes after the last catch block and
is used to do any cleanup that might be necessary, such as releasing resources
the try block was using. This is very common when doing IO.
Scanner intScan = new Scanner(System.in);
int k;
try {
    k = intScan.nextInt ( );
} catch (NoSuchElementException e) {
    // ran out of input
} catch (InputMismatchException e) {
    // token isn't an integer
} finally {
    // this will be executed as long as the JVM does not exit early
    intScan.close();
}
An even more concise version of the finally bloack is the try-with-resources
block. It allows you to declare resources being used as part of the try block,
and Java will automatically release those resources for you. The code below is
equivalent to the snippet above, but it doesn't use the finally block.
int k;
try (Scanner intScan = new Scanner(System.in)) {
    k = intScan.nextInt ( );
} catch (NoSuchElementException e) {
    // ran out of input
} catch (InputMismatchException e) {
    // token isn't an integer
}
Generate Some Exceptions
Uncomment and fill in the blanks in the code below (which is also in
TestExceptions.java) so that, when run, its output is:
/**
 * Desired output
 * 1) got null pointer
 * 2) got illegal array store
 * 3) got illegal class cast
 */

public class TestExceptions {
    public static void main (String [ ] args) {
        //_______________ ;
        try {
            //_______________ ;
        } catch (NullPointerException e) {
            System.out.println ("got null pointer");
        }
        try {
            //_______________ ;
        } catch (ArrayStoreException e) {
            System.out.println ("got illegal array store");
        }
        try {
            //_______________ ;
        } catch (ClassCastException e) {
            System.out.println ("got illegal class cast");
        }
    }
}
Hint: If you're not sure what kinds of errors these exceptions are for, you can look them up in the Java documentation. If you don't happen to remember the link, googling the name of the exception will likely turn it up.
Throwing Exceptions
If your code may produce a checked exception, you have two choices. One is to
catch the exception. The other is to "pass the buck" by saying
throws <Exception Class Name> in the method header. This puts responsibility on the
calling method either to handle the exception or pass the exception to its
caller.
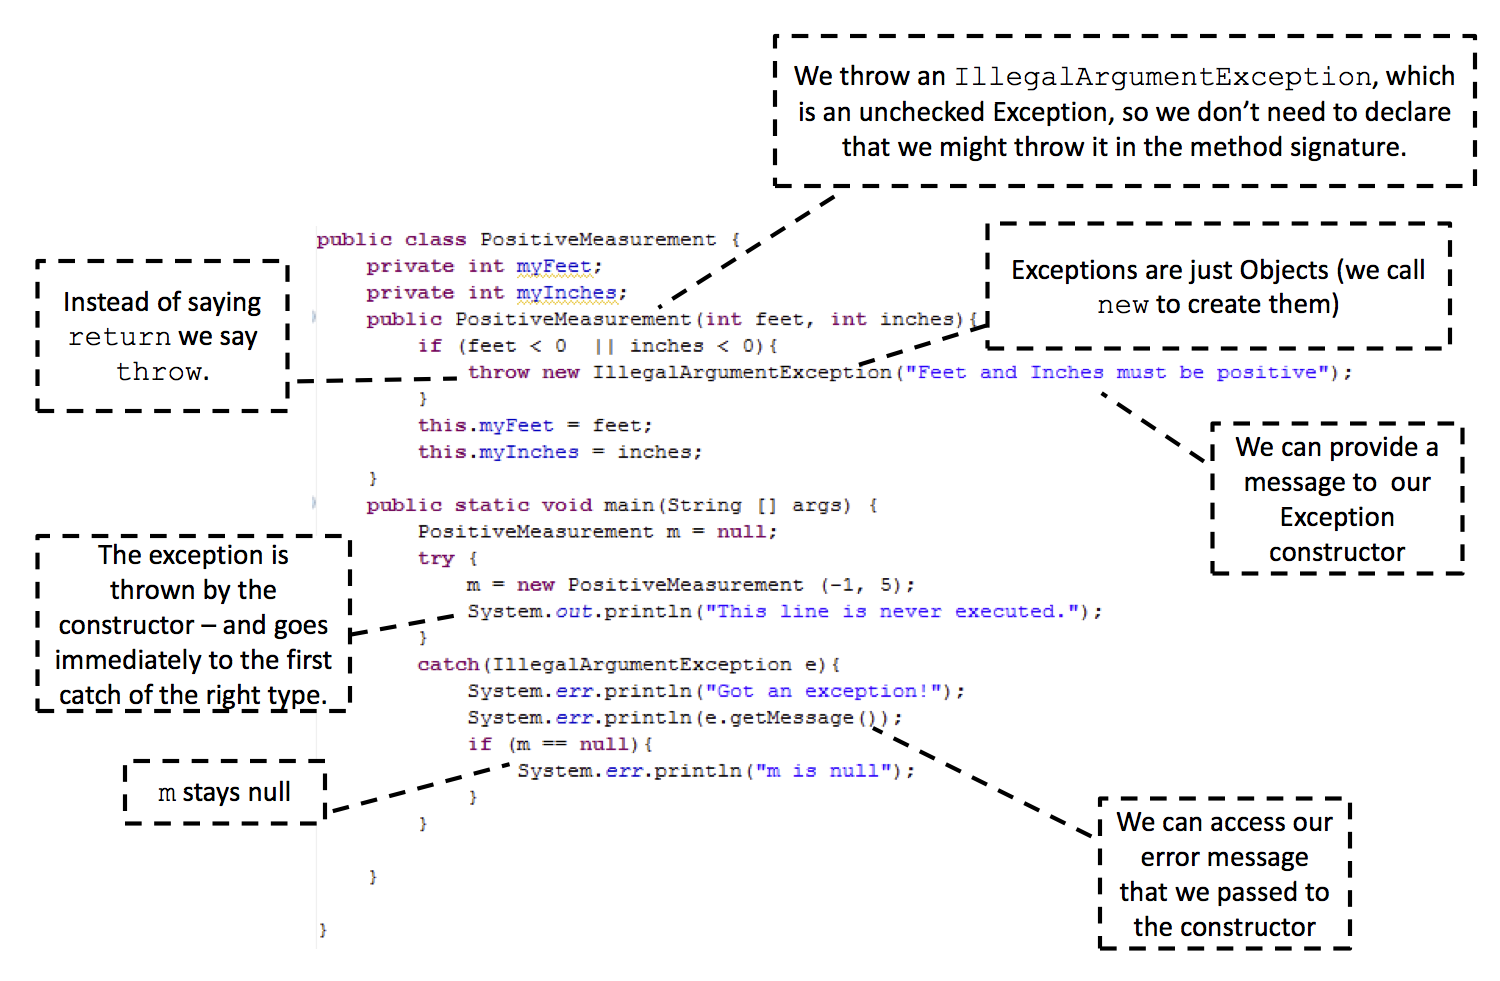
To throw an exception, we use the throw operator and give it a newly
created exception as argument. For example, if a scanned value must be
positive, we could have the following:
k = intScan.nextInt();
if (k <= 0) {
    throw new IllegalArgumentException("value must be positive");
}
The programmer can easily define his or her own exceptions by extending
Exception or RuntimeException. Each has two constructors to override,
one with no arguments, the other with a String argument in which an error
message is stored. Here's an example.
class Disaster extends RuntimeException {

    public Disaster() {
        super();
    }

    public Disaster(String msg) {
        super(msg);
    }
}
In the exception-catching code, we may access the String msg argument to the
Exception constructor via the getMessage() method.
Example: Time Input
The code at the bottom of the page is also in Time.java.
It represents a time of day in military time, storing a number of hours
that's between 0 and 23 and a number of minutes between 0 and 59.
Here is a method for testing the constructor, suitable for pasting into a JUnit file.
public void testConstructor() {
    String[] timeArgs = {null, "x", "x:", ":x", "x:y", "1:", ":30",
        "4: 35", "55:00", "11:99", " 3:30", "00004:45", "4:007", "4:7",
        "4 :09", "3:30", "11:55"};
    Time[] correctTimes = {null, null, null, null, null, null, null,
        null, null, null, null, null, null, null, null,
        new Time (3, 30), new Time (11, 55)};
    for (int k = 0; k < timeArgs.length; k++) {
        Time t = new Time(timeArgs[k]);
        assertEquals(correctTimes[k], t);
    }
}
Now do the following:
Modify the
testConstructormethod:- Surround the call to the
Timeconstructor withtry catch. In the catch block, print the corresponding error message, and make sure that the correspondingcorrectTimesentry isnull, that is, the constructor call threw an exception as it was supposed to. - If the constructor call didn't throw an exception, compare the
constructed result with the corresponding
correctTimesentry as in the existing code.
- Surround the call to the
- Within the
Timeconstructor, catch all exceptions that arise and handle them by throwing anIllegalArgumentExceptionwith an informative message string.
Our solution produces eight different error messages for the given test cases. Cases for illegal times must be tested separately:
- too many leading zeroes in the hours or minutes (e.g. "00007")
- values for hours and minutes that are out of range.
You should add the tests for these cases and throw IllegalArgumentException
with informative message strings.
public class Time {
    private int myHours;
    private int myMinutes;
    public Time(String s) {
        int colonPos = s.indexOf(":");
        myHours = Integer.parseInt(s.substring(0, colonPos));
        myMinutes = Integer.parseInt(s.substring(colonPos+1));
    }
    public Time(int hours, int minutes) {
        myHours = hours;
        myMinutes = minutes;
    }
    public boolean equals(Object obj) {
        Time t = (Time) obj;
        return myHours == t.myHours && myMinutes == t.myMinutes;
    }
    public String toString() {
        if (myMinutes < 10) {
            return myHours + ":0" + myMinutes;
        } else {
            return myHours + ":" + myMinutes;
        }
    }
}
F. Consistency Checkers
Setting Up Projects
The rest of the lab will involve four main Java files: Date.java, NumberGuesser.java, XsBeforeOs.java and InsertionSort.java. They are located in the lab08 folder.
If you haven't yet switch which partner is coding in this lab, do so now.
Test Driven Development
Each of the tests will check many different cases, especially edge cases. They are all already written for you. This style of workflow, where tests are written before the central code, is called test driven development (it has been mentioned in earlier labs). For the purposes of this lab, do not look at the test files before attempting to complete the method.
Viewing the test cases before writing your code may affect your thinking and cause you to miss thinking about edges cases that might not be tested in the tests. The tests are provided as a black box, intended to check your work while not influencing your code.
If you need help, ask your partner, fellow students, or the staff for help. View the tests only after you have debugged and completed your own work. Viewing the tests after the fact can give you insight into how JUnit 4 tests are constructed. In particular, these tests will show you have you can test that methods will throw exceptions.
Detecting Program Errors
Earlier in this lab, we focused on designing test cases to check results for our code. This is not always the best and most thorough way to look out for bugs, however. Even for simple classes, it is difficult to design a thorough test suite. Secondly, not all aspects of a class (e.g. private instance variables and methods) are accessible to a separate testing class.
In this section, we will introduce the concept of using self-monitoring methods to alert when bugs appear. We will tie the concept of invariants with exception throwing, catching, and handling to check an object's internal state for inconsistencies.
Example: Inconsistencies in Tic-Tac-Toe Boards
Consider a class that represents a board used to play the game of Tic-Tac-Toe, which is played on a three-by-three grid by two players, X and O. Players take turns putting their mark on an empty square of the grid, with X going first. The winner is the player that first puts marks in three horizontal cells, three vertical cells, or three diagonal cells in a row.
Not all possible arrangements of X's and O's in a 3x3 grid will occur in a legal Tic-Tac-Toe game. For example, a board containing nine X's will never appear. Inconsistencies in a Tic-Tac-Toe playing program would thus be represented by impossible boards. The consistency checker would check for these impossible boards, and signal an error if any of them arise.
Discussion: Internally Consistent Boards
What kinds of Tic-Tac-Toe boards are legal?
Consistency Checker for Tic-Tac-Toe Boards
In a Tic-Tac-Toe playing program, we might see the following pseudocode:
Process an X move.
Check the board for consistency.
Repeat the following:
    Process an O move.
    Check the board for consistency.
    If O just won, exit the loop.
    Process an X move.
    Check the board for consistency.
    If X just won, exit the loop.
The consistency checker is called immediately after executing an operation that changes the board. We won't be implementing a consistency checker for Tic-Tac-Toe, but we will be for other problems in this lab.
In subsequent discussion, we will use the name isOK to refer to the
consistency checking method. We can combine this concept of consistency
checking with what we learned previously in this lab about exceptions.
If the state of the object being checked is internally consistent, the void
isOK method should not do anything. However, if the object being checked
is not internally consistent, isOK should throw an exception that can
be handled by the method that called it or by our tests. Usually, when you
throw an exception, you should also print an informative error message that
can be used with debugging.
Example: Consistency Checker for Dates
Consider the representation of a date (year, month, day) as three integers:
- year: value between 1900 and 2100
- month: value between 1 and 12 (inclusive), with 1 representing January, 2 representing February, etc
- day: value between 1 and 28, between 1 and 29, between 1 and 30, or between 1 and 31, depending on the month and year
The three integers are the instance variables of a Date class that we are
providing you. The methods include a constructor and an incomplete isOK.
Open the Date.java file and fill out the isOK method that throws an
IllegalStateException (which is built into Java) if the instance variable's
values do not represent a legal date in a year between 1900 and 2100, inclusive.
Test your work by compiling and running the DateTest.java file. It should
pass all the tests.
Example: Efficient (Though Buggy) Number Guessing
The NumberGuesser class uses the binary search technique to guess the
user's number. Binary search starts with a range of values in sorted order—
here, the integers between 0 and 20 (inclusive). To find a particular value, we
first look at the middle value in the range. If the middle value is not what
we're looking for, we check whether what we want is higher or lower than the
middle value. If it's higher, we don't need to search the lower values; if
it's lower, we don't need to search the higher values.
This elimination of (roughly) half the candidates from contention with each iteration yields a much faster algorithm than searching all the candidates one by one with a linear search.
Here's a sample dialog with the program.
Please think of an integer between 0 and 20 (inclusive).
Is your number 10? (Type y or n.) n
Is 10 too high? (Type y or n.) y
Is your number 5? (Type y or n.) n
Is 5 too high? (Type y or n.) n
Is your number 7? (Type y or n.) n
Is 7 too high? (Type y or n.) n
Is your number 8? (Type y or n.) y
Got it!
The code uses variables low and high to keep track of the range of values
that are currently candidates for the secret number. low starts out at 0 and
high at 20, reflecting the assumption that the user's number is somewhere
between 0 and 20 (inclusive). At each guess, the program shrinks the range of
values that can contain the user's value, either by lowering high (and
discarding large values) or by raising low (discarding small values).
The program includes a consistency checker isOK method that makes sure that
0 <= low <= high <= 20, and each unsuccessful guess removes the guess from
consideration for the duration of the game.
The program has a bug, however. The number-guessing code and the isOK
method are inconsistent. You'll identify the bug in the next step.
On a side note, notice that this particular isOK method is not void but
rather returns a boolean. This is also a possibility you could use when
working with your own consistency checkers.
#### Self-test: Identifying the Inconsistency
Some of the statements in the NumberGuesser program are numbered (1, 2, etc.). One or more of the numbered statements is buggy. Luckily, isOk will catch the error, and alert you when something goes wrong. Identify which statement is the problem.
1 |
Incorrect
|
|
2 |
Incorrect
|
|
3 |
Incorrect
|
|
4 |
Incorrect
|
|
5 |
Correct
|
|
6 |
Incorrect
|
|
7 |
Incorrect
|
Discussion: Fixing the Bug
First fix the statements you just identified. Now the isOk check should never fail (assuming the user does not lie to the program). Then briefly explain what you fixed and why it solves the problem.
G. Invariant Relationships
Invariant Relations
A more formal term for the relationships between variables that our isOK
methods are verifying is invariants. "Invariant" means "not varying" or
"not changing". There are two kinds of invariant relationships:
- Class invariants relate values of instance variables to one another. These invariants are also known as representation invariants or data invariants. The "not varying" property is set up initially in the class constructors, and should also hold between calls to the other methods. Inside a method call, the invariant relationship may get temporarily invalidated, but it's restored by the time the method exits.
- Loop invariants relate values of variables in a loop or recursion. The "not varying" property is set up the first time at the start of a loop or at the initial call to a recursive method, and should hold at the end of each loop iteration. Within the loop, the invariant relationship may get temporarily invalidated, but it's restored by the end of the iteration.
The Tic-Tac-Toe board consistency checker contains a class invariant. The board class invariant relates the number of X's and O's in the board. After each move, the number of X's or O's will change, but the relationship between them will still hold (not more O's than X's, and no more than one X more than the number of O's).
The date example also contained a class invariant because the date invariant
relates the year, month, and date-in-month. Updating a date object with
something like a setToTomorrow method (code below) may temporarily invalidate
the relationship, but the relationship will be restored prior to exiting
the method.
public void setToTomorrow ( ) {
    myDateInMonth++;
    // This may invalidate the invariant relationship
    // if tomorrow is the first day of the next month.
    if (myDateInMonth > monthLength (myMonth)) {
        myMonth++;
        if (myMonth == 13) {
            myMonth = 1;
        }
        myDateInMonth = 1;  // restore the invariant relationship
    }
}
The buggy number guesser contains an example of a loop invariant. The invariant related the value-to-be-guessed to the range of values that could contain it, and to the sequence of previous guesses. (The bug in the code resulted from incorrectly maintaining that relationship.)
Loop Invariants with Array Processing
Here is a common invariant pattern that shows up in array processing. The
processing involves a loop. In this case, the array is called values:
for (int k = 0; k < values.length; k++) {
    Process element k of values.
}
Often the processing of element k consists of including it somehow among elements 0, 1, ..., k–1. The loop invariant property says something about the first k elements or elements 0, 1, ..., k. Thus the invariant pattern is:
for (int k = 0; k < values.length; k++) {
// At this point, the invariant is valid for the subarray
// that contains elements 0, 1, ..., k–1 of values.
Process element k of values.
// At this point, the invariant is valid for the subarray
// that contains elements 0, 1, ..., k of values.
}Loop Invariant Example: Moving X's to Precede O's
Suppose we have a character array that contains X's and O's, and we want to rearrange the contents of this array so that all the X's precede all the O's, as shown in the example below:

One way to do this is to loop through the array with an index variable named
k, maintaining the invariant that all the X's in the first k elements precede
all the O's. We must also keep track of the position of the last X among
those elements; we'll call that lastXpos. Each loop iteration will start by
examining element k. If it's an O, the invariant is easy to extend, as shown
below.
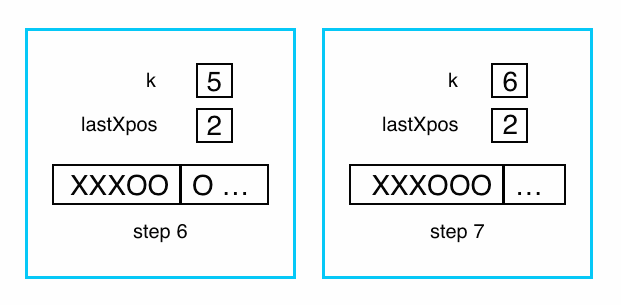
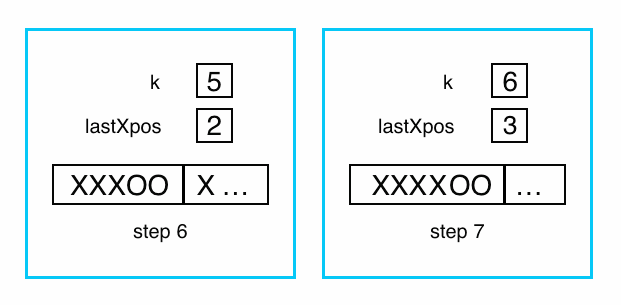
The more complicated case is when element k is an X. To restore the
invariant, we exchange element k with the position of the first O, as in
the following diagram.
Incidentally, a similar algorithm is used in the Quicksort sorting method that will be covered later in this course.
In the XsBeforeOs class, fill out the isOK method. Given a char array
values and an index variable k, isOK should check that in the first k
elements of values all the Xs precede all the Os. If this consistency
check is not satisfied, isOK should throw an IllegalStateException,
which is built into Java.
After you have completed this method. Compile and run using the instructions provided earlier in the lab. Your code should pass two tests.
Now complete the rearrange method based on the framework given in the
XsBeforeOs class. After completing this method, remove the two @Ignore
annotations before the two rearrange tests in XsBeforeOsTest.java. Compile
and run again. This time, your code should pass all four tests and should not
be printing any error messages.
Exercise: Insertion Sort
Here's another application of the same pattern to sorting the elements of an array. The algorithm is called insertion sort. We will revisit it later. Pseudocode appears below.
for (int k = 1; k < values.length; k++) {
    // Elements 0 through k-1 are in nondecreasing order:
    //   values[0] <= values[1] <= ... <= values[k-1].
    // Insert element k into its correct position, so that
    //   values[0] <= values[1] <= ... <= values[k].
    ...
}
Here's how insertion sort is supposed to work. At the start of the kth time
through the loop, the leftmost k elements of the values array are in order.
The loop body inserts values[k] into its proper place among the first k
elements (probably moving some of those elements up one position in the array),
resulting in the first k+1 elements of the array being in order. The table
below shows a sample array being sorted.
| k | array at start of loop body | array at end of loop body | comments |
|---|---|---|---|
| 1 | 3, 1, 5, 4, 2 | 1, 3, 5, 4, 2 | first two elements in order |
| 2 | 1, 3, 5, 4, 2 | 1, 3, 5, 4, 2 | first three elements in order |
| 3 | 1, 3, 5, 4, 2 | 1, 3, 4, 5, 2 | first four elements in order |
| 4 | 1, 3, 4, 5, 2 | 1, 2, 3, 4, 5 | whole array in order |
Open InsertionSort.java. While this class compiles as we've presented it to
you, it doesn't yet work correctly. The bodies of the methods insert and
isOK are both missing.
Before filling out the isOK and insert methods, open InsertionSortTest.java
and create three additional tests. Examples are given for you. After you have
finished writing your tests, continue to fill out the isOK and insert
methods.
Given an array of ints named list and an index k into the array, isOK
should throw an IllegalStateException when elements 0 through k of list
are not sorted in increasing order. It does nothing if they are sorted
correctly. In the case where k is negative or k exceeds the maximum list
index, isOK should also throw an exception.
Also fill in the body for the insert method, which takes the kth element
of a array and inserts it correctly into the array so that the first k + 1
elements are sorted correctly.
After you have filled out both methods, compile and run the tests. You should pass all six tests, three of which were provided by us and three of which were written by you and your partner.
H. Conclusion
Summary
The second half of lab activities for today included two applications of exceptions. One is checking user input in multiple fields for correctness. Our solution involves cascading tests, first for null input, then empty input, then incorrectly formatted input (too few or too many fields), then incorrect values within a field.
The other is checking internal state of an object for consistency. We saw several examples of "isOK" methods, which check that internal information for the objects is logically consistent. Some of these checks involve class invariant relations (e.g. in the TicTacToe and Date classes), while others involve loop invariant relations (the number-guessing code, the "moving X's to precede O's" code, and insertion sort). We observed a pattern for loop invariants among array values:
for (int k=0; k<values.length; k++){
    // At this point, the invariant is valid for the subarray
    // that contains elements 0, 1, ..., k-1 of values.
    Process element k of values.
    // At this point, the invariant is valid for the subarray
    // that contains elements 0, 1, ..., k of values.
}
Submission
Push your files to github to submit.