
This guide assumes a basic understanding of the command line on your computer. If you’ve never used the command line, first Learn to Use the Terminal in the setup lab.
Version Control Systems
Version control systems are tools to keep track of changes to files over time. Version control allows you to view or revert back to previous iterations of files. Some aspects of version control are actually built into commonly used applications. Think of the undo command or how you can see the revision history of a Google Doc.
In the context of coding, version control systems can track the history of code revisions, from the current state of the code all the way back until it was first tracked. This allows users to reference older versions of their work and share code changes with other people, like fellow developers.
Git
Git is a distributed version control system as opposed to a centralized version control system. This means that every developer’s computer stores the entire history (including all old versions) of the entire project!
We call the entire history of an entire project a repository. The fact that the repository is stored locally leads to our ability to use Git locally on our own computers, even without an internet connection.
The lab computers already have Git installed on the command line, and the setup lab guide explains how to install git on your own computer.
Local Repositories (Narrative)
Let’s go through a narrative example of how we might use git. We’ll be using lots of unfamiliar terms and ideas in this story.
See also the video version of this narrative example.
Suppose we want to store text files containing recipes of various foods, and we’d like to keep track of the history of these recipes as we change them. We might start by creating directories for both seitan and tofu recipes, and then create text files for each recipe.
If you’re following along by typing everything out, you’ll want to use your favorite text editor instead of
subl. Atom is popular amongst students.
$ cd /users/sandra
$ mkdir recipes
$ cd recipes
$ mkdir seitan
$ mkdir tofu
$ cd seitan
$ subl smoky_carrot_tahini_seitan_slaw.txt
$ subl boiled_seitan.txt
$ cd ../tofu
$ subl kung_pao_tofu.txt
$ subl basil_ginger_tofu.txt
Now we have four recipes, two for tofu, and two for seitan. To set up our git repository to store the histories of our recipes as they evolve, we’d use the following commands:
$ cd /users/sandra/recipes
$ git init
What git init does is tells the git version control system that we want to track the history of the current directory, in this case /users/sandra/recipes. However, at this point NOTHING IS STORED IN THE REPOSITORY.
It’s like we’ve purchased a safe, but we haven’t put anything inside it yet.
To store everything in the repository, we need to first add files. For example, we might do the following:
$ git add ./tofu/kung_pao_tofu.txt
Now here’s where git is going to start seeming weird. Even after calling the add command, we still haven’t stored our recipe in the repository (i.e. in the safe).
Instead, what we’ve done is added kung_pao_tofu.txt to the list of files to track (i.e. to be added to the safe later). The idea is that you might not want to necessarily track every single file in the /users/sandra/recipes folder, so the add command tells git which ones it should be tracking. We can see the effect of this command by using the git status command.
$ git status
In which case, you’d see the following in response:
On branch master

Initial commit

Changes to be committed:
  (use "git rm --cached <file>..." to unstage)

    new file:   tofu/kung_pao_tofu.txt

Untracked files:
  (use "git add <file>..." to include in what will be committed)

    seitan/
    tofu/basil_ginger_tofu.txt
The “changes to be committed” portion of the output lists all files that are currently being tracked and whose changes are ready be committed (i.e. that are ready to be put in the safe). We also see that there are some untracked files, namely the seitan folder, and the tofu/basil_ginger_tofu.txt file. These are untracked because we have not added them using git add.
Let’s try adding tofu/basil_ginger_tofu.txt, and check the status once more:
$ git add ./tofu/basil_ginger_tofu.txt
$ git status
On branch master

Initial commit

Changes to be committed:
  (use "git rm --cached <file>..." to unstage)

    new file:   tofu/basil_ginger_tofu.txt
    new file:   tofu/kung_pao_tofu.txt

Untracked files:
  (use "git add <file>..." to include in what will be committed)

    seitan/
We see that both tofu recipes are tracked, but neither seitan recipe is tracked. We will next use the commit command to stick copies of our tofu recipes into the repository (i.e. into the safe). To do this, we use the git commit command, as shown below:
$ git commit -m "added tofu recipes"
When executed, the commit command stores a snapshot of all added files (i.e. current tofu recipes) into the repository. Because we did not use git add on the seitan recipes, they were not included in the snapshot that was placed in the repository. This snapshot of our work is now safe forever and ever (as long as our computer’s hard drive doesn’t fail or we don’t damage the secret repository files). The -m command lets us add a message to the commit, so we can remember what was most important about this commit.
Another way of thinking about the process is that it’s like taking a panoramic picture on a camera. The
addcommand captures one portion of the image, and thecommitcommand stitches all “added” items together into a single panorama and then stores the panorama in the safe. And just as a panorama only includes the images you took, the commit command only saves those files which have been added using theaddcommand (and not all files in the recipes directory).
After using commit, you’ll note that git status no longer lists files under “changes to be committed.” This is similar to how after you finish taking a panoramic photo, all of the temporary tiny image files are thrown away. The result of git status at this point is shown below:
$ git status
On branch master
Untracked files:
  (use "git add <file>..." to include in what will be committed)

    seitan/

nothing added to commit but untracked files present (use "git add" to track)
If you go looking at the files in the tofu folder, you’ll see that the commit process did NOT affect the original files on our computer. This is much like how when you take a panoramic photo of your friends, they do not get sucked into a cyber hellscape inside your phone.
We can see evidence of our snapshot by using the special git log command.
$ git log

commit 9f955d85359fc8e4504d7220f13fad34f8f2c62b
Author: Sandra Upson <sandra@Sandras-MacBook-Air.local>
Date:   Sun Jan 17 19:06:48 2016 -0800

    added tofu recipes
That giant string of characters 9f955d... is the ID of the commit. We can use the git show command to peek inside of this commit.
$ git show 9f955d85359fc8e4504d7220f13fad34f8f2c62b

commit 9f955d85359fc8e4504d7220f13fad34f8f2c62b
Author: Sandra Upson <sandra@Sandras-MacBook-Air.local>
Date:   Sun Jan 17 19:06:48 2016 -0800

    added tofu recipes

diff --git a/tofu/basil_ginger_tofu.txt b/tofu/basil_ginger_tofu.txt
new file mode 100644
index 0000000..9a56e7a
--- /dev/null
+++ b/tofu/basil_ginger_tofu.txt
@@ -0,0 +1,3 @@
+basil
+ginger
+tofu
diff --git a/tofu/kung_pao_tofu.txt b/tofu/kung_pao_tofu.txt
new file mode 100644 index
0000000..dad9bd9
--- /dev/null
+++ b/tofu/kung_pao_tofu.txt
@@ -0,0 +1,3 @@
+szechuan peppers
+tofu
+peanuts
+kung
+pao
The git show command lets us peer right into the beating heart of a commit. We don’t expect all of its innards to make sense to you, but you can maybe glean that the commit is a snapshot of both the names and contents of the files.
Suppose we now want to revise our kung pao recipe, because we decided it should have bok choy in it.
$ subl ./tofu/kung_pao_tofu.txt
The changes we just made to kung_pao_tofu.txt are not saved in the repository. In fact, if we do git status again, we’ll get:
$ git status

On branch master
Changes not staged for commit:
  (use "git add <file>..." to update what will be committed)
  (use "git checkout -- <file>..." to discard changes in working directory)

    modified:   tofu/kung_pao_tofu.txt

Untracked files:
  (use "git add <file>..." to include in what will be committed)

    seitan/
You might think to yourself “OK, I’ll just commit again”. However, if we try to commit, git will say that there’s nothing to do:
$ git commit -m "added bok choy"

On branch master
Changes not staged for commit:
    modified:   tofu/kung_pao_tofu.txt

Untracked files:
    seitan/

no changes added to commit
This is because even though kung_pao_tofu.txt is being tracked, we have not staged our changes for commit. To store our changes in the repository, we first need to use the add command again, which will stage the changes for commit (or in other words, we need to take a picture of our new kung_pao_tofu.txt before we can create the new panorama that we want to put in the safe).
$ git add ./tofu/kung_pao_tofu.txt
$ git status

On branch master
Changes to be committed:
  (use "git reset HEAD <file>..." to unstage)

    modified:   tofu/kung_pao_tofu.txt

Untracked files:
  (use "git add <file>..." to include in what will be committed)

    seitan/
We see that our change to kung_pao_tofu.txt is now “to be committed”, meaning that the next commit will include changes to this file. We commit just like before, and use git log to see the list of all snapshots that have been taken.
$ git commit -m "added bok choy"
$ git log

commit cfcc8cbd88a763712dec2d6bd541b2783fa1f23b
Author: Sandra Upson <sandra@Sandras-MacBook-Air.local>
Date:   Sun Jan 17 19:24:45 2016 -0800

    added bok choy

commit 9f955d85359fc8e4504d7220f13fad34f8f2c62b
Author: Sandra Upson <sandra@Sandras-MacBook-Air.local>
Date:   Sun Jan 17 19:06:48 2016 -0800

    added tofu recipes
We now see that there are TWO commits. We could again use show to see what changed in cfcc8c..., but we won’t in this guide.
Suppose we later decide bok choy is gross. We can roll back our files using the checkout command, as shown below:
$ git checkout 9f955d85359fc8e4504d7220f13fad34f8f2c62b ./recipes/tofu
Think of the checkout command as a robot that goes to our safe, figures out what the tofu recipe looked like back when the newest panorama was 9f955d..., and finally rearranges everything in the actual recipes/tofu folder so that it is exactly like it was at the time snapshot 9f955d... was created. If we now look at the contents of recipes/tofu/kung_pao_tofu.txt after running this command, we’ll see that bok choy is gone (phew)!
szechuan
peppers
tofu
peanuts
kung
pao
The checkout command does not change the commit history!
Or, in other words, the safe containing our panoramic photos is entirely unaffected by the checkout command. The entire point of git is to create a log of everything that has EVER happened to our files. If you took a panoramic photo of the Bay Area once in 2014 and again in 2015, and put both photos in a safe, and then decided in 2016 to restore the state of the safe from 2014, you would not set the panoramic photo from the year 2015 on fire. Nor would a picture of it in 2016 magically appear inside your safe. If you wanted to record what it looked like in 2016, you’d need to take another photo (with the appropriate -m message to remember what you just did).
Make sure to always specify a file (or directory) when you use checkout. Otherwise, you’re using a more powerful version of checkout that will probably confuse you. If that should happen, see the git-WTFS (git weird technical failure scenarios).
If we want to actually commit a snapshot of the newest kung pao tofu (which no longer has bok choy), we’d have to commit:
$ git commit -m "went back to the original recipe with no bok choy"
$ git log

commit 4be06747886d0a270bf1d618d58f3273f0219a69
Author: Sandra Upson <sandra@Sandras-MacBook-Air.local>
Date:   Sun Jan 17 19:32:37 2016 -0800

    went back to the original recipe with no bok choy

commit cfcc8cbd88a763712dec2d6bd541b2783fa1f23b
Author: Sandra Upson <sandra@Sandras-MacBook-Air.local>
Date:   Sun Jan 17 19:24:45 2016 -0800

    added bok choy

commit 9f955d85359fc8e4504d7220f13fad34f8f2c62b
Author: Sandra Upson <sandra@Sandras-MacBook-Air.local>
Date:   Sun Jan 17 19:06:48 2016 -0800

    added tofu recipes
We could then use show to see the contents of this most recent commit.
$ git show 4be06747886d0a270bf1d618d58f3273f0219a69

commit 4be06747886d0a270bf1d618d58f3273f0219a69
Author: Sandra Upson <sandra@Sandras-MacBook-Air.local>
Date:   Sun Jan 17 19:32:37 2016 -0800

    took boy choy out gross

diff --git a/tofu/kung_pao_tofu.txt b/tofu/kung_pao_tofu.txt
index 35a9e71..dad9bd9 100644
--- a/tofu/kung_pao_tofu.txt
+++ b/tofu/kung_pao_tofu.txt
@@ -1,4 +1,3 @@
szechuan
peppers
tofu
peanuts
kung
pao
-bok choy
\ No newline at end of file
Not very important note: The very attentive reader may have noticed that I did not use git add before I committed the removal of bok choy. This is because of the funny fact that checkout actually also does an automatic git add on any files that change as a result of the rollback.
This is the foundation of git. To summarize, using our photo analogy:
git init- Creates a box in which to permanently store panoramic pictures.
git add- Takes a temporary photo of one thing that can be assembled into a panoramic photo later.
git commit- Assembles all available temporary photos into a panoramic photo. Also destroys all temporary photos.
git log- Lists all the panoramic photos we’ve ever taken.
git show- Looks at what is in a particular panoramic photo.
git checkout- Rearranges files back to how they looked in a given panoramic photo. Does not affect the panormiac photos in your box in any way.
There’s more to learn about git, but before we get there, let’s give a more formal explanation of what we’ve just done.
Local Repositories (Technical)
Initialization
Let’s first start off with the local repository. As mentioned above, a repository stores files as well as the history of changes to those files. In order to begin, you must initialize a Git repository by typing the following command into your terminal while in the directory whose history you want to store in a local repository. If you’re using Windows, you should be using a Git Bash terminal window while you type these commands.
$ git init
How does Git keep track of the repository’s history? When you initialize a Git repository, Git creates a .git subdirectory. Inside this (normally hidden) directory, git will store the snapshots of the along with additional information about each file. You’ll never need to actually open the contents of this .git directory, and you should definitely not change anything inside directly!
Tracked vs. Untracked Files
Git repos start off not tracking any files. In order to save the revision history of a file, you need to track it. The Git documentation has an excellent section on recording changes.
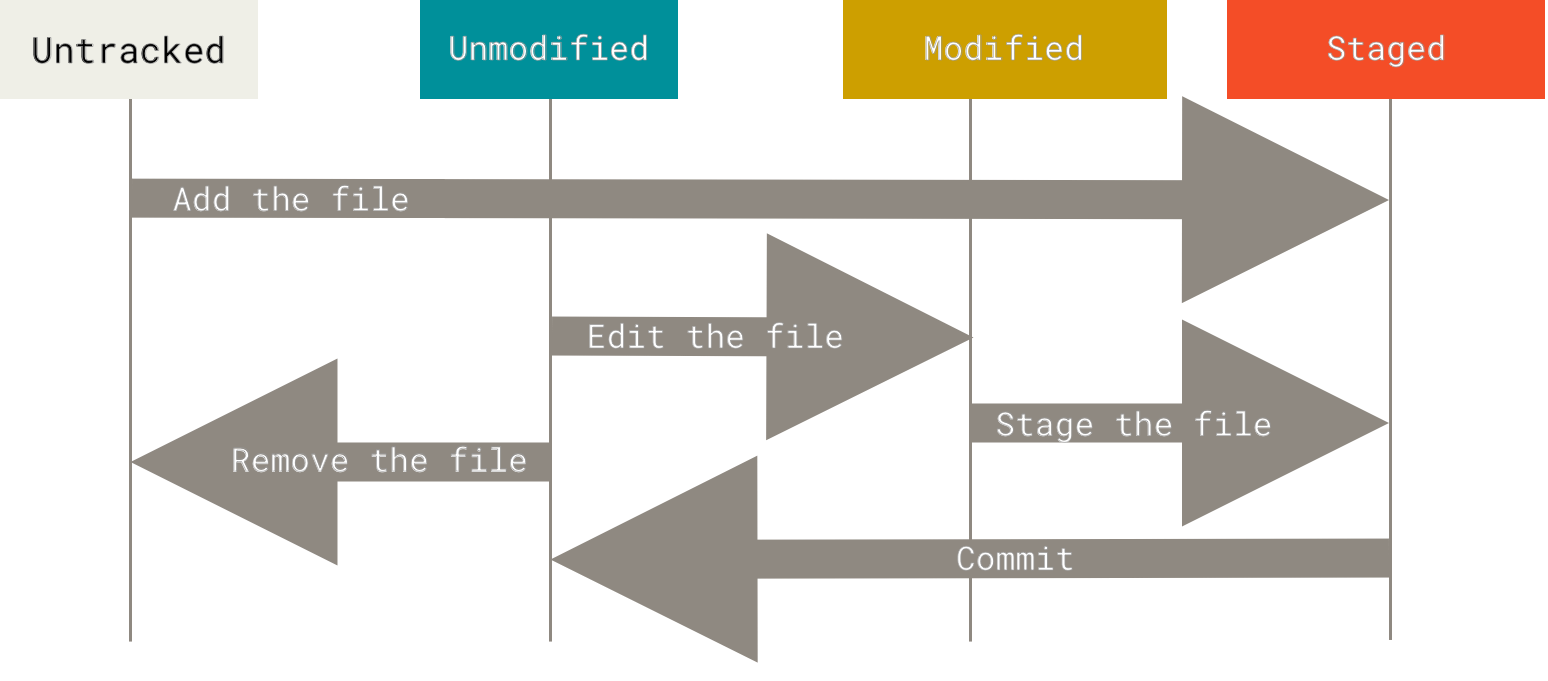
As this figure shows, files fall into two main categories:
- Untracked files
- These files have either never been tracked or were removed from tracking. Git is not maintaining history for these files.
- Tracked files
- These files have been added to the Git repository and can be in various stages of modification: unmodified, modified, or staged.
-
An unmodified file is one that has had no new changes since the last version of the files was added to the Git repo.
-
A modified file is one that is different from the last one Git has saved.
-
A staged file is one that a user has designated as part of a future commit (usually through use of the
git addcommand). We can think of these as files which have lights shining upon them.
-
The following Git command allows you see the status of each file, i.e. whether it is untracked, unmodified, modified, or stageds:
$ git status
The git status command is extremely useful for determining the exact status of each file in your repository. If you are confused about what has changed and what needs to be committed, it can remind you of what to do next.
Staging & Committing
A commit is a specific snapshot of your working directory at a particular time. Users must specify what exactly composes the snapshot by staging files.
The add command lets you stage a file (called FILE in the example below).
$ git add FILE
Once you have staged all the files you would like to include in your snapshot, you can commit them as one block with a message.
$ git commit -m MESSAGE
Your message should be descriptive and explain what changes your commit makes to your code. You may want to quickly describe bug fixes, implemented classes, etc. so that your messages are helpful later when looking through your commit log.
In order to see previous commits, you can use the log command:
$ git log
The Git reference guide has a helpful section on viewing commit history and filtering log results when searching for particular commits. It might also be worth checking out gitk, which is a GUI prompted by the command line.
As a side note on development workflow, it is a good idea to commit your code as often as possible. Whenever you make significant (or even minor) changes to your code, make a commit. If you are trying something out that you might not stick with, commit it (perhaps to a different branch, which will be explained below).
Rule of Thumb: If you commit, you can always revert your code or change it. However, if you don’t commit, you won’t be able to get old versions back. So commit often!
Undoing Changes
The Git reference has a great section on undoing things Please note that while Git revolves around the concept of history, it is possible to lose your work if you revert with some of these undo commands. Thus, be careful and read about the effects of your changes before undoing your work.
- Unstage a file that you haven’t yet committed
-
$ git reset HEAD [file]This will take the file’s status back to modified, leaving changes intact. Don’t worry about this command undoing any work. This command is the equivalent of deleting one of the temporary images that you’re going to combine into a panorama.
Why might we need to use this command? Let’s say you accidentally started tracking a file that you didn’t want to track. (an embarrassing video of yourself, for instance.) Or you were made some changes to a file that you thought you would commit but no longer want to commit quite yet.
- Amend latest commit (changing commit message or add forgotten files)
-
$ git add [forgotten-file]
$ git commit --amend
Please note that this new amended commit will replace the previous commit.
- Revert a file to its state at the time of the most recent commit
-
$ git checkout -- [file]This next command is useful if you would like to actually undo your work. Let’s say that you have modified a certain
filesince committing previously, but you would like your file back to how it was before your modifications.Note: This command is potentially quite dangerous because any changes you made to the file since your last commit will be removed. Use this with caution!
If you’re working on lab 1, return and do the Git Exercise.
Remote Repositories
One especially handy feature of git is the ability to store copies of your repository on computers other than your own. Recall that our snapshots are all stored on our computer in a secret folder. That means if our computer is damaged or destroyed, so are all our snapshots.
Suppose we wanted to push our tofu and seitan recipes to another computer, we’d typically use the following command.
$ git push origin master
However, if we tried that out, we’d simply get the message below:
fatal: 'origin' does not appear to be a git repository
fatal: Could not read from remote repository.

Please make sure you have the correct access rights and the repository exists.
This is because we have not yet told git where to send the files. As it happens, there is a for-profit private company called GitHub that has made a business out of storing copies of people’s repositories. Their business model is simple: You pay them to store your repositories, though they let you have free repositories if you leave it open to the world, or if you’re a student.
In this course, we’ll use GitHub to store our repositories. To create a repository on GitHub, you’d probably use their web interface. We’ll help you do this during the setup lab.
The most important remote repository commands are listed below, along with a technical description that might not make sense yet. If you’re working on lab 1, head back to the lab to learn more about these commands.
git clone [remote-repo-URL]- Makes a copy of the specified repository, but on your local computer. Also creates a working directory that has files arranged exactly like the most recent snapshot in the download repository. Also records the URL of the remote repository for subsequent network data transfers, and gives it the special remote-repo-name “origin”.
git remote add [remote-repo-name] [remote-repo-URL]- Records a new location for network data transfers.
git remote -v- Lists all locations for network data transfers.
git pull [remote-repo-name] master- Get the most recent copy of the files as seen in remote-repo-name
git push [remote-repo-name] master- Pushes the most recent copy of your files to the remote-repo-name.
Other Git Features
There are tons of other cool Git commands. Unfortunately, we need to continue on to discuss remote repositories. Thus, this segment will just list some other interesting features that you are encouraged to explore in your own time:
- Stashing
- Stashing allows you to save your changes onto a stack without making a more permanent commit. It is equivalent to picking up your work-in-progress and placing it in a box to get back to later. In the meantime, your desk is now clean.
Why might you want to use this?
-
Your files may be in a disorganized state, and you don’t want to commit yet, but you also don’t want to get rid of your changes.
-
You modified multiple files, but you dislike your changes and you would just like to get things back to how they were after your most recent commit. Then you can
stashyour code and then drop that stash rather than having to manually revert multiple files. (Be careful with this usage!) -
You modified files but accidentally modified them on the wrong branch. Then you can
stashyour changes, switch branches, and unstash your changes so that they are all in the new branch.
-
- Rewriting History
- Let’s say you want to do more than change your last commit or drop changes to your files before your most recent commit. What if you want to do something crazy like rewrite history? You can change multiple commit messages, split one commit into two, and reorder commits.
- Rebasing
- Rebasing changes the parent commit of a specific commit. In doing this, it changes the commits so that it is no longer the same.
Rebasecan be used as an alternative tomergefor integrating changes from one branch to another. It is quite different frommergein thatmergecreates a new commit that has both parent branch commits as parents. Rebasing takes one set of commits from a branch and places them all at the end of the other branch.There are different reasons why you would want to use
mergeversusrebase. One of these reasons is thatrebaseleads to a cleaner history when working with many different branches and team members. - Reset
- Perhaps you decide that you want things to be how they were a certain number of commits ago. You can use
resetif you are absolutely sure that you don’t want the last few commits.Resetis quite a nuanced command, so read carefully before attempting use. - Revert
Revertallows you to reverse the changes introduced by certain commits by recording new commits to undo the changes. This is a safer option that simply throwing away past commits. But again, use this with caution.- Cherry Pick
Cherry pickallows you to apply the changes introduced by some existing commits. For example, if you have two different branches, and your current branch lacks one or two commits that would be helpful but are only in the other branch, then you cancherry pickto grab those commits without merging or rebasing to get all the commits.
There are far more features and commands not mentioned here. Feel free to explore more and search for answers. There most likely exists a Git command for nearly everything you would want to do.
Supplementary Reading
For those of you who found this topic interesting, check out these extra resources! Keep in mind, however, that the best way to learn to use Git effectively is to just start incorporating it into your own coding workflow!
-
Git Documentation is really quite good and clear, and there is a great Pro Git book by Scott Chacon. Now that you’ve completed this introductory guide, a good place to pickup from is the section on Working with Remotes.
-
Hacker’s Guide to Git is a very friendly introduction to how Git works. It gives a peek at the structure of commits & branches and explains how some commands work.
-
Learn Git Branching is a fun and interactive tutorial that visualizes Git commands.