
Before You Begin
Make sure you’re familiar with conditionals and loops from the Java introduction before beginning this lab!
For this lab, we’ll continue to use the the text editor we installed in lab 1. If you’ve been working ahead, don’t start using IntelliJ just yet.
At the beginning of every lab, we’ll ask that you first get the latest starter code from the skeleton. Run the following command in your terminal from your su18-** Git repository directory.
$ git pull skeleton master
In addition, for this lab, we’ll be picking up a lot of terminology. We’ve done our best to be careful and precise, and we’ll bold terms that are important to help highlight differences and key terms. While it’s not necessary to memorize the terms, it’s important to understand how each term differs from each other term especially for some of the trickier terms for variables and references.
Find A Partner
Introduce yourself another student in class, someone you don’t already know.
The subsequent activities in today’s lab and almost all of the lab activities later in the course involve collaboration with one of your classmates.
Why do we care about collaboration? Why don’t we just let you work by yourself? There are several reasons.
- Collaborating allows you to solve bigger problems faster than you can alone.
- In industry, to make really cool things, you’ll have to be working on a team.
- Collaborating is hard!
- But see the previous point—to do really cool stuff you need to collaborate.
- Industry is continually telling Berkeley that our graduates aren’t good enough
- at working in teams.
- Collaboration is a vital aspect of life after college. Both careers in industry and in academia require significant amounts of collaboration. We need to be doing more of this.
- Several of the upper-division programming courses involve large team projects.
- If you haven’t learned good collaboration techniques by then, you’re liable to doom your team.
- All the projects in CS 61BL will be done in partnership.
- Since these are bigger commitments, the lab staff will help you find a good match.
- You learn more than you would on your own through collaboration.
-
- Explaining a concept to someone helps you understand it better.
- Having a concept explained to you might provide you with different and more productive ways of understanding the concept.
- Explaining a program to someone else can help you find its bugs.
- Working with someone else helps you identify your own strengths and weaknesses.
Finally, collaboration not only can be helpful to learning, but fun! You can make new friends who will make good partners in future courses and supporters both on campus and beyond.
Effective Collaboration
As you meet different students in lab this week, think about what qualities helped each partnership and which kinds of collaboration activities are the most effective for each situation.
In the Collaboration guide, we list a few possibilities and help answer questions. In short, our best experience with collaboration was through writing the code together.
- Writing the code together.
- There are many styles for writing code together, but they mostly involve two programmers sharing a single computer. We suggest a pair programming approach where one person types the code while the other person checks their work as they go along. Partners then switch off every so-often. This method is especially helpful when working on a complex problem with many interacting components: the ‘navigator’ can help reduce the cognitive load on the ‘driver’ and catch any painful bugs before they cause problems.
You might also want to experiment with other ways to collaborate while sharing the same computer.
In general, we think more communication and setting expectations can help any team become more effective. The lab staff will be proactive in helping ensure partnerships are as successful as possible. Lab assistants might also have their own experiences with working in groups, so feel free to use them as resource as well!
Learning Goals
This lab will also focus on formalizing our Java notional machine by developing our mental models for how variables and objects behave.
- Learn the line-by-line execution model.
- Learn the difference between Java primitives and reference types.
- Learn how to use box-and-pointer diagrams to visualize program state.
- Learn how to think about the two sides of Java: Java, the compiler, and Java, the runtime evaluator.
We’ll use several exercises to demonstrate this. First, we will enhance a bank account class by providing deposit and withdraw functionalities. We will additionally code how to merge accounts and provide overdraft protection.
Next, we will be coding our own object to represent pursuit curves, a powerful way of rendering paths on a computer. Make sure to read this lab carefully as it will explain important design practices that will help develop your Java and general coding skills!
Discussion: Warming Up
These exercises are adapted from our optional Java textbook, Head First Java.
Dog Goes Bark
Without using a computer to help you, discuss with your partner what each line of code below will do. Come up with a shared definition for each line.
Check with a neighboring partnership if you’re not sure about any these lines.
int size = 27;
String name = "Fido";
Dog myDog = new Dog(name, size);
int x = size - 5;
if (x < 15) {
    myDog.bark(8);
}

while (x > 3) {
    x -= 1;
    myDog.play();
}

int[] numList = {2, 4, 6, 8};
System.out.print("Hello ");
System.out.println("Dog: " + name);

System.out.println(numList[1]);
if (numList[3] == 8) {
    System.out.println("potato");
}
A Jigsaw Puzzle
Working again with your lab partner, assemble the following parts plus as many right braces as necessary into a complete program that, when run, produces the output
a-b c-d
public class Jigsaw {
    public static void main(String[] args) {
        // (1)
        if (x == 1) {
            System.out.print("d");
            x = x - 1;
        }

        // (2)
        if (x == 2) {
            System.out.print("b c");
        }

        // (3)
        public class Shuffled {
            public static void main(String[] args) {

        // (4)
        if (x > 2) {
            System.out.print("a");
        }

        // (5)
        int x = 3;

        // (6)
        x = x - 1;
        System.out.print("-");

        // (7)
        while (x > 0) {
    }
}
You may do this either on paper or the online Java Visualizer.
Then, discuss and write down in your lab notebook what you learned about Java or your problem-solving process in the last step.
Here are some ideas:
- How did you go about solving the “jigsaw puzzle” of the previous step?
- What caused the most trouble or confusion?
- How did working in a partnership help?
Primitive Types
When initializing a variable in Java you must put the type next to it.
int number = 10;
The above line tells Java that the variable number is an integer that holds the value 10. Types represent things such as integers and decimals and are fundamental to the operation of a language. In Java, there are a predefined set of primitive types. The ones we care about are,
boolean- A
booleanrepresents the two possible values oftrueandfalse. int- An
intrepresents a 32-bit integer. This is the most commonly used integer numeric type and can hold values between about negative 2 billion to positive 2 billion. (Formally, that’s . You’ll learn about the ‘minus 1’ in CS 61C.) long- A
longrepresents a 64-bit integer. We uselongto express large integer numbers as it can hold values between about negative 9 quintillion to positive 9 quintillion. (Formally, . That’s about the range ofintsquared.) double- A
doublerepresents a 64-bit “double precision floating point number” which can be used to represent decimal numbers. There is also afloattype for 32-bit floating point numbers, but we don’t use it very often because it turns out to be too imprecise for a large number of uses. (Again, more in CS 61C.) char- A
charrepresents an ASCII letter, like the English alphabet.
These words are reserved in Java: we cannot use int and double in any other context besides declaring a variable of that type. Note that all primitives begin with a lowercase letter.
Declaring a primitive is very simple. For example, if we wanted to declare a double, we can write the following.
double pi = 3.14;
Certain primitives require an extra letter after the initial value. To initialize a long (explicitly), we write the following.
long num = 9223372036854775807L;
Finally, we can declare a char using a single-quoted literal. If we want to initialize variable a to the letter ‘a’, we would write the following.
// 'a', not "a"!
char a = 'a';
We don’t always need to initialize the value of a primitive. Sometimes it is useful to just declare a variable and let later blocks of code determine its value. We do so by writing the following.
char a;
double d;
int i;
Objects
Read Chapter 1.2 of the online textbook.
We’ve added a few notes and caveats in each subsection below. You don’t need to memorize these details and you won’t be tested on these definitions directly on an exam, but they’re helpful to know when programming in Java and solving code-writing or analysis questions. You might want to write some of these down for reference later in your lab notebook.
Instance Variables
- Default values
- Types have default values which are given by default when a variable is not initialized in the constructor. These defaults correspond to a zero value. 0 for
int,long,double; false forboolean, andnullfor object types includingString.
public class Dog {
    public int weightInPounds;
    public String name;

    public static void main(String[] args) {
        Dog d;
        d = new Dog();
    }
}
Constructors
- Using the
thiskeyword - In certain situations, it’s possible for there to be an instance variable,
weightInPounds, as well as a local variable,weightInPounds. Java defaults to using the local variable for assignment, so this bit of code below won’t work as you might expect. Read about how to solve the problem in the official Java tutorial section on using thethiskeyword.In this respect, Java differs greatly from Python. In Python, we would always have to write
self.weightInPoundsto reference the instance variable, but in Java, there’s a hierarchical lookup procedure: if the name isn’t a local variable, then look in the instance variables (and class variables, as we’ll learn later).public class Dog { public int weightInPounds; public void setWeight(int weightInPounds) { weightInPounds = weightInPounds; } public static void main(String[] args) { Dog d; d = new Dog(); d.setWeight(20); System.out.println(d.weightInPounds); } }
- Default constructors
- If no constructors are defined in the class, then Java will provide a default constructor that accepts no argument. However, if a constructor is defined, then the compiler will not provide a default constructor. Read more about it in the official Java tutorial section on constructors.
In practice, this means that this code will compile since Java provides the default constructor.
public class Dog {
    public int weightInPounds;

    public void makeNoise() {
        if (weightInPounds < 10) {
            System.out.println("yipyipyip!");
        } else if (weightInPounds < 30) {
            System.out.println("bark. bark.");
        } else {
            System.out.println("woof!");
        }
    }
}

public class DogLauncher {
    public static void main(String[] args) {
        Dog d;
        d = new Dog();
        d.weightInPounds = 20;
        d.makeNoise();
    }
}
When we introduce our own constructor, Java no longer provides the default constructor, so this code won’t compile.
public class Dog {
    public int weightInPounds;

    public Dog(int w) {
        weightInPounds = w;
    }

    public void makeNoise() {
        if (weightInPounds < 10) {
            System.out.println("yipyipyip!");
        } else if (weightInPounds < 30) {
            System.out.println("bark. bark.");
        } else {
            System.out.println("woof!");
        }
    }
}

public class DogLauncher {
    public static void main(String[] args) {
        Dog d;
        d = new Dog();
        d.weightInPounds = 20;
        d.makeNoise();
    }
}
Static Variables
A static variable is a variable that all instances share, and are sometimes called class variables as a result. In this course, the static variables we use will almost always be declared static final. The final keyword means that the value of the variable never changes: it’s a constant.
For example, in the Dog class, we would want to make the binomen a static final variable because this variable is a constant. We want all instances of the Dog class to share this one class variable.
public class Dog {
    public int weightInPounds;
    public static final String binomen = "Canis familiaris";
    ...
}
If you’re in a situation where you think you’d want to use a static variable, it’s important to try to figure out what underlying problem needs to be solved. Often, the problem is information sharing: one object needs to access the data found in another object.
Let’s say we’re trying to change the weight of a dog from our animal shelter. We could change the weightInPounds to be a static variable, and the program will work as expected.
public class AnimalShelter {
    public void feedDog(int foodWeightInPounds) {
        Dog.weightInPounds += foodWeightInPounds;
    }
}

public class Dog {
    public static int weightInPounds;
    ...
}
However, this tends to make code more brittle and hard to maintain. How does this change impact the behavior of maxDog?
public class Dog {
    public static int weightInPounds;

    public Dog maxDog(Dog d2) {
        if (this.weightInPounds > d2.weightInPounds) {
            return this;
        }
        return d2;
    }
}
The alternative (and better) implementation for AnimalShelter is to pass in a Dog as an argument.
public class AnimalShelter {
    public void feed(Dog d1, int foodWeightInPounds) {
        d1.weightInPounds += foodWeightInPounds;
    }
}

public class Dog {
    public int weightInPounds;
    ...
}
Examples in the real-world aren’t usually as clear-cut as this, so make sure to question the design decisions that go into choosing whether a variable should be static or non-static because these bugs can get very expensive to fix once a lot of code has been written!
We’ll touch on more of these design pitfalls in a later lab, but know that we’ll almost always use static final variables in this course.
Box and Pointer Diagrams
For this section, we’re going to jump around the textbook slightly. Read Chapter 2.1 of the online textbook up until the Law of the Broken Futon which is a fun, but not required read.
There’s a lot of material here, so discuss with your partner as you work through the exercises.
If the section on Instantiation of Arrays feels a little foreign to you, review the section on Array Instantiation, Arrays of Objects from Chapter 1.2.
Throughout this class it will be extraordinarily helpful to visualize the the state of variables and changes to objects during the execution of code. The diagrams we’ll teach you to use in this class are often referred to as box and pointer diagrams, or sometimes box and arrow diagrams. These are similar to, but less structured than environment diagrams from CS 61A.
Discussion: Drawing Objects
For practice, draw the box-and-pointer diagram that results from evaluating the following code.
public class Pokemon {
    public String name;
    public int level;

    public Pokemon(String name, int level) {
        this.name = name;
        this.level = level;
    }

    public static void change(Pokemon poke, int level) {
        poke.level = level;
        level = 50;
        poke = new Pokemon("Gengar", 1);
    }

    public static void main(String[] args) {
        Pokemon p = new Pokemon("Pikachu", 17);
        int level = 100;
        change(p, level);
        System.out.println("Name: " + p.name + ", Level: " + p.level);
    }
}
Discuss with your partner to see if you can come up with the intuition as to why these diagrams are drawn the way they are. Try to answer these questions using knowledge we’ve learned from the online textbook.
- Why does it make sense that objects are not stored inside variables, but are only referred by them?
- Why does it make sense that objects are not drawn inside other objects?
- Why aren’t objects on the right-hand side of the diagram labeled with the name of the variable that it’s assigned to?
There aren’t necessarily correct answers to these question, so just see if you can come up with explanations that make sense to you.
Exercise: Account Management
If you haven’t gotten the latest skeleton files, do so now by running the following command from your
su18-**Git repository.$ git pull skeleton master
The next several exercises involve modifications to an Account class, which models a bank account. The file you will be working with is Account.java.
The Account class allows deposits and withdrawals. Instead of warning about a balance that’s too low, however, it merely disallows a withdrawal request for more money than the account contains.
Modifying Withdrawal Behavior
The withdraw method is currently defined as a void method. Modify it to return a boolean: true if the withdrawal succeeds (along with actually performing the withdrawal) and false if it fails.
Merging Accounts
Define a merge method. This method should transfer all of the money from the argument account to the current account. In other words, the argument account balance should be zeroed while the current account’s balance increases by the argument’s old balance. We’ve provided a skeleton of the method in Account.java.
Overdraft Protection
A convenient feature of some bank accounts is overdraft protection: rather than bouncing a check when the balance would go negative, the bank will deduct the necessary funds from a second account. One might imagine such a setup for a student account, provided the student’s parents are willing to cover any overdrafts (!). Another use is to have a checking account that is tied to a savings account where the savings account covers overdrafts on the checking account. In our system, we’ll be keeping things simple with only one type of account so we don’t have to worry about student or savings accounts.
Implement and test overdraft protection for Account objects by completing the following steps.
- Add a
parentAccountinstance variable to theAccountclass; this is the account that will provide the overdraft protection, and it may have overdraft protection of its own. - Add a two-argument constructor. The first argument will be the initial balance as in the existing code. The second argument will be an
Accountreference with which to initialize the instance variable you defined in step 1. - In the one-argument constructor, set the parent account to
null. We’d like to emphasize the fact that there is no parent if the one-argument constructor is used by explicitly settingparentAccounttonull, but notice it is technically unnecessary as any non-initialized objects default tonull. - Modify the
withdrawmethod so that if the requested withdrawal can’t be covered by this account, the difference is withdrawn from the parent account. This may trigger overdraft protection for the parent account, and then its parent, and so on. The number of accounts connected in this way may be unlimited. If the account doesn’t have a parent or if the parent (and its parents and so forth) can’t cover the withdrawal, thewithdrawmethod should merely print an error message as before and not change any account balances.
Here’s an example of the desired behavior, with the Account object kathy providing overdraft protection for the Account object megan. Recall this means the parentAccount of megan is kathy.
Suppose, in each scenario below, megan has 100 as her balance while kathy has 500 as her balance.
meganattempts to withdraw 50meganthen has 50 remaining in her balance, whilekathystill has 500.meganattempts to withdraw 200meganthen has 0 remaining in her balance, whilekathyneeded to cover 100 formegan, leaving 400 as her balance.meganattempts to withdraw 700- return false without changing either balance as the withdrawal is denied due to insufficient funds.
To test your code, try copy and pasting the
Accountclass into the online Java Visualizer. Make sure to add amainmethod with a few example cases like the ones provided above.Account kathy = new Account(500); Account megan = new Account(100, kathy); megan.withdraw(50);
Discussion: Merging Revisited
One proposed solution for merging accounts is the following:
public void merge(Account other) {
    this.balance = this.balance + other.balance;
    other = new Account(0);
}
This doesn’t work. Explain why not.
Exercise: Pursuit Curves
Pursuit curves provide a powerful way to render curves on a computer. The traditional method for drawing a path is to analytically define it via some algebraic formula like and trace it point-wise. Consider an alternative where we define two points: the pursuer and the pursued.
Now suppose the pursued point (in black) follows some fixed path . Then the pursuer (in red) will seek the pursued in the following manner.
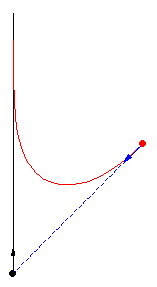
We notice that the pursuer always follows the pursued along its tangent, which gives some serious first order differential equation vibes. Letting the pursuer’s path be given by , then the closed form solution for its path is given by the following equation.
Of course, we won’t require you to solve a differential equation.
Programming Task
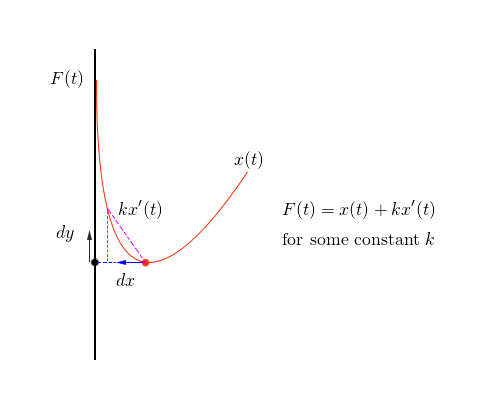
Implement a simpler version of pursuit curves in order to create a cool visual by filling out Path.java. An additional file PathHarness.java is provided containing code that will render your code in Path.java using Java’s graphics framework.
Path.java will represent the path traveled by the pursuer. You will need to keep track of the following two points:
curr- Represents where the path currently ends. This will be a
Pointobject. next- Represents where the path (and thus, the
curr) will travel to next. This will also be aPointobject.
Make sure these
Pointinstance variables are declaredpublicso that the autograder can access them.
Next, you will need to define a constructor that, given an and coordinate, sets next to the starting point . The constructor may look something like this.
public Path(double x, double y)
When the Path object is first constructed, the curr can be set to a Point instance with any coordinate so long as it is not null. Try playing around with initial curr values to see what you can get!
Finally, you will need to implement the following instance methods.
void iterate(double dx, double dy)- Sets
currtonextand updates the position ofnextto be thecurrwith movement defined bydxanddy
If you were to implement a pursuit curve in full generality, then this is where you would solve a differential equation, but we won’t have you do that.
Instead we’re giving you and which will tell you how the path travels on each call to iterate.
To summarize your task:
- Keep track of
currandnext. - Implement a constructor taking in a
double xanddouble y. - Implement the methods listed in the table above.
Here are some tips to keep you on the right track!
- As
currandnextare bothPointobjects, we’ve provided a class definingPoint. Make sure to read through and understand what each method and constructor does! - When defining
iterate(double dx, double dy)you may find that yourcurrandnextare not being set to what they are coded to be. Think about object references and try drawing a box-and-pointer diagram.
Once you’ve completed the
Pathclass, compile and runPathHarnessand see what happens! Feel free to modify thePathHarnessclass and try changing some of the variables.
If you want to learn more about pursuit curves, Wolfram’s MathWorld provides a very interesting read.
Recap
- Bits
- The computer stores information as memory, and represents this information using sequences of bits, which are either 0 or 1.
- Primitives
- Primitives are representations of information. In this course, we care about the following Java primitive types:
boolean,int,long,double, andchar. Each primitive is represented by a certain number of bits. For example, ints are 32 bit primitives, while doubles are 64 bit primitives. - Declaring Primitives
- When we declare a variable to be a primitive (i.e.
int x;), we set aside enough memory space to hold the bits (in this case, 32). We can think of this as a box holding the bits. Java then maps the variable name to this box. Say we have a line of codeint y = x;wherexwas defined before. Java will copy the bits inside thexbox into the bits in theybox. - Client Programs and Main Methods
- A Java program without a main method cannot be run using the
javacommand. However, methods from one class can be invoked using themainmethod of another class. A java class that uses another class is called a client of that class. - Class Declaration
- Java classes can contain methods and/or variables. We say that such methods and variables are “members” of the class. Members can be instance members or static members. Static members are declared with the
statickeyword. Instance members are any members without thestatickeyword. - Class Instantiation
- Instantiating a class is almost always done using the new keyword, e.g.
Dog d = new Dog(). An instance of a class in Java is also called anObject. - Dot Notation
- We access members of a class using dot notation, e.g.
d.bark(). Class members can be accessed from within the same class or from other classes. - Constructors
- Constructors tell Java what to do when a program tries to create an instance of a class, e.g. what it should do when it executes
Dog d = new Dog(). - Array Instantiation
- Arrays are also instantiated using the
newkeyword. If we have an array of objects, e.g.Dog[] dogarray, then each element of the array must also be instantiated separately. - Static vs. Instance Methods
- The distinction between static and instance methods is incredibly important. Instance methods are actions that can only be taken by an instance of the class (i.e. a specific object), whereas static methods are taken by the class itself. An instance method is invoked using a reference to a specific instance, e.g.
d.bark(), whereas static methods should be invoked using the class name, e.g.Math.sqrt(). Know when to use each. - Static Variables
- Variables can also be static. Static variables should be accessed using the class name, e.g.
Dog.binomenas opposed tod.binomen. Technically Java allows you to access using a specific instance, but we strongly encourage you not to do this to avoid confusion. voidMethods- A method which does not return anything should be given a void return type.
- The
thiskeyword - Inside a method, we can use the
thiskeyword to refer to the current instance. public static void main(String[] args)- We now know what each of these things means:
public: So far, all of our methods start with this keyword.static: It is a static method, not associated with any particular instance.void: It has no return type.main: This is the name of the method.String[] args: This is a parameter that is passed to the main method.
- Getting Help from the Internet
- You’re welcome to seek help online. However, you should always cite your sources, and you should not seek help on specific homework problems or projects. For example, googling “how convert String Java” or “how read file Java” are fine, but you should not be searching “project 2 61b java berkeley”.
The internet is also a great boon for more coding practice. Checkout Reddit’s /r/dailyprogrammer and Topcoder’s online exercises. Project Euler also provides a ton of questions with solutions that a potential interviewer might one day ask you!
- Creating Objects
- When we create an instance of a class using the
newkeyword, Java creates boxes of bits for each field, where the size of each box is defined by the type of each field. For example, if aWalrusobject has anintvariable and adoublevariable, then Java will allocate two boxes totaling 96 bits (32 + 64) to hold both variables. These will be set to a default value like 0. The constructor then comes in and fills in these bits to their appropriate values. The return value of the constructor will return the location in memory where the boxes live, usually an address of 64 bits. This address can then be stored in a variable with a reference type. - Reference Types
- If a variable is not a primitive type, then it is a reference type. When we declare object variables, we use reference type variables to store the location in memory of where an object is located. Remember this is what the constructor returns. A reference type is always a box of size 64 bits. Note that the variable does not store the entire object itself!
- Golden Rule of Equals
- For primitives, the line
int y = xcopies the bits inside thexbox into theybox. For reference types, we do the exact same thing. In the lineWalrus newWalrus = oldWalrus;, we copy the 64 bit address in the oldWalrus box into the newWalrus box. So we can think of this Golden Rule of Equals (GroE) as: when we assign a value with equals, we are just copying the bits from one memory box to another! - Parameter Passing
- Say we have a method
average(double a, double b). This method takes two doubles as parameters. Parameter passing also follows the GRoE, i.e. when we call this method and pass in two doubles, we copy the bits from those variables into the parameter variables. - Array Instantiation
- Arrays are also Objects, and are also instantiated using the new keyword. This means declaring an array variable (i.e.
int[] x;) will create a 64-bit reference type variable that will hold the location of this array. Of course, right now, this box contains the value null, as we have not created the array yet. The new keyword for arrays will create the array and return the location of this array in memory. So by sayingint[] x = new int[]{0, 1, 2, 3, 4};, we set the location of this newly created array to the variablex. Note that the size of the array was specified when the array was created, and cannot be changed!
Deliverables
To quickly recap what you need to do for this lab:
- Read through the lab and learn about Java objects and the Golden Rule of Equals. Make sure you understand how to draw box-and-pointer diagrams.
- Build good collaboration habits as you work through the provided discussion questions, exercises, and online assessment at the end.
- In
Account.javaedit the behavior of withdrawal to return a boolean then implement account merging and overdraft protection. - Implement
Path.javathe keeps track ofcurrandnextand implementsiterate(dx, dy)