
FAQ #
Each assignment will have an FAQ linked at the top. You can also access it by adding “/faq” to the end of the URL. The FAQ for Lab 1 is located here.
Learning Goals #
In this lab, we will set up the software that we will use throughout the course: the terminal, git, java, IntelliJ, etc. We will also look at a small Java program and learn a little bit about Java syntax.
Before You Begin #
Welcome to CS 61BL! We have a wonderful summer planned for y’all, and we’re so excited that you’ll be joining us!
First things first: setup! In this class, you’ll be using real-world tools, and that means that you’ll likely run into real-world problems with configuration and setup these first few days. Don’t be discouraged, and make sure to ask for help if you’re stuck! The best place to ask for help is during your actual lab time. If you attempt to do this outside of that time and run into any problems, please ask them on Ed. For more information on using Ed in this course, read through our Ed Policies and Guidelines.
If ever something isn’t working, or a screen that should show up isn’t showing up, make sure you ask for help – do not keep going because this might make it more difficult for us to identify the problem later on if you do hit a dead-end.
Personal Computer Setup #
Task: Configure Your Computer #
Depending on your operating system, there are a few things we need to do to set your computer up for 61B(L).
The precise steps to take depend on your operating system.
Move on to the next section only once you’ve completed the instructions above for your operating system.
The Terminal #
Learn to use the Terminal #
In CS 61BL we will be using the terminal extensively, even more than you likely did in previous classes. Bash commands can be pretty powerful and will allow you to create folders or files, navigate through your file system, etc. To jump start your knowledge we have included a short guide of the most essential commands that you will be using in this class. Please carefully read this and try to familiarize yourself with the commands. We will help you as you get started, but by the end of the class we hope that you will have become a proficient user of the bash terminal!
-
pwd: present working directorypwdThis command will tell you the full absolute path for the current directory you are in if you are not sure where you are.
-
ls: list files/folders in directorylsThis command will list all the files and folders in your current directory.
ls -lThis command will list all the files and folders in your current directory with timestamps and file permissions. This can help you double-check if your file updated correctly or change the read-write- execute permissions for your files.
-
mkdir: make a directorymkdir dirnameThis command will make a directory within the current directory called
dirname. -
cd: change your working directorycd hwThis command will change your directory to
hw. -
.: means your current directorycd .This command will change your directory to the current directory (aka, do nothing).
-
..: means one parent directory above your current directorycd ..This command will change your directory to its parent. If you are in
/workspace/day1/, the command will place you in/workspace/. -
rm: remove a filerm file1This command will remove file1 from the current directory. It will not work if
file1does not exist.rm -r dir1This command will remove the
dir1directory recursively. In other words, it will delete all the files and directories indir1in addition todir1itself. Be very careful with this command! -
cp: copy a filecp lab1/original lab2/duplicateThis command will copy the
originalfile in thelab1directory and and create aduplicatefile in thelab2directory. -
mv: move or rename a filemv lab1/original lab2/originalThis command moves
originalfromlab1tolab2. Unlikecp, mv does not leave original in thelab1directory.mv lab1/original lab1/newnameThis command does not move the file but rather renames it from
originaltonewname. -
touch: create a file if it doesn’t existtouch lab1/newFileThis command will create a new empty file called
newFilein thelab1directory.touch existingFileThis command will leave the contents of
existingFileunchanged. -
cat: catenate file(s) to outputcat file1This command will print out the contents of
file1to the terminal.cat file1 file2This command will print out the contents of
file1followed byfile2to the terminal.There are some other useful tricks when navigating on a command line:
-
Your shell can complete file names and directory names for you with tab completion. When you have an incomplete name (for something that already exists), try pressing the
tabkey for autocomplete or a list of possible names. -
If you want to retype the same instruction used recently, press the
upkey on your keyboard until you see the correct instruction. This saves typing time if you are doing repetitive instructions.
GitHub and Beacon #
Instead of bCourses, CS 61BL uses an in-house system for centralizing your grades and student information called Beacon.
In this section, we’ll set up your Beacon account as well as your CS 61B GitHub repository (“repo”), which you will need to submit all coding assignments.
Task: Account Setup #
- Create an account at GitHub.com. If you already have an account, you do not need to create a new one.
- Go to the Beacon website and you’ll be guided through a few steps to complete your GitHub repository registration. Please follow them carefully! You must be logged in to your Berkeley account to complete the Google Form quiz. If any errors occur while you’re working through the steps, please let your TA know immediately.
- After completing all of the steps, you should receive an email inviting you to collaborate on your course GitHub repository. This email will be sent to the email that you used to create your GitHub account, which may not necessarily be your Berkeley email.
Don’t follow the instructions that GitHub says you might want to do. We have our own set of instructions later in this lab.
Task: Follow the steps above to create your GitHub and Beacon accounts, and connect them.
Your Repository #
Your repository will have a name containing a number that is unique to you!
For instance, if your repo is called “su24-s42”, you’ll be able to visit your
private repository at https://github.com/Berkeley-CS61B-Student/su24-s42
(when logged into GitHub). If your repo number is not “42” this link will not
work for you. Replace “42” with your own to see your repo on Github.
Additionally, the instructors, TAs, and tutors will be able to view your repository. This means you can (and should!) link to your code when creating gitbugs posts on Ed. No other students will be able to view your repository.
As a reminder, you may not post code from this course publicly, even after completing the course. Doing so is a violation of our course policies and you might be subject to disciplinary action.
Git #
In this course, you’ll be required to use the Git version control system, which is wildly popular out in the real world. Since the abstractions behind it are fairly tricky to understand, don’t be worried if you encounter significant frustration as you learn to use git. Towards the middle of the semester, we’ll be learning the inner workings of git in much greater detail but, for now, let’s just get a working knowledge of how to use git.
Before you proceed, read sections up to the Remote Repositories section of the Using Git Guide.
Do not proceed until you have read sections up to the Remote Repositories section of the Using Git Guide. You do not need to read past that.
Setting Up Git #
Before we use git, we have some short commands to configure it appropriately.
First, set the name and email that git will use with these two commands:
git config --global user.name "<your name>"
git config --global user.email "<your email>"
Set git’s default branch name:
git config --global init.defaultBranch main
Set the “merge strategy”:
git config --global pull.rebase false
We’ll also change the text editor associated with git. Sometimes, git needs
your help when inputting things like commit messages, so it will open a text
editor for you. The default editor is vim, which is notoriously difficult to use.
Follow the instructions here. This will configure Git’s default editor (make sure that you follow the correct instructions for your operating system). If you’ve worked with a text editor like VSCode, Sublime Text or Atom before, we suggest setting whatever you’re most familiar with as the default editor. If not we suggest using Notepad for Windows, TextEdit for MacOS and Nano for Linux.
Task: Configure git by following the above instructions, and set your preferred editor.
Task: Git Exercise #
Now that you’ve read the first 3 sections of the Using Git Guide, you’re ready to start using git! As part of your lab checkoff, you will be working through a small git workflow by setting up a git repository and making a couple commits to the repository.
If you need help with creating directories, creating files, changing directories, etc., refer back to Learn to use the Terminal.
- Create a directory called
lab01-checkoff(mkdir). You can put this directory anywhere on your computer (unless you have already cloned yoursu24-s***repository, in which case, you should not put this directory inside of yoursu24-s***repo). - Move into the
lab01-checkoffdirectory (cd), and initialize a git repository in this directory (git init). - Create a file called
61b.txtin any way you’d like (touch). In this text file, add the text “61b version 1” into it. - Create another file called
61bl.txtin any way you’d like. In this text file, add the text “61bl version 1” into it. - Begin tracking only
61b.txt, and create a new commit containing just this file, with the following commit message: “Add 61b.txt”. - Make a modification in
61b.txtby changing the text in the file to: “61b changed to version 2”. - Make another commit, this time containing both
61b.txtand61bl.txt. The commit message should be: “Update 61b.txt and add 61bl.txt”. - Make one more modification to
61b.txtby changing the text in the file to: “61b changed to version 3”. Don’t commit this version.
At this point, if you were to type in git status and git log, something like this should
show:
- Using git only, restore
61b.txtto the version in the first commit. - Using git only, restore
61b.txtto the version in the most recent commit.
Be sure to save this repository and directory until you complete the asynchronous checkoff form on beacon and obtain a magic word. We’ll be using this magic word later in the lab.
Task: Do the steps above, then get checked off by filling out the Beacon form.
Git and Remote Repos #
First, read the Remote Repositories section of the Using Git Guide.
In this course, you’ll be required to submit your code using Git to your course GitHub repository that you created in Account Setup. This is for several reasons:
- To spare you the incredible agony of losing your files.
- To submit your work for grading and to get results back from the autograder.
- To save you from the tremendous anguish of making unknown changes to your files that break everything.
- To ensure that we have easy access to your code so that we can help if you’re stuck.
- To dissuade you from posting your solutions on the web in a public GitHub repository. This is a major violation of course policy!
- To expose you to a realistic workflow that is common on every major project you’ll ever work on in the future.
Task: Setting up your Git Repository #
Authenticate With Github #
First, run the following command in your terminal. It will print out any SSH keys you have and generate a new one if none exists:
curl -sS https://cs61bl.org/su24/labs/lab01/get-ssh-key.sh | bash
If you get an error message such as bash: line 1: syntax error near unexpected token 'newline', try refreshing this page and run the updated command.
With the location that is provided, go ahead and run the following
command, ensuring to replace <path_to_ssh_key> with the location of the SSH key
and appending with the .pub suffix.
cat <path_to_ssh_key>.pub
The result of running the above command should produce something similar to the format below:
ssh-ed25519 AAAAC3NzaC1lZDI1N6jpH3Bnbebi7Xz7wMr20LxZCKi3U8UQTE5AAAAIBTc2HwlbOi8T [some-comment-here]
Then, copy the output from your terminal. The [some-comment-here] will be system
dependent and may vary for individuals. Taking the output, go to
Github, Settings, SSH, GPG Keys, New SSH Key (or click the link)
and paste the output into the Key section. Name the key, so it’s memorable what device
the key is on or so you recognize what it’s for and select
the Key type as Authentication Key. Then, add the key to your account.
In your terminal, run the following command to connect with Github using SSH:
ssh -T git@github.com
If all went well, you should see something like this:
Hi USERNAME! You've successfully authenticated, but GitHub does not provide shell access.
You should now be successfully authenticated with Github and good to go!
Clone your su24-s*** Git Repository #
Navigate to the spot in your folders on your computer that you’d like to start
your repository. In the example below, we’re assuming you want all your stuff
in a folder named cs61bl, but you can pick a different name if you’d like.
cd cs61bl
Enter the following command to clone your GitHub repo. Make sure to replace the
*** with your class repository number (this should be the repo number you
were assigned through Beacon, not your lab section number).
git clone git@github.com:Berkeley-CS61B-Student/su24-s***.git
After cloning your terminal will report “warning: You appear to have cloned
an empty repository.” This is not an issue, it is just git letting you know
that there are no files in the repo, which is what we expect here.
Move into your newly created repo!
cd su24-s***
Make sure that we’re working with the branch name we expect, main:
git branch -M main
Now, we will add the skeleton remote repository. You will pull from this
remote repository to get starter code for assignments. (Make sure that you are
within the newly created repository folder when you continue with these
commands.) Enter the following command to add the skeleton remote.
git remote add skeleton https://github.com/cs61bl/skeleton-su24.git
Listing the remotes should now show both the origin and skeleton remotes.
git remote -v
If you see an error like fatal: not a git repository make sure you have
properly moved into the su24-s*** directory using cd.
Getting the Skeleton #
Task: Follow the instructions in the Getting the Skeleton section of the Assignment Workflow guide to get the skeleton code for Lab 1.
At this point, you should have a lab01 folder, with the contents
src/Arithmetic.java and tests/ArithmeticTests.java, among some other files. If you do not have
these contents, don’t make it manually! Instead, pull from the skeleton or
ask a staff member.
Pushing to GitHub #
You will need the magic word (obtained from checkoff) to complete this step.
Open the file lab01/magic_word.txt in a text editor, and edit it to contain
the magic word obtained during the git exercise.
Now stage and commit magic_word.txt (make sure you’re in your repo!).
git add lab01/magic_word.txt
git commit -m "Added Magic Word"
Right now, the modified magic_word.txt is only on your computer. We want to
push these changes to the GitHub repository so that your changes can be seen by
us and Gradescope. Push these changes to the main branch on the origin
remote repo.
git push origin main
You can verify that this was successful by checking your repository online on
GitHub’s website. It should contain the updated magic_word.txt file. If it
doesn’t, make sure that your add and commit were successful. In particular,
make sure that you are in your repo, su24-***.
Task: Follow the instructions above to push your magic word to GitHub, and check that it appears.
Our work is now on GitHub, and ready to submit!
Submitting to Gradescope #
Although we use GitHub to store our programming work, we use Gradescope to actually grade it. The last step is to submit your work with Gradescope, which we use to autograde programming assignments.
We added everyone’s CalCentral email to Gradescope on the first day of labs. Make sure to login using the email address listed on CalCentral.
If you’re having trouble accessing the course on Gradescope or would like to use a different email address, ask your TA!
As above, we strongly encourage you to make frequent commits! Lack of proper version control will not be considered an excuse for lost work, particularly after the first week.
Task: Follow the instructions in the Submitting to Gradescope section of the Assignment Workflow guide to submit to Gradescope.
At this point, Gradescope should show you something similar to the following:
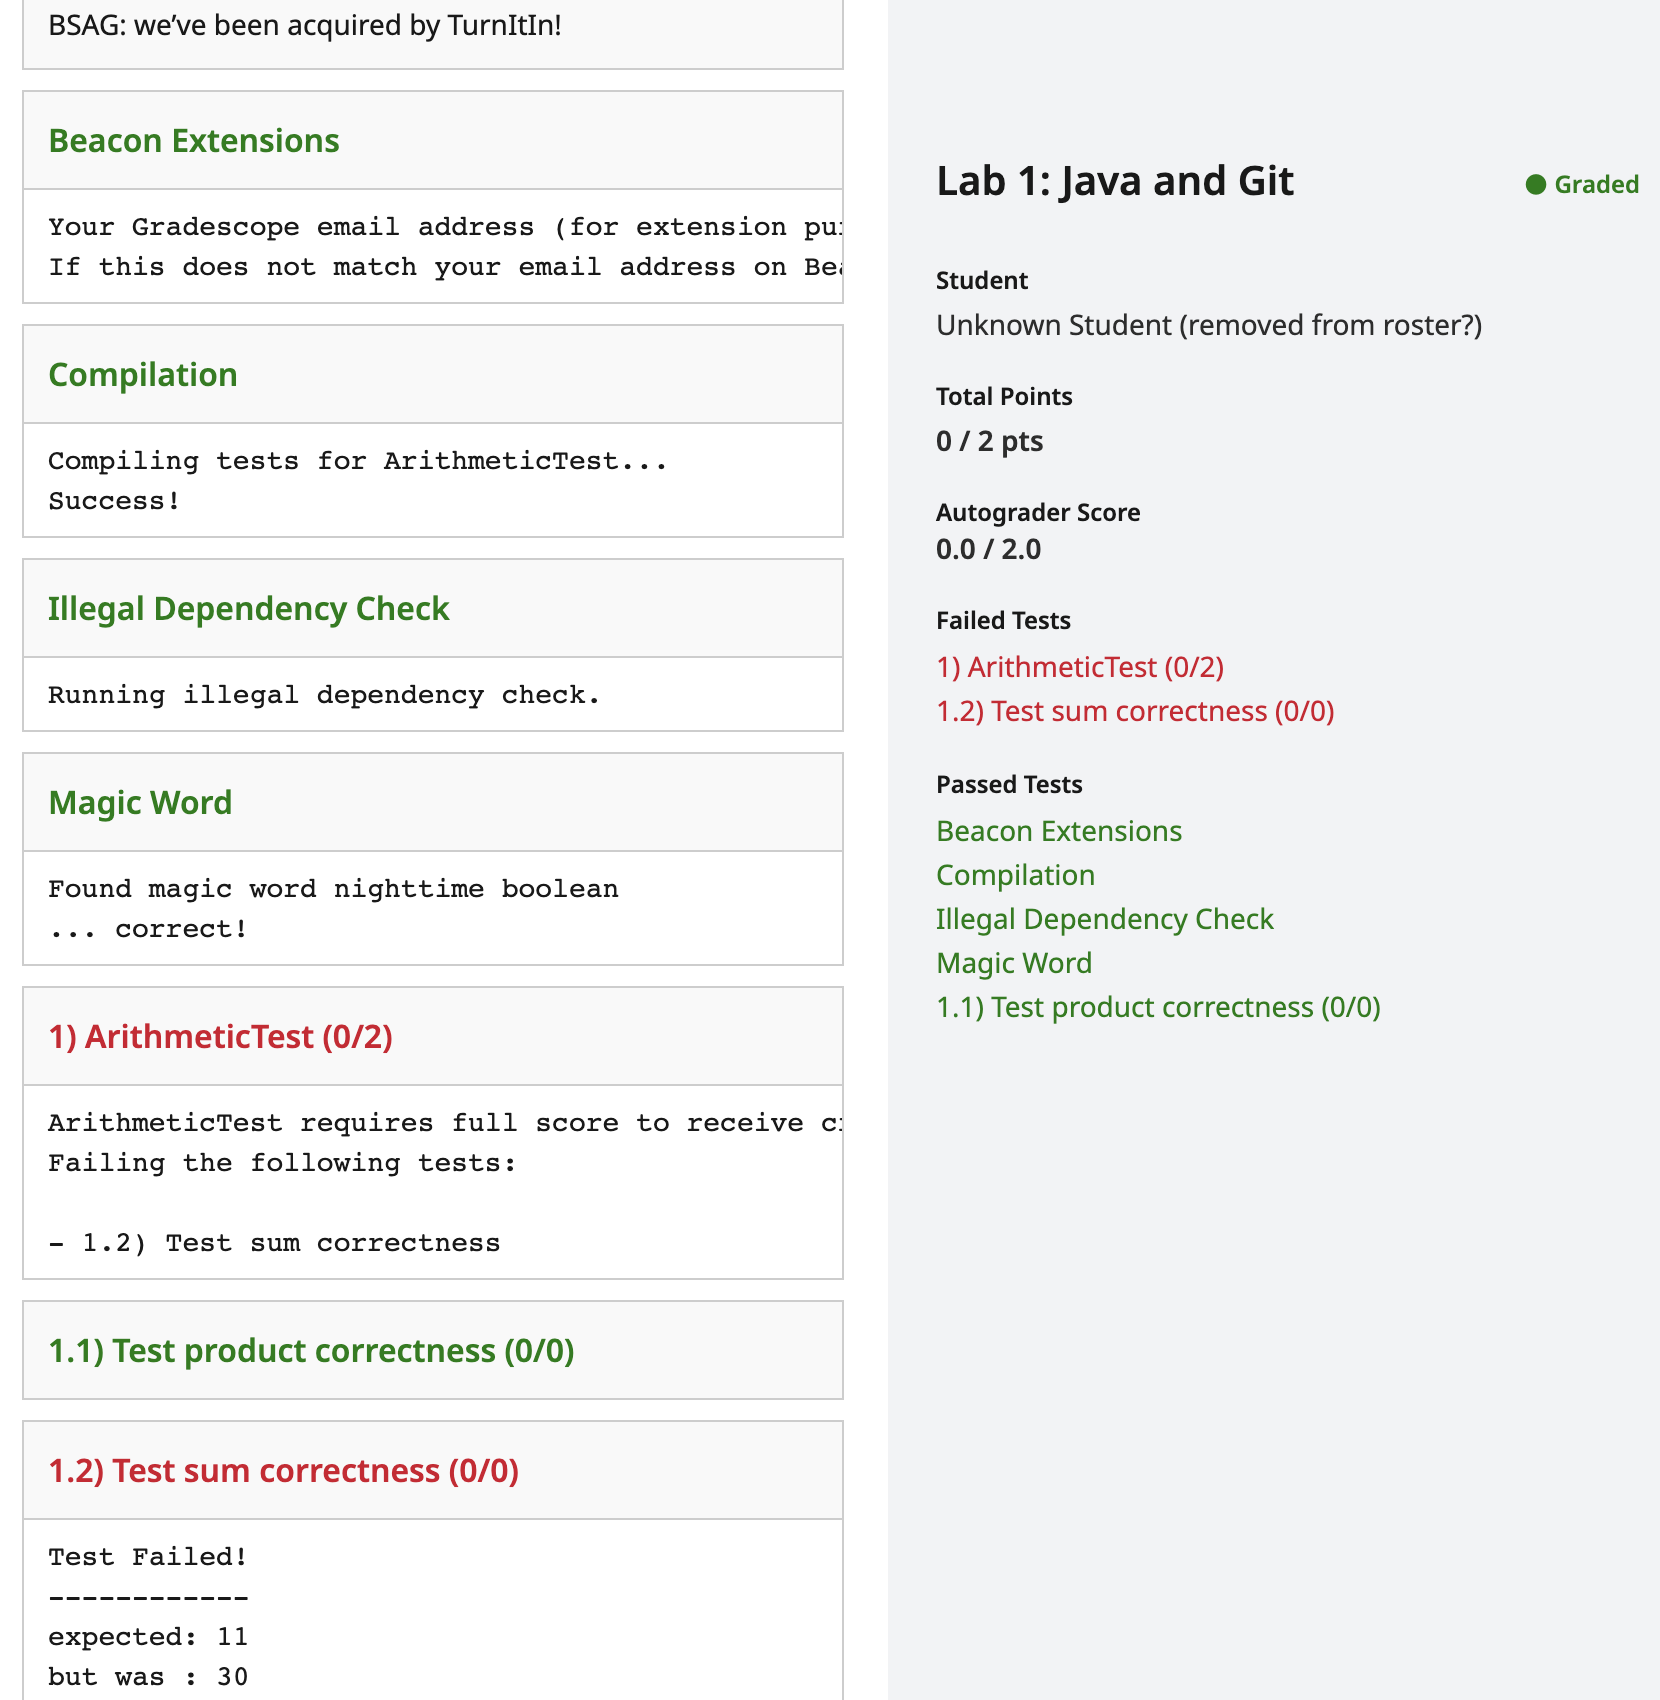
In CS 61BL, we use automated tests to check that your code is written correctly. In your first submission, you:
- Should be passing “Magic Word”, if you received the magic word
- Should be passing “Test product correctness”
- Should not be passing “Test sum correctness”
We’ll now show you how you can work on and check your code locally, which is much easier than checking on Gradescope every time.
Setting Up Java Libraries #
Like in Python, we sometimes want to use libraries that others wrote. Java dependency management is a bit of a mess, so we instead provide a git repo that contains all the dependencies that we will use in this course.
First, move out of your su24-s*** repo with cd ... Failing to do so can
cause many headaches later.
Then, run:
git clone https://github.com/cs61bl/library-su24
Below is shown the directory structure of library-su24. Look inside the
folder using ls library-su24 and make sure you see the .jar files
listed below. There are many more, but we only list the first few. If you’re
using your operating system’s file explorer, the jar part might not show up
in the filenames, and that’s OK.
library-su24
├── algs4.jar
├── animated-gif-lib-1.4.jar
├── antlr4-runtime-4.11.1.jar
├── apiguardian-api-1.1.2.jar
└── ...
Task: Follow the instructions above to get the course libraries.
IntelliJ Setup #
IntelliJ is an Integrated Development Environment or IDE. An IDE is a single program which combines typically a source code editor, tools to compile and run code, and a debugger. Some IDEs like IntelliJ contain even more features such as an integrated terminal and a graphical interface for git commands. Finally, IDEs also have tools like code completion which will help you write Java faster.
We highly recommend using IntelliJ. Our tests are written to run in IntelliJ, and we will explicitly use its debugger in later labs. Additionally, IntelliJ is an industry-standard tool that you will almost certainly encounter if you work with Java again in the future.
We will assume that you are using IntelliJ, and will not offer support for other editors, including VSCode.
IntelliJ is a real world, industrial software development application. There are many features that we will not use, and you will sometimes encounter situations that do not make sense. Ask for help if you are stuck or something seems broken! It can be very hard to guess the right thing to do in IntelliJ. Check out the IntelliJ WTFS Guide for solutions to some common problems.
Before continuing, make sure that you have completed all above tasks besides the git exercise:
- You have successfully created your local repo for the class on your own
machine. This is the
su24-s***repository you earlier. - You have pulled from the skeleton, and you have a
lab01directory.
Installing IntelliJ #
- Download the Community Edition of IntelliJ from the JetBrains website. As a student you can actually get a student license for the Ultimate version, but there are not any additional features that we will use for this class. It is recommended and assumed that you proceed with the Community Edition.
If you have an M1 or M2 Mac, select “.dmg (Apple Silicon)”. Otherwise, select “.dmg (Intel).”
-
After selecting the appropriate version for your OS, click download and wait a few minutes for the file to finish downloading.
-
Run the installer. If you have an older version of IntelliJ, you should uninstall it at this time and replace it with this newer version.
While IntelliJ downloads, you can read / skim our Using IntelliJ Guide. You don’t need to read or internalize all of this to complete the lab. IntelliJ is complicated, but the core features should feel somewhat familiar to text editors you have used in the past.
Installing Plugins #
Open IntelliJ. Then follow the steps below.
Make sure you’re running IntelliJ Version 2021.2 or later before continuing. This is because we will use Java 17. We are using IntelliJ Version 2023.2. Older versions may also work but we haven’t tried them ourselves.
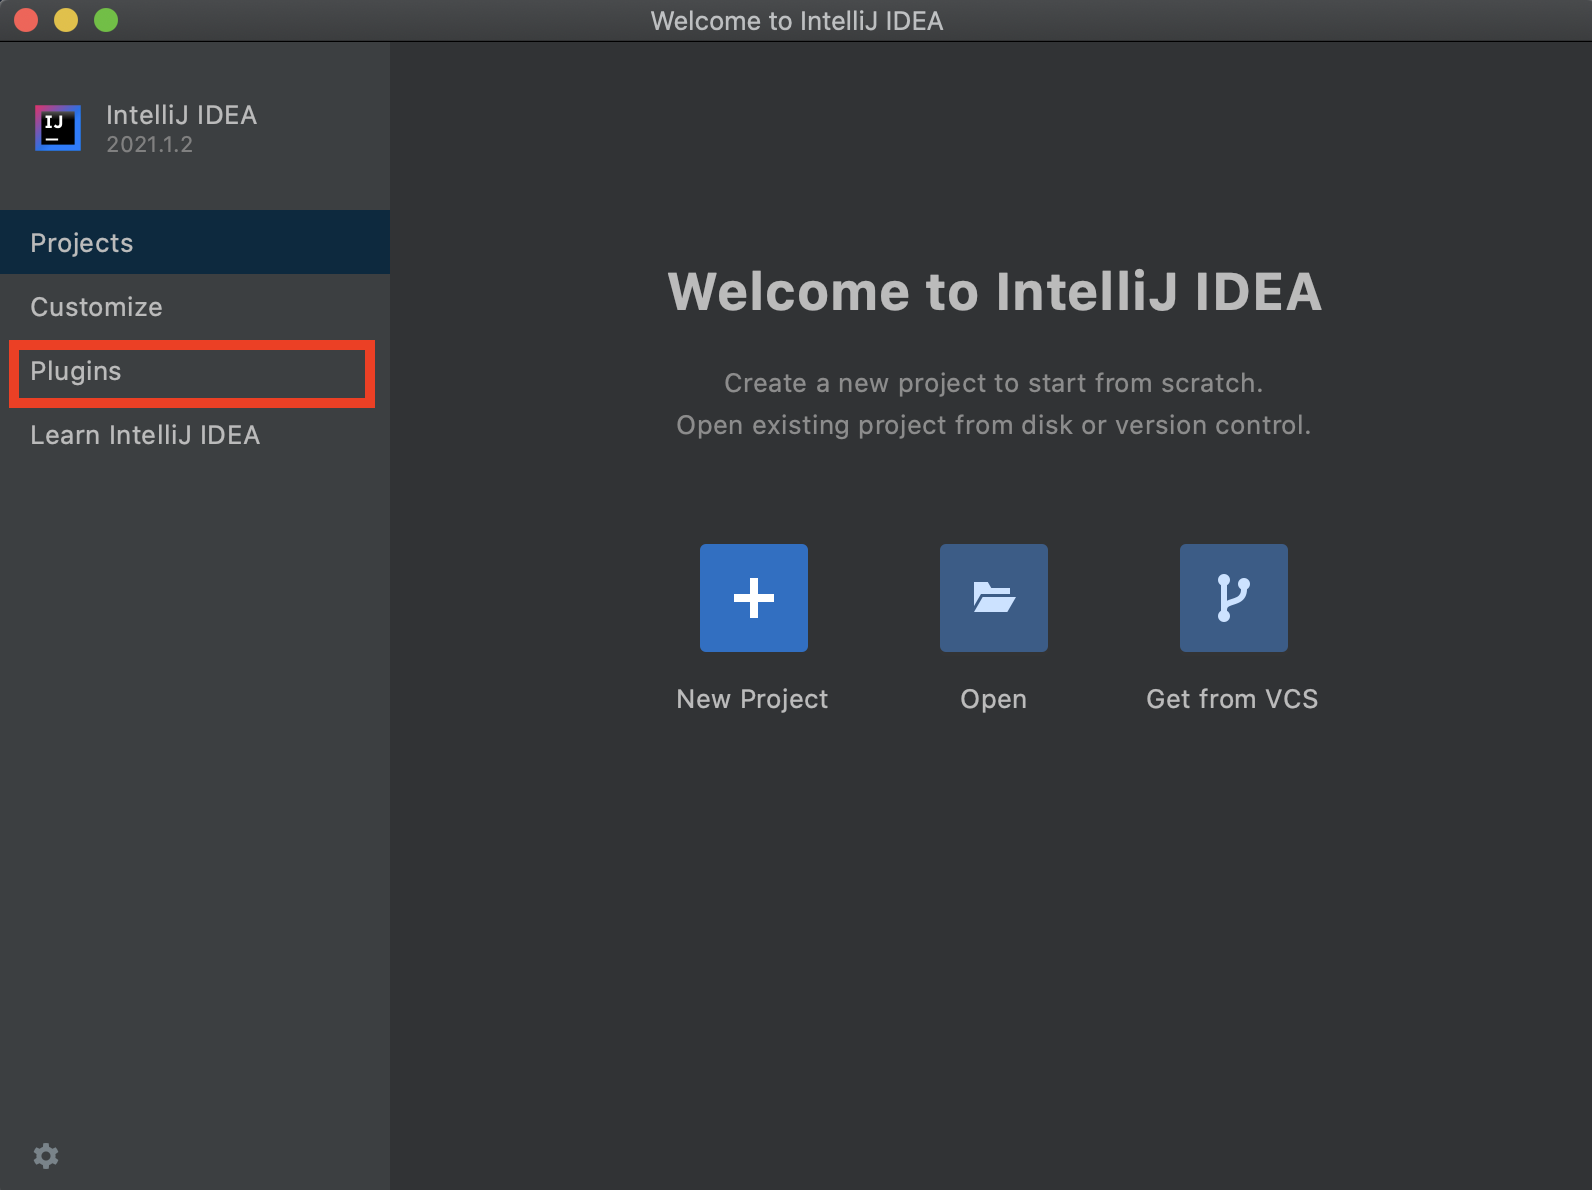
-
In the Welcome window, click the “Plugins” button in the menu on the left.
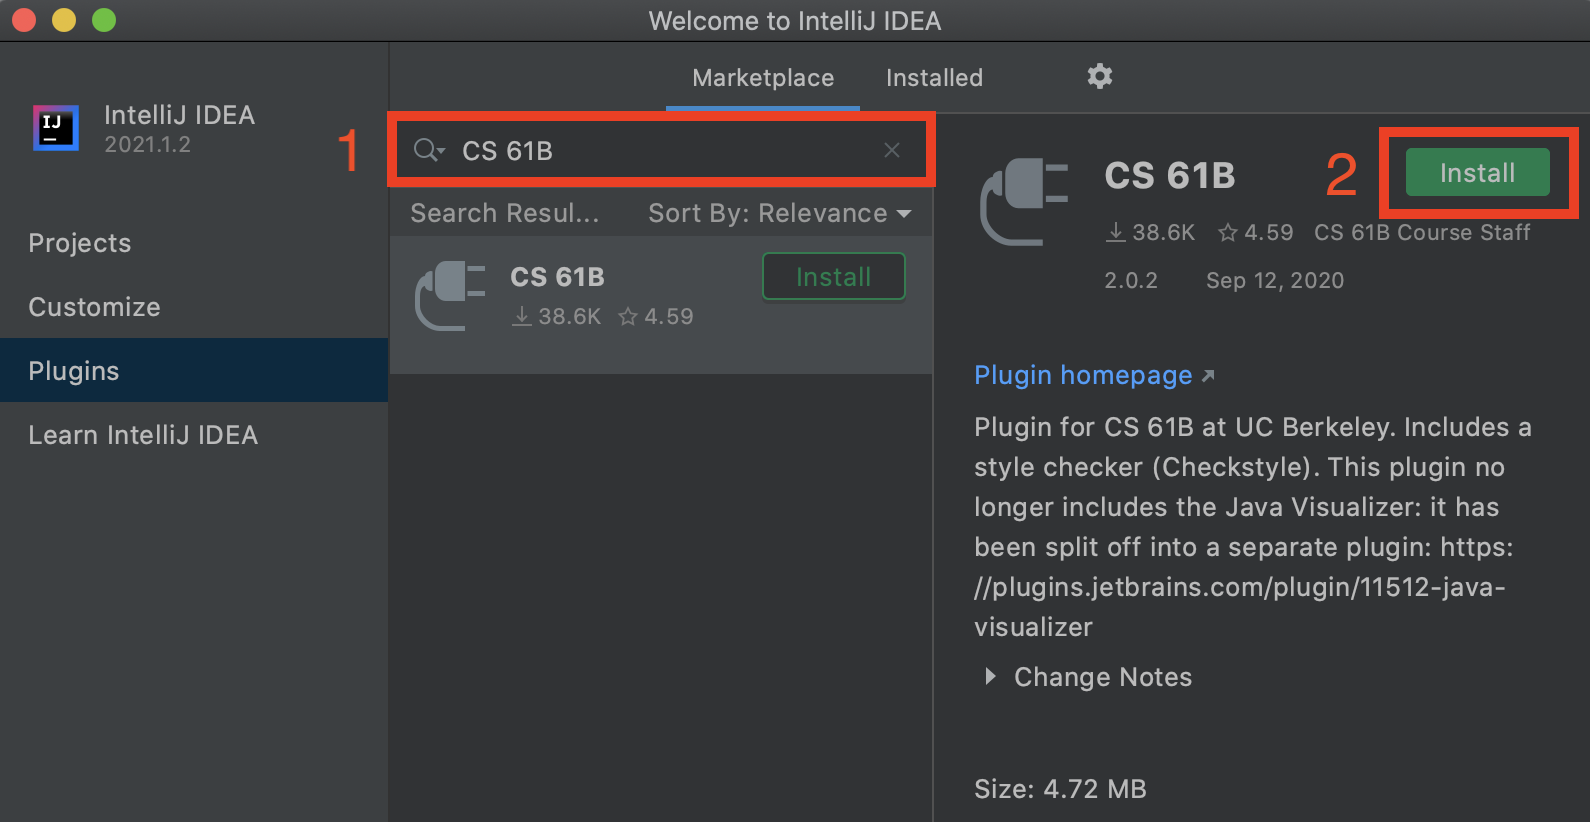
-
On the window that appears, click “Marketplace” and enter “CS 61B” in the search bar at the top. The CS 61B plugin entry should appear. If you click the autocomplete suggestion, a slightly different window from what is shown below may appear – this is okay.
-
Click the green Install button, and wait for the plugin to download and install.
If you have the plugin installed from a prior term, make sure to update it.
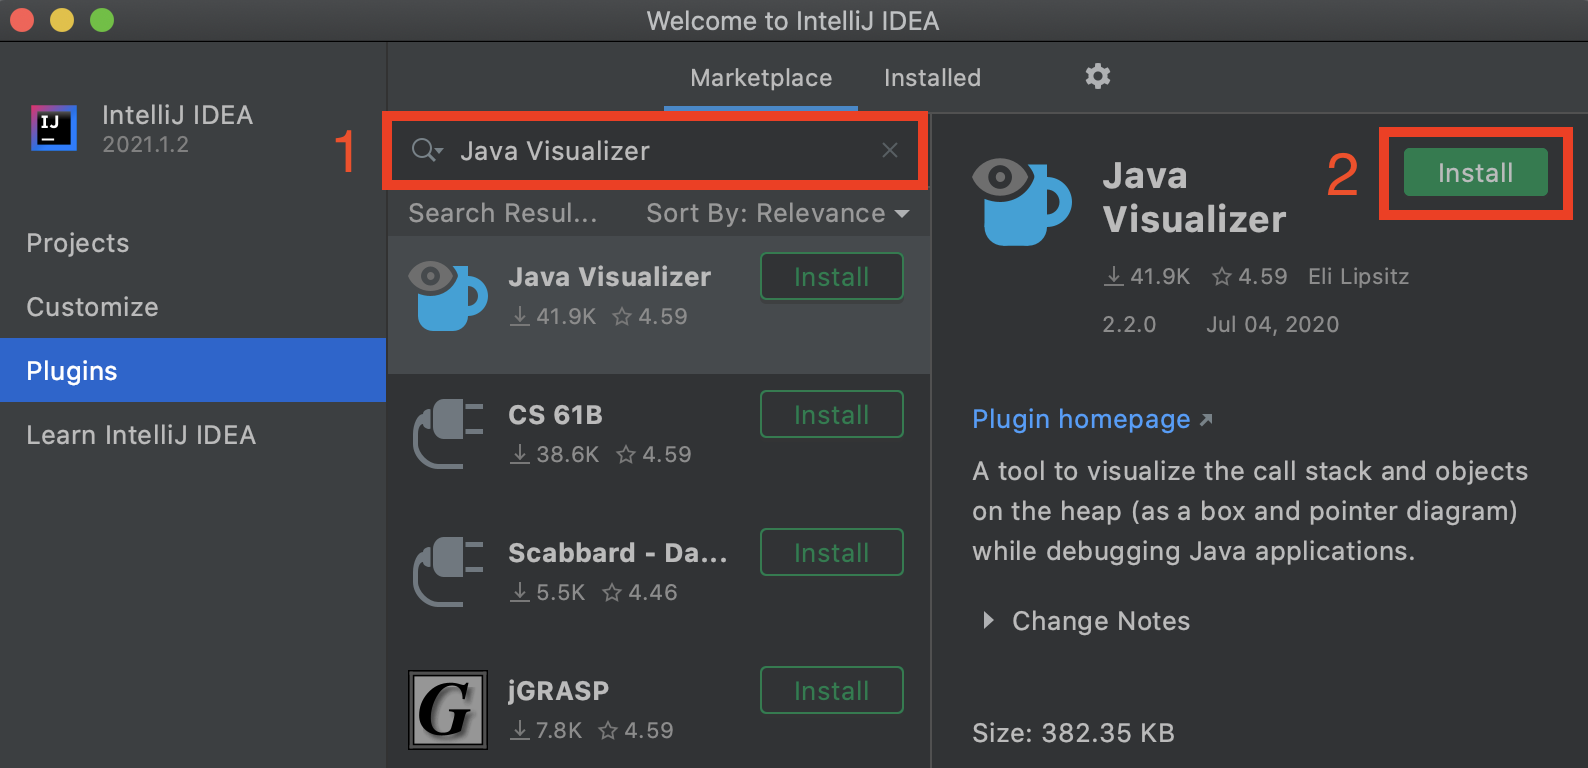
-
Now, search for “Java Visualizer”, and click the green Install button to install the plugin.
-
Restart (close and reopen) IntelliJ.
For more information on using the plugins, read the plugin guide. You don’t have to read this right now.
Installing Java #
With IntelliJ and the plugins installed, we can install the JDK. Follow the steps below:
- Start up IntelliJ. If you have no projects open, click the “Open” button. If you have a project currently open, navigate to “File –> Open”.
- Find and choose the directory of your current assignment. For example, for Lab 1, you would select the
lab01 directory inside your
su24-s***. - Navigate to the “File -> Project Structure” menu, and make sure you are in the Project tab. Then, follow the instructions Set up the project JDK to download your JDK version. Choose a version that is 17 or greater! Depending on which version you choose, make sure that it is compatible with the language level (e.g. if you choose SDK 18, choose your language level to be 18).
Task: Terminal Test Run #
Let’s ensure that everything is working.
Tip: We have a video below that shows what the correct outputs for these commands should look like.
-
First open up your terminal. Check that git is a recognized command by typing the following command:
git --versionThe version number for git should be printed. If you see “git: command not found”, or similar, try opening a new terminal window, restarting your computer, or installing git again.
-
Second, let’s check that
javacandjavaare working.javacandjavaallow Command Line Compilation, or in other words, the ability to run Java programs directly from the command line. In practice, most developers run Java programs through an IDE like IntelliJ, so we won’t be using command line compilation for much this semester other than testing your setup. Start by running the following commands at your terminal.mkdir ~/temp cd ~/temp-
In this newly created directory, create an empty file
HelloWorld.java.touch HelloWorld.java -
Then, open the file using your operating system’s text editor. You can do this from the command line:
- Mac:
open -e ./HelloWorld.java - Windows:
notepad ./HelloWorld.java - Linux:
xdg-open ./HelloWorld.java
- Mac:
-
Copy paste the following code block into the editor, then save and close.
public class HelloWorld { public static void main(String[] args) { System.out.println("Hello world!"); } } -
In your terminal, type
cat HelloWorld.java. You should see the contents of the file we just created. -
In your terminal, enter
ls(list the files/folders in this directory). You should only seeHelloWorld.javalisted. -
Run
javac HelloWorld.java. If this produces any output, then something may be wrong with your setup. Try opening a new terminal window or restarting your computer. If that still doesn’t work, see the Troubleshooting section under the directions for your operating system. -
Type
ls, you should see bothHelloWorld.javaand a freshly createdHelloWorld.class(thejavaccommand created this file). -
Run
java HelloWorld. It should print out “Hello world!” for you. If it didn’t, something is wrong with your setup! -
You’re done! You can also delete the “temp” folder and its contents as you please.
The video below shows what we’re hoping for when we run through the steps above. If you see something similar to this, your java setup is complete.
-
Creating Projects #
Task: Follow the instructions in the
Opening in IntelliJ section of the Assignment Workflow guide
to open lab01.
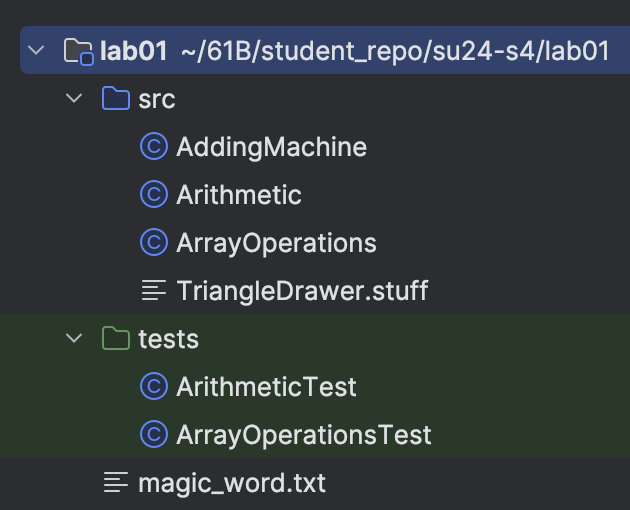
Once you’ve done this, you should see at least these three files in the left pane:
magic_word.txt, which should contain the magic word you added.src/Arithmetic, a Java file which contains your first programming exercise.tests/ArithmeticTest, another Java file which will check thatArithmeticis implemented correctly.
When you open Arithmetic and ArithmeticTest, you should not see any red
text or red squiggles.
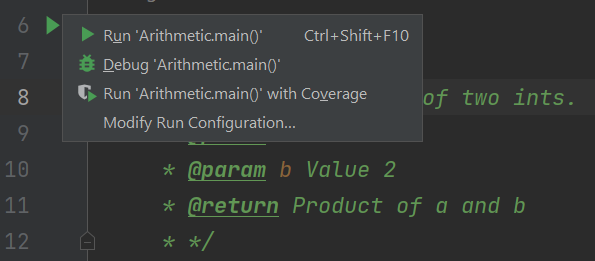
IntelliJ Test #
To test if everything is working correctly, run the Arithmetic class by
opening the file, clicking on the green triangle next to
public class Arithmetic, then clicking “Run ‘Arithmetic.main()’”.
You should see a console pop up, prompting you to enter a number:
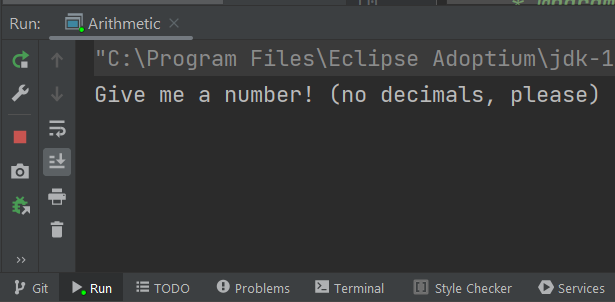
If you follow the prompts, you will (probably) see something wrong! Don’t fix it yet.
Testing Your Code #
While we could run the Arithmetic file again and again to check that our
code works correctly, it would take a lot of time to type into the program each
time, and manually check that the output is correct. Instead, we use tests.
Open ArithmeticTest, and click the green triangle(s) next to the
public class ArithmeticTest. This will run the tests that we have provided
in this assignment. At this point, you will see the following:
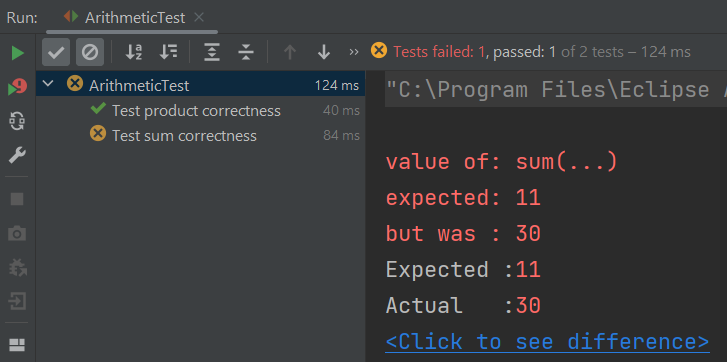
The green checkmark indicates tests that you have passed, while the yellow X indicates tests that you have failed. Don’t worry about the doubled output; this is a strange quirk of IntelliJ.
This should look familiar. The test that failed on Gradescope is the same test that we see here! We can run these tests locally, very easily!
Task: Fix the bug in Arithmetic.java so that the tests pass.
Saving Your Work using Git and GitHub #
As you are making changes to your code, it is good practice to save your work often. We have briefly discussed the commands, but now we will explain how they should be used in practice. In the case that you ever want to go back to another version of your code, it is better to have more options to roll back to. The next set of instructions will talk you through git’s version of saving work through snapshots of your file system called commits.
-
After you have made some changes to the code within our local repository, git will take notice of these changes. To see the current state of your local repository, use the command
git status. Run this and try to interpret the results. Do they make sense to you or do they match your intuition? It is a good habit to run this before running other git commands to know what the state of things are. -
To save work that we have completed on a file, we first stage the file, and then we can commit it. We stage a file with the command
git add. This does not save the file, but it marks it to be saved the next time you commit. The two below commands show what saving work looks like in a git repository. Forgit adddepending on what directory you are in, the path to the file you are adding might differ (usegit statusto see the path).The
-m "Completed Arithmetic.java"part of the commit command specifies a message to be attached to this snapshot. You should always have a commit message to identify what exactly happened in this commit. As an example workflow:git add lab01/src/Arithmetic.java git commit -m "lab01: Completed Arithmetic.java"If you run
git status, you will see thatYour branch is ahead of 'origin/main'. You will also see that the staged changes are no longer staged, and are instead committed. If you haven’t edited since staging, you shouldn’t have any changes not staged for commit. -
We want to push these changes to the GitHub repository so that your changes can be seen by us and Gradescope. Your changes will also be available to
pulled if you had your repo initialized in other places or other computers.git push origin maingit statuswill now show thatYour branch is up to date with 'origin/main'.
Get into the habit of saving your files and doing the git commit step often
(i.e. every 15 minutes). It will be incredibly helpful when you mess things up,
since it allows you to back out of changes and to see what you have changed
recently.
Basically, right when you sit down to work in your repository, first git pull
to make sure you are starting with the most recent code. While you are working,
frequently commit. When you are finished, git push so all your changes are
uploaded and ready for you to pull again next time.
Task: Follow the instructions (again!) in the Submitting to Gradescope section of the Assignment Workflow guide to submit to Gradescope. This time, you should receive a full score on the lab.
(Optional) Java: Conditionals, Loops, and Arrays #
This section is ungraded and contains a significant amount of content. We recommend revisiting the topics and exercises presented here throughout the semester. To see what you need to complete for full credit on this lab, skip to the Deliverables section below.
This section will provide an introduction to Java loops and conditionals (the if, while and for statements), followed by a brief explanation of Java Arrays. We assume no prior experience with any of these topics in Java, but we do assume some prior knowledge of these concepts from an earlier course (like Python control flow and lists as taught in CS61A).
Because of this, there is a lot of information presented here, but hopefully most of it will be review that can be skimmed through quickly.
This course strives to teach you how to “program”, and this includes not just teaching you how to write code, but how to do a variety of activities. We have included a few optional exercises for you to practice writing, analyzing, and testing code.
How if and if ... else Work #
An if statement starts with the word if. It is followed by a condition
statement in parentheses that is either true or false (a boolean
expression). There is then a sequence of statements surrounded by braces,
which is called the body. For example:
if (year % 4 == 0) {
    System.out.println (year + " might be a leap year.");
}
Note: like in Python, the
%symbol above is called mod, and it takes the remainder after division. The above statement is checking ifyearhas no remainder when divided by 4). The behavior of the%operator in Java annoyingly differs slightly from how it functions in Python, particularly with respect to negative numbers.For example in Python
-5 % 4evaluates to3whereas in Java-5 % 4evaluates to-1. If you want the behavior to match what you might expect in Python, you should use the Math.floorMod function in Java. If you do this then Math.floorMod(-5, 4) evaluates to 3.
The braces after an if statement aren’t technically necessary if there is
only one statement in the sequence; however, it is good practice to always
include them since it makes it easier to add lines to the body later.
Unlike other languages (Python in particular), the condition of the if
statement must be a boolean statement or a statement that reduces to a
boolean expression. if (5): is a legal statement in Python, but if (5) {
will not compile in Java.
Boolean expressions often involve comparisons. The comparison operators in Java
are == and != for equality and inequality testing, and >, >=, <, and
<= for comparison of magnitudes. Multiple comparisons can be chained together
with the logical operators && (and) and || (or). If instead you wish to
negate an expression, you can prefix your expression with !, the Java
negation operator.
The block of statements following the if statement above will not execute if
year’s value is not divisible by 4. If you wanted something to happen when
the test fails, use the else keyword. Here’s an example:
if (year % 4 == 0) {
    System.out.println (year + " might be a leap year.");
} else {
    System.out.println (year + " is definitely not a leap year.");
}
You can also add further tests that are executed only if above boolean
expressions evaluate to false, similarly to elif in Python. For example:
if (year % 4 != 0) {
    System.out.println (year + " is not a leap year.");
} else if (year % 100 != 0) {
    System.out.println (year + " is a leap year.");
} else if (year % 400 != 0) {
    System.out.println (year + " is not a leap year.");
} else {
    System.out.println (year + " is a leap year.");
}
Note that only one body section, the one corresponding to the first true
boolean expression (or else if none are true), will execute. After that,
your program will continue on, skipping all the remaining code in this if
structure. This implies that none of the conditions below the first true
boolean expression will be evaluated.
One consequence of conditions becomes apparent in non-void methods. Recall that in Java, you must return something of the return type. Consider the following code snippet:
public int relu(int x) {
    if (x < 0) {
        return 0;
    }
}
As the code is, it will not compile. That is because currently, a value is only
returned when x is less than 0. What happens when that’s not the case? Java
must be assured that relu() always returns an int, and thus will not allow
you to compile your code.
A correct version looks like this:
public int relu(int x) {
    if (x < 0) {
        return 0;
    } else {
        return x;
    }
}
How while Works #
The while statement is used to repeat a sequence of statements. It consists
of the word while, followed by a continuation test in parentheses, also
called the condition. It is then followed by a sequence of statements to
repeat enclosed in braces, called the loop body.
The while statement works by evaluating the condition. If the condition is
true (the test succeeds), the entire loop body is executed, and the condition
is checked again. If it succeeds again, the entire loop body is executed again.
This continues, possibly infinitely.
A common mistake when first learning a Java-like language is to think that the
behavior of while is to stop as soon as the test becomes false, possibly in
the middle of the loop. This is not the case. The test is checked only at the
end of a complete iteration, and so this is the only time the loop can stop.
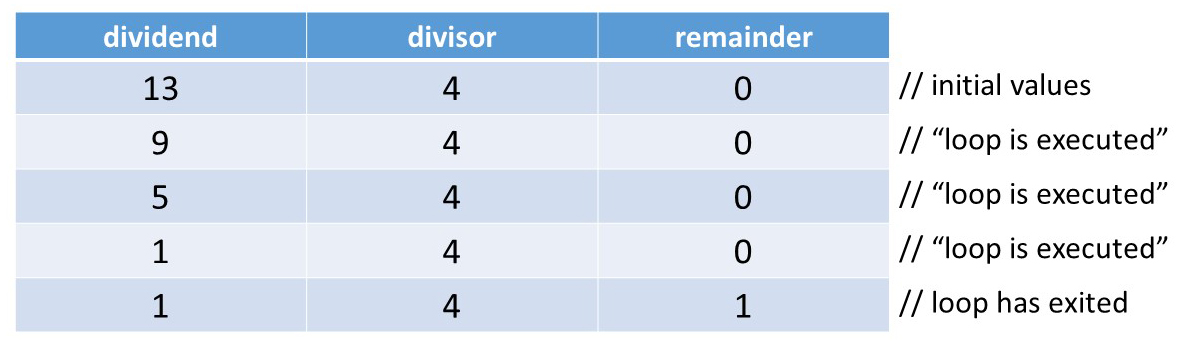
Here’s an example that implements the remainder operation dividend % divisor,
and produces some output. We assume all variables have already been declared,
and that divisor and dividend have already been assigned positive values.
while (dividend >= divisor) {
    dividend = dividend - divisor;
    System.out.println ("loop is executed");
}
remainder = dividend;
All statements of the loop body are executed, even if one of them affects the
truth value of the test. In the example above, values of 9 for dividend and
4 for divisor result in two lines of output. We show a representation with
values of 13 for dividend and 4 for divisor and initially 0 for
remainder. This results in 3 lines of output.
When debugging while loop code, sometimes it’s useful to make charts like the
one below to keep track of the value of each variable.
How for Works #
The for statement provides another way in Java to repeat a sequence of
statements, similar to while but slightly different. It starts with for,
continues with loop information inside parentheses, and ends with the loop
body (the segment to be repeated) enclosed in curly braces.
for (loop-information) {
    loop-body;
}
Loop information consists of initializations, a test (condition), and increments. If the test succeeds, the loop continues and then increments. These refer to the creation of variables, boolean conditions that dictates when the loop should and should not be entered, and the equation we use to update our position between loops. These three sections are separated by semicolons, and any of these may be blank. If there is more than one initialization or increment, they are separated by commas.
for (initialization; test; increment) {
    loop-body;
}
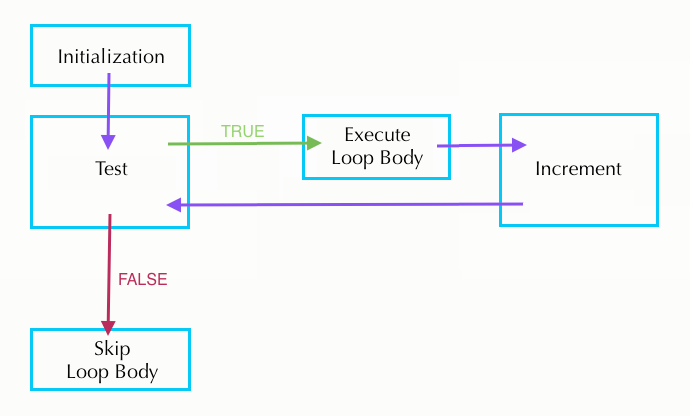
Loop execution proceeds as follows:
- Initializations are performed.
- The test is evaluated.
- If the condition is false, the loop is finished and execution continues with the code following the for loop.
- If the condition is true, the loop body is executed, increments are performed, and we loop back to the top of step 2 where the test is evaluated again. (Note: We never re-initialize.)
Note that, in fact, all of these sections of the for loop are optional. The code
for (;;) is in fact valid Java code. It never terminates!
The following loops are several equivalent ways to compute n factorial
(the product of all the positive integers up through n).
-
Two initializations in loop-information
for (int k = n, product = 1; k > 0; k = k - 1) { product = product * k; } -
Product initialized outside for loop
int product = 1; for (int k = n; k > 0; k = k - 1) { product = product * k; } -
Decrement performed inside the loop-body
int product = 1; for (int k = n; k > 0; ) { product = product * k; k = k - 1; } -
While loop equivalent
int product = 1;
int k = n;
while (k > 0) {
    product = product * k;
    k = k - 1;
}
As the last loop demonstrates, the for loop is basically a
repackaged while loop that puts all the information about how long the
loop should continue in one place. Thus, a for loop is generally easier
to understand than an equivalent while loop.
Shortcuts for Incrementing / Decrementing #
Let k be an integer variable. Then the three following statements all increment k by 1:
k = k + 1;
k += 1;
k++;
Similarly, these three statements all decrement k by 1.
k = k - 1;
k -= 1;
k--;
Note: The motivation for this shorthand notation is that the operations of incrementing and decrementing by 1 are very common. While it is legal to increment or decrement variables within larger expressions like
System.out.println(values[k++]);
this is a risky practice very susceptible to off-by-one errors. In general,
we suggest starting with more verbose syntax. Therefore, we ask that you
only use the ++ or -- operations on lines by themselves.
The break Statement #
The break statement “breaks out of” a loop (both for and while loops). In
other words, it stops the execution of the loop body, and continues with the
statement immediately following the loop. An example of its use would be a
program segment that searches an array named values for a given value,
setting the variable found to true if the value is found and to false if it
is not in the array.
boolean found = false;
for (int k = 0; k < values.length; k++) {
    if (values[k] == value) {
        found = true;
        break;
    }
}
This break statement allows us to save computation time. If we find the value within
the array before the end, we don’t waste more time looping through the rest
of the array.
However, the break statement is not always necessary, and code with a lot
of breaks can be confusing. Abusing the break statement is often considered
poor style. When using break, first consider if instead it would be more
appropriate to put another condition in the test.
The continue Statement #
The continue statement skips the current iteration of the loop body,
increments the variables in the loop information, then evaluates the loop
test. This example checks how many 0’s there are in array values:
int count = 0;
for (int i = 0; i < values.length; i++) {
    if (values[i] != 0) {
        continue;
    }
    count += 1;
}
System.out.println("Number of 0s in values array: " + count);
Similar to the break statement, the continue allows us to save time by
skipping sections of the loop. In this case, the continue allows us to add
to the count only when there is a 0 in the array. Removing continue will
give an incorrect output.
The difference between break and continue is that break immediately stops
the loop and moves on to the code directly following it. In comparison,
continue stops going through the current iteration of the loop body and
immediately continues on to the next iteration as given by the loop information.
Like with break, abusing continue is often considered poor style. Try not
to go crazy with nested breaks and continues.
Both break and continue apply to only the closest loop it is enclosed in.
For instance, in the case of the following nested loop, the break will only
exit out of the inner for loop, not the outer one.
for (int i = 0; i < values.length; i++) {
    for (int j = i + 1; j < values.length; j++) {
        if (values[i] == value[j]) {
            break;
        }
    }
}
Array Definition and Use #
An array is an indexed sequence of elements, all of the same type. Real-life examples of arrays include the following:
- ducks in a row
- slices of bread
- words in this sentence
- book pages
- egg cartons
- chessboards / checkerboards
We declare an array variable by giving the type of its elements, a pair of square brackets, and the variable name, for example:
int[] values;
Note that we don’t specify the length of the array in its declaration.
Arrays are basically objects with some special syntax. To initialize an array,
we use the new operator as we do with objects; the argument to new is the type
of the array, which includes the length. For example, the statement
values = new int[7];
stores a reference to a 7-element integer array in the variable values. This
initializes the array variable itself. If we want to declare and initialize the
array at the same time, we can:
int[] values = new int[7];
The elements of the array are indexed from 0 to (array length) - 1 and the
element at a particular index can be changed with an assignment statement. For
example, to set the second element to 4 we write:
values[1] = 4;
For an int array, Java will (by default) set all of the elements to 0.
Similarly, double arrays will be filled with 0.0, boolean with false,
etc. For arrays of references to non-primitive objects (whose precise definition we will
cover in lab 4), the array will be initialized with null.
If you know what every value in your array should be at initialization time, you can use this simplified syntax to directly initialize the array to the desired values. Note that you don’t have to provide the array length because you’re explicitly telling Java how long your array should be.
int[] oneThroughFive = new int[]{1, 2, 3, 4, 5};
// This also works but only if you declare and initialize in the same line
int[] oneThroughFive = {1, 2, 3, 4, 5};
To access an array element, we first give the name of the array, and then
supply an index expression for the element we want in square brackets. For
example, if we want to access the kth element of values (0-indexed), we can
write:
values[k]
If the value of the index expression is negative or greater than/equal to the length of the array, an exception is thrown (negative indexing is not allowed).
Every array has an instance variable named length that stores the number of
elements that array can hold. For the values array just defined,
values.length is 7. The length variable can’t be changed; once we create an
array of a given length, we can’t shrink or expand that array.
for Statements with Arrays #
for statements work well with arrays. Consider, for example, an array named
values. It is very common to see code like the following:
for (int k = 0; k < values.length; k += 1) {
    // do something with values[k]
}
Multidimensional Arrays #
Having an array of objects is very useful, but often you will want to have an array of arrays of objects. Java does this in a very natural way. We’ve already learned that to declare an array, we do:
int[] array;
Similarly, to declare an array of arrays, we do:
int[][] arrayOfArrays;
When constructing an array of arrays, you must declare how many arrays it contains (because this is the actual array you are constructing), but you don’t have to declare the length of each array. To declare an array of 10 arrays, you do this:
int[][] arrayOfArrays = new int[10][];
To construct the first array in the array of arrays, you could do:
arrayOfArrays[0] = new int[5];
And you could access the first index of the first array as:
arrayOfArrays[0][0] = 1;
Hopefully this all makes sense. Alternatively, you can fix the length of each array in the array of arrays as the same length like this:
int[][] tenByTenArray = new int[10][10];
You can also directly instantiate an array of arrays with prefilled elements, such as:
int[][] oneThroughTen = {{1, 2, 3}, {4, 5, 6}, {7, 8, 9}};
An array of arrays, when the different sub-arrays can be of different sizes, is called a jagged array. If they are all the same size, it is often convenient to forget altogether that you have an array of arrays, and instead to simply imagine you had a multi-dimensional array. For instance, you could create a 3-dimensional array (to represent points in space, for example) like this:
int[][][] threeDimensionalArray = new int[100][100][100];
This 3D array has 100x100x100 = 1,000,000 different values. Multidimensional arrays are extremely useful, and you’ll be encountering them a lot.
(Optional) Exercise: A Jigsaw Puzzle - Drawing a Triangle #
The file TriangleDrawer.stuff contains a collection of statements. Some of
the statements, together with some extra right braces, form the body of a main
method that, when executed, will print the triangle:
*
**
***
****
*****
******
*******
********
*********
**********
(Each line has one more asterisk than its predecessor; the number of asterisks
in the last line is the value of the SIZE variable. SIZE has a hard-coded value,
which you should experiment with. Feel free to make SIZE controlled by a command-line argument!
However, when you turn it in, make sure that it will run with SIZE = 10!)
At the top of IntelliJ, you should see “File”. Click on it, and then hover over “New”
and then click on “Java Class”. See this reference screenshot:
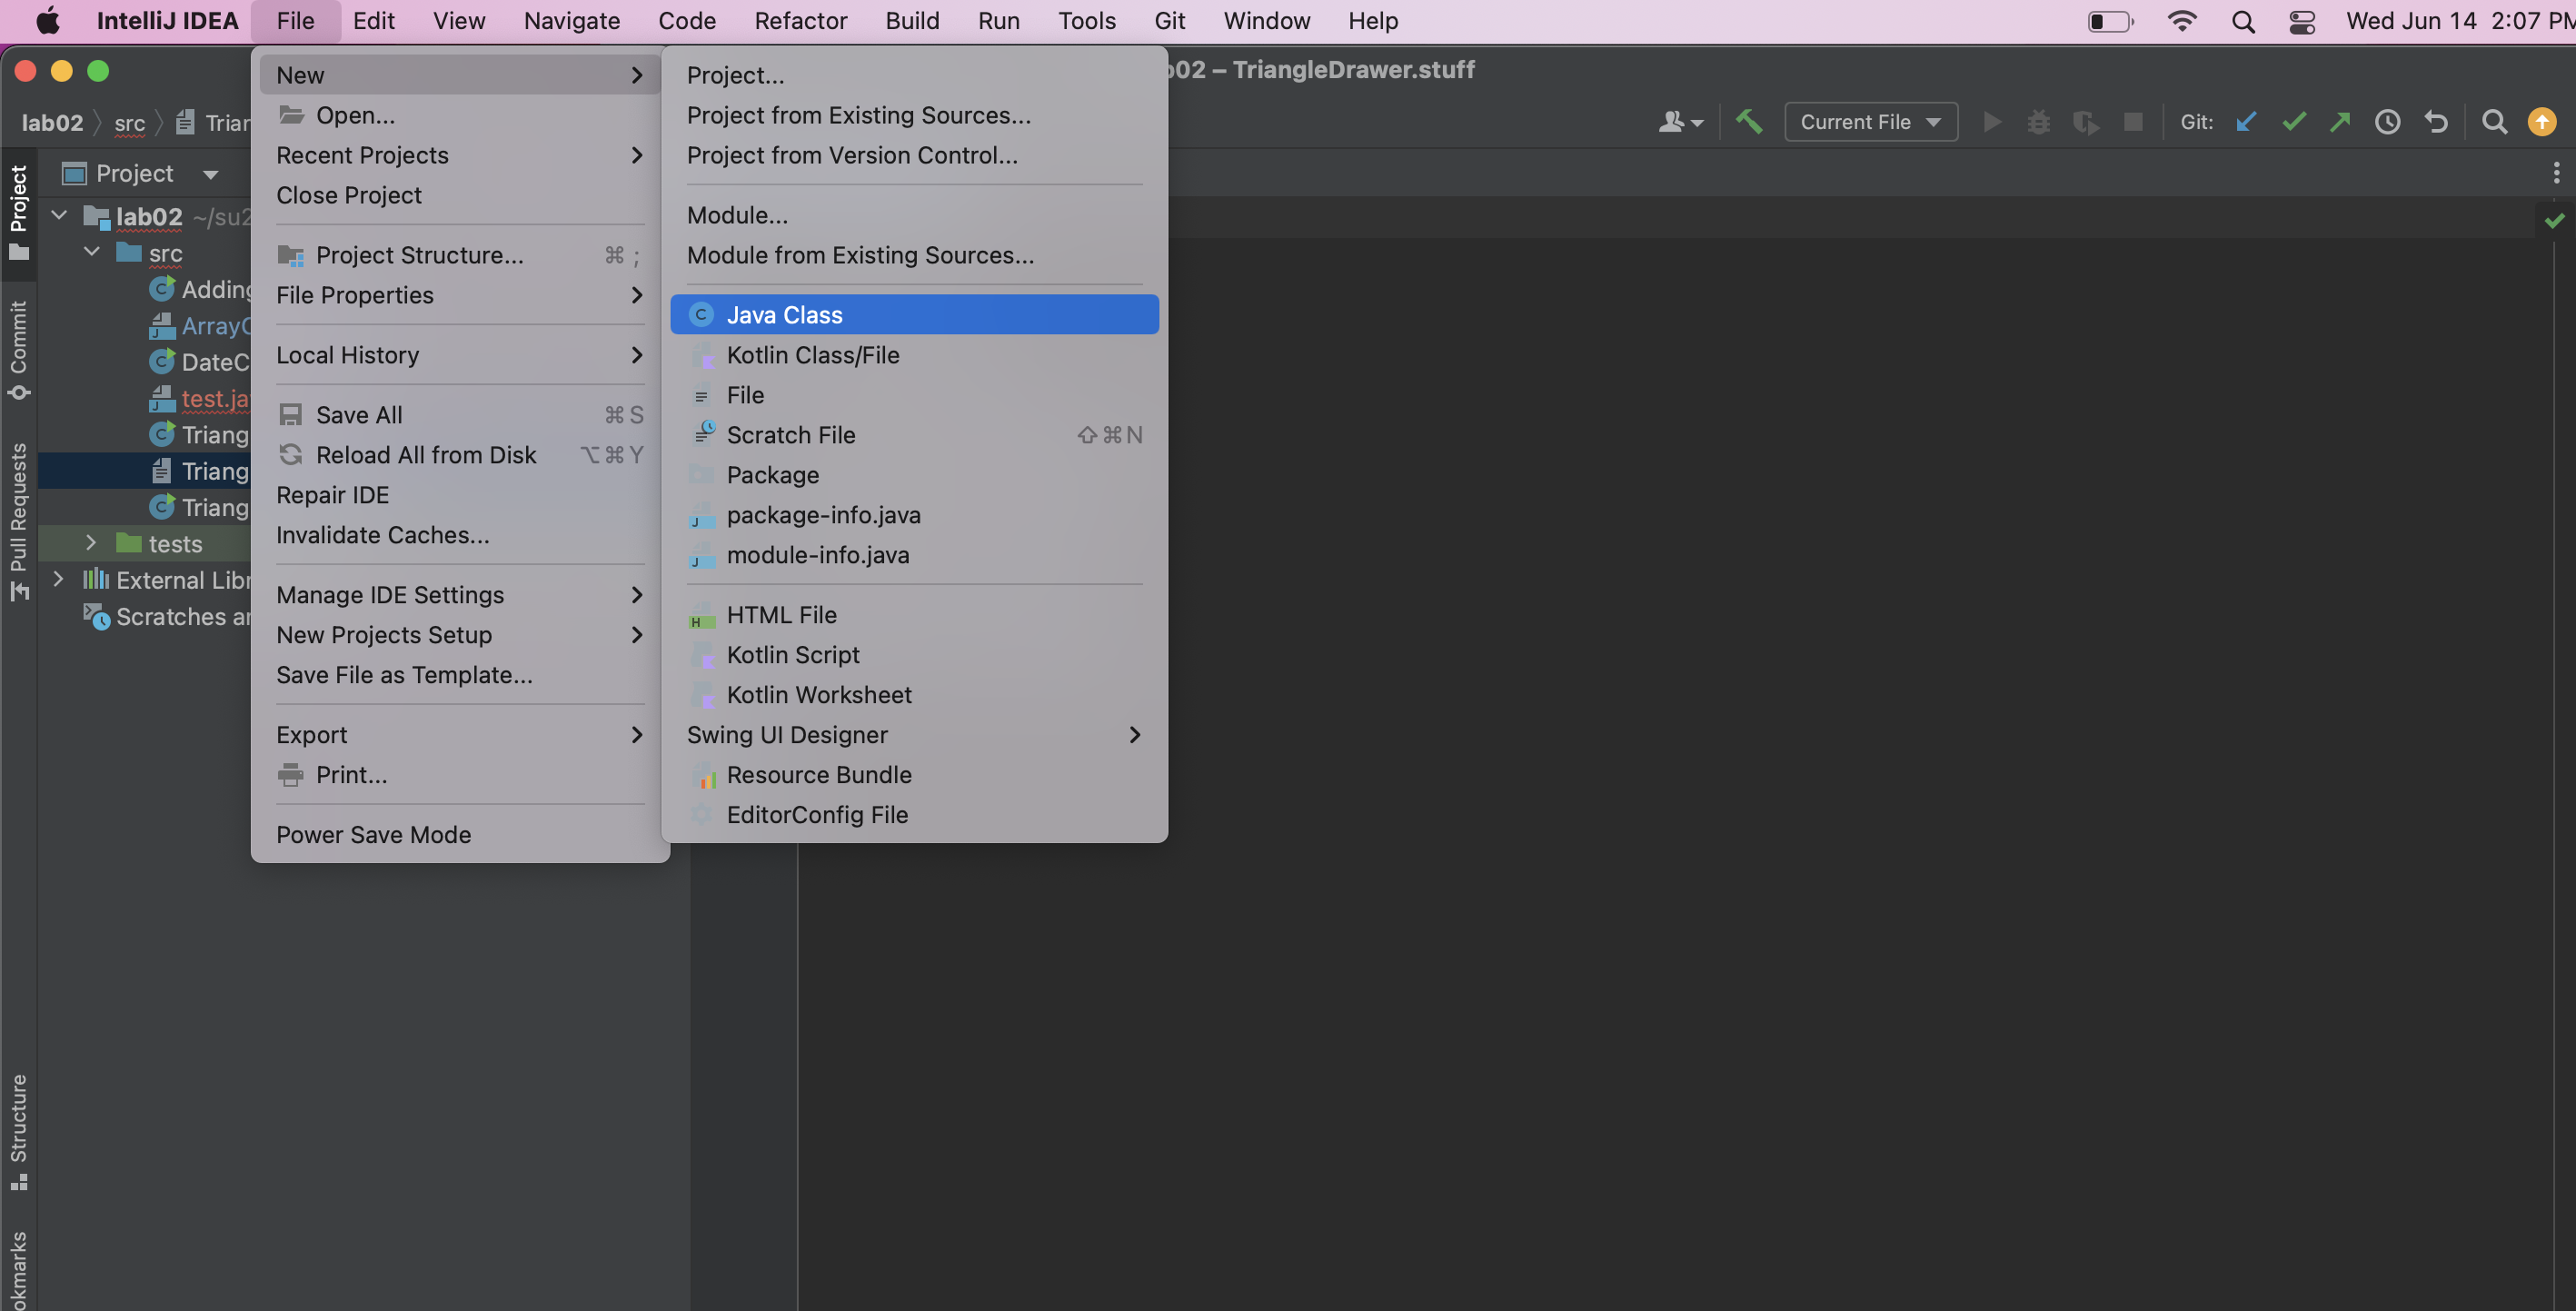
You will then be prompted to give a name, which in this case you should write TriangleDrawer.java.
Now, you’ve learned how to create a new Java class, and are ready to continue on to the
next part of the lab!
Next, let us add a main method to the class. As a reminder, the structure of a main method is as follows:
public static void main(String[] args) {
    // statements go here
}
Copy and paste statements from the TriangleDrawer.stuff file into the main method of
TriangleDrawer.java. You’ll have to add some right braces in addition to the copied lines
that you’ve chosen and rearranged. (You won’t need all the statements. You shouldn’t need to use
any statement more than once.)
Many students encounter infinite loops in their first solutions to this
problem. If you get an infinite loop, be sure to hit CTRL+C in your terminal to halt
execution.
Hint: So far, we have mostly used the well-named function System.out.println to conduct our printing. However, this function always outputs a new line at the end of its provided string. There is a variant of this function, System.out.print, which does not output a new line. You may find it helpful in this exercise!
(Optional) Exercise: Another Jigsaw Puzzle #
Make a new Java file called TriangleDrawer2.java (you might want to copy and
paste from TriangleDrawer.java). In this file, rewrite the program so that it
produces the exact same output, but using for loops and no while loops. If
you have having trouble, re-read the parts above describing how to convert a
while loop to a for loop.
Hint: When do we define variables? #
When working with loops, we have to consider scope. In other words, we have to consider when our variables are being created, when they are being modified, and when they are inaccessible. Which variables do we want to define within the loop (either in the header or the body) and which variables do we want to define outside of the loop (either before or after the loop)?
For example, consider the SIZE variable. When is it being modified? Based on that, where should it be defined?
(Optional) Exercise: An Adding Machine Simulator #
Consider a program that simulates an old-fashioned adding machine. The user types integers as input, one per line. Input should be handled as follows:
-
A nonzero value should be added into a subtotal.
-
A zero value should print the subtotal and reset it to zero.
-
Two consecutive zeroes should print the total of all values inputted, then print out every value that was inputted in sequence (not including zeroes) then terminate the program.
Open the associated file AddingMachine.java that holds the implementation of
the above described program. Read through the TODO in the comments provided in the AddingMachine.java file.
For this exercise, you will be asked to “complete” AddingMachine so that it executes as specified in this spec.
Here’s an example of how the program should behave.
| User input | Printed output |
|---|---|
| 0 | subtotal 0 |
| 5 | |
| 6 | |
| 0 | subtotal 11 |
| -5 | |
| 5 | |
| 0 | subtotal 0 |
| 13 | |
| -8 | |
| 0 | subtotal 5 |
| 0 | total 16 |
| 5 | |
| 6 | |
| -5 | |
| 5 | |
| 13 | |
| -8 |
There are several things to note. First, look at how the project description leads to the implementation. Try testing the implementation with the inputs and outputs listed above. Do the steps make sense?
Second, does this program work with all inputs?
In programming, the person who writes the code can, intentionally or not,
introduce their own ideas and assumption in the code, some of which can lead to
problems. Specifically, for the class AddingMachine.java we assumed that the
user will never enter more than MAXIMUM_NUMBER_OF_INPUTS non-zero values during
any run of the program.
Is this usually a fair assumption to make? Try running the code and supply input that violates this assumption. Does the code tell you that you have made an error or does it just crash? This touches on a new idea of programming: robustness. This refers to code’s ability to handle incorrect user input. In real life, you’ll never have a guarantee like this, but you haven’t been taught the proper Java to handle an arbitrarily long sequence of inputs (yet!).
A few things to take away from this code:
-
Always consider what will happen if your user interacts incorrectly with your data.
-
To exit the
mainmethod, execute areturn;statement somewhere inside the method. Because themainmethod is of typevoid, it can’t return a value. Therefore, the appropriatereturnstatement doesn’t have an argument. -
This code introduces the
Scannerclass. AScannercan be used to read user input. Here theScanneris created withSystem.inas an argument, which means that it is expecting input from the command line.-
You can do a variety of things with a
Scanner, but in this exercise you’ll find it most useful to use code like this:int k; k = scanner.nextInt(); -
Here,
scannerreads everything it can from its input and stores the result in an integerk. Becausescanner’s input is the command line, the program will actually stop and wait at this part of the code until the user types in something at the command line and hits enter. For example, if the user types100, then the program will store the value100inkbefore continuing on.
-
(Optional) Exercise: insert & delete #
Look at the files ArrayOperations.java and ArrayOperationsTest.java.
Fill in the blanks in the ArrayOperations class. Your methods should pass
the associated tests in ArrayOperationsTest.
Note: Before trying to program an algorithm, you should usually try a small case by hand. For each of the exercises today, demo each algorithm by hand before writing any code.
- The
insertmethod takes three arguments: anintarray, a position in the array, and anintto put into that position. All the subsequent elements in the array are moved over by one position to make room for the new element. The last value in the array is lost.
For example, let values be the array {1, 2, 3, 4, 5}. Calling
insert(values, 2, 7)
would result in values becoming {1, 2, 7, 3, 4}.
- The
deletemethod takes two arguments: anintarray and a position in the array. The subsequent elements are moved down one position, and the value 0 is assigned to the last array element.
For example, let values be the array {1, 2, 3, 4, 5}. Calling
delete(values, 2)
would result in values becoming {1, 2, 4, 5, 0}.
For today don’t worry about the methods being called with incorrect input.
(Optional) Exercise: Catenate #
Again, look at the files ArrayOperations.java and ArrayOperationsTest.java.
Note that, with the provided starter code, the tests specific to this exercise will not pass. This is expected! Implement the related method as described below and in the comments and the tests will pass!
Complete the Java function catenate so that it
performs as indicated below and in the comments. Remember that some
arrays can have zero elements!
Note: Again, before trying to program an algorithm, you should usually try a small case by hand.
You may find System.arraycopy useful for this problem, but you are not
required to use it. If you are not sure how to use this method, try Googling it!
- The
catenatemethod takes in two arguments: integer arraysAandB. You should return a new array with all of the elements ofAdirectly followed by all of the elements inB.
For example, let A be the array {1, 2, 3} and B be the array {4, 5}.
Calling
int[] values = catenate(A, B);
would result in values becoming {1, 2, 3, 4, 5}.
Again, for today, don’t worry about the method being called with incorrect input.
When you finish this function, all tests in ArrayOperationsTest.java should
compile and pass.
Deliverables #
As a reminder, this assignment has an FAQ page.
There are two required files, all inside the lab01 directory:
magic_word.txt- You should have received the correct magic word from completing the git checkoff.
Arithmetic.java- You should have fixed the bug so that the tests pass. We check this file with an autograder! For this lab, the autograder tests are the same as the ones you have on your computer.
Be sure to submit again according to the submission section, so that you submit your completed lab. Congratulations on finishing your first CS 61BL lab!