
FAQ #
Each assignment will have an FAQ linked at the top. You can also access it by adding “/faq” to the end of the URL. The FAQ for Lab 03 is located here.
Introduction #
To debug a program, you must first know what’s wrong. In this lab, you’ll get some experience with using the debugger to see program state. There are 3 types of bugs that you can encounter in code:
- Compiler error: There is some compilation issue (ie. IntelliJ underlines the code in red).
- Runtime: There is an exception that occurs while running the program.
- Correctness: The program runs without error, but it produces incorrect results.
When you run into a runtime bug, the error is accompanied by a “stack trace” that details the method calls that caused the error in the first place. One of the focuses of this lab will be to get you used to reading these stack traces, because they can be super helpful in debugging your own code.
After you’ve gotten practice debugging, you’ll explore TDD (test-driven development), a good practice industry-standard approach in which you design and write test cases before writing the actual code they test.
Setup #
Follow the assignment workflow instructions to get the assignment and open it in IntelliJ.
Goals and Outcomes #
In this lab, you will enhance your code debugging and testing abilities by defusing a (programmatic) bomb and practicing test-driven development. We’ll guide you through this process, but the intention is to make this a realistic debugging and testing experience.
By the end of this lab, you will…
- Be able to use the debugger and visualizer to inspect program state.
- Be able to interpret stack traces.
- Be better able to approach debugging code.
- Have learned about some common Java bugs and errors.
- Have better testing practices when developing.
Bomb #
The BombMain class calls the various phase methods of the Bomb class.
Your job is to figure out what the passwords to each of these phrases is by
using the IntelliJ debugger.
The code is written so that you can’t find the password just by reading it. For
this lab, you are forbidden from editing the Bomb code, whether to add
print statements or otherwise modify it. The autograder tests will use our version of Bomb.
The point of this exercise is to get comfortable using tools that will help you a lot down the road. Please take it seriously!
Interactive Debugging vs. Print Debugging #
So far, you might have practiced debugging by using print statements to see the values of certain variables as a program runs. When placed strategically, the output from printing might help make the bugs obvious or narrow down their cause. This method is called print debugging. While print debugging can be very useful, it has a few disadvantages:
- It requires you to modify your code, and clean it up after.
- It’s tedious to decide and write out exactly what you want to print.
- Printing isn’t always formatted nicely.
In this lab, we’ll show you a new technique, interactive debugging – debugging by using an interactive tool, or a debugger. We’ll focus on IntelliJ’s built-in debugger.
Debugger Overview #
Breakpoints #
Before starting the IntelliJ debugger, you should set a few breakpoints. Breakpoints mark places in your code where you can suspend the program while debugging and examine its state. This:
- Doesn’t require you to modify your code or clean it up after, since breakpoints are ignored in normal execution.
- Lets you see all the variables without needing to write print statements.
- Lets IntelliJ display everything in a structured manner
To set a breakpoint, click the area just to the right of the line number.
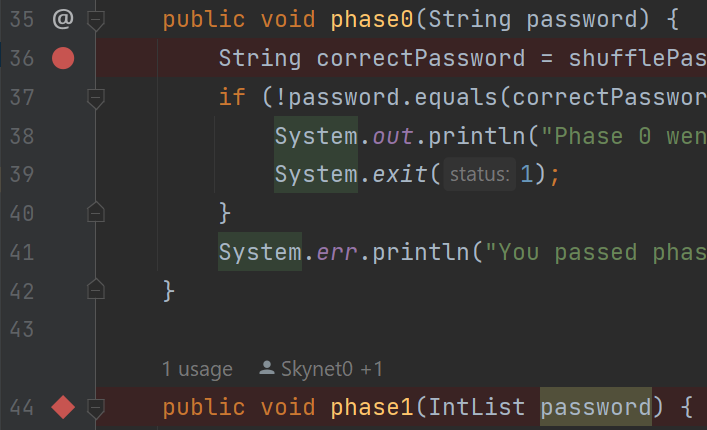
A red circle or diamond should appear where you clicked. If nothing appears, make sure that you click next to a line with code. When the debugger reaches this point in the program, it will pause before the execution of the line or method. Click the breakpoint again to remove it.
Running the Debugger #
Once you’ve set some breakpoints, you’re ready to start a debugging session!
Click on the green triangle next to the class or test you want to debug (in test
files there may be two green triangles). Instead of clicking the green triangle
to run, click the
 debug option:

The selected program should run until it hits its first breakpoint. A debugger window should also appear on the bottom of the interface, where the console was.
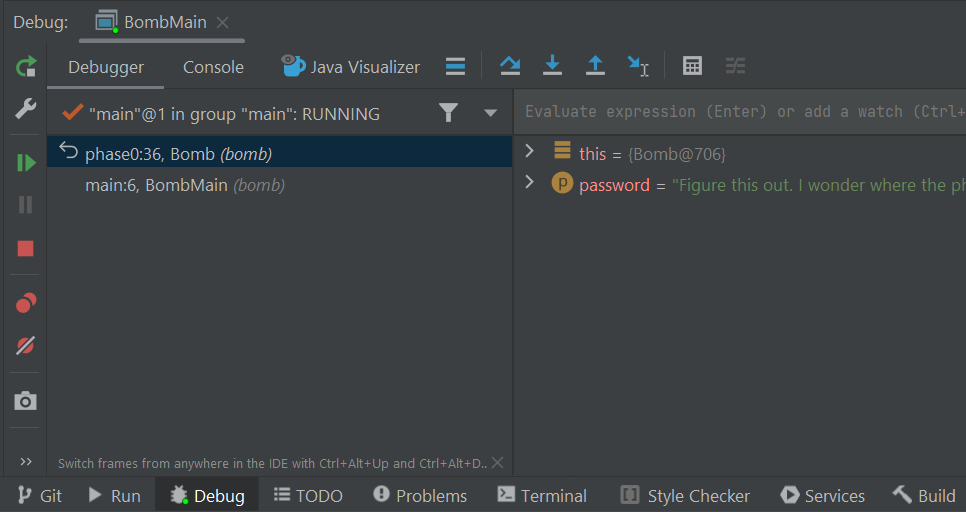
On the left, you will be able to see all current method calls and on the right, you will be able to see the values of instantiated variables at this point in the program (they will also be shown in gray text in the editor). For instances of classes, you can click the dropdown to expand them and look at their fields.
In the debugger, you have a few options:
- Learn something from the displayed values, identify what’s wrong, and fix
your bug! Click the stop button
 to stop the debug session.
 - Click the resume button
 to resume the program (until it
hits another breakpoint or terminates).
to resume the program (until it
hits another breakpoint or terminates). - Click the step over button
 to advance the program by
one line of code.
to advance the program by
one line of code.
- The step into button
 does something similar, but
it will step into any method called in the current line, while
the step over button will step over it.
does something similar, but
it will step into any method called in the current line, while
the step over button will step over it. - The step out button
 will advance the program until
after it returns from the current method.
will advance the program until
after it returns from the current method.
- The step into button
- If you accidentally step too far and want to start the session over, click the rerun button
 .
.
To see the console output (and type into the console) while debugging, click the “Console” tab next to “Debugger” in the top left of the debug window, just above the frames. If you want to see everything simultaneously (while being more compressed), you can drag the console tab to the far right of the bottom panel.
Reading Stack Traces #
When a runtime error occurs in Java, a stack trace is printed to the console
to provide information on where the error occurred and what steps the program
took to get there. When running Bomb for the first time, your stack
trace will look something like this:

The first thing to note is what kind of error occurred; this is shown at the
first line of the stack trace. In this case, our code threw a
NullPointerException.
For some exceptions, including NullPointerExceptions, Java will give you an
explanation. Here, password is null, so we can’t invoke (call) a method on
it.
The lines beneath it represent the sequence of methods the program took to arrive at the error: the first line in the list is where the error occurred and the line beneath it represents the line of code that called the method which threw the error, and so on.
You can click on blue text to navigate to that file and line.
Bomb Introduction (Phase 0) #
For this lab, we will be providing hints. Please only use them if you’re stuck! You’ll get much more out of the exercises if you try to solve them on your own first.
Task: Set a breakpoint at phase0 and use the debugger to find the password
for phase0 and replace the phase0 argument accordingly in
bomb/BombMain.java.
Once you’ve found the correct password, running the code (not in debug mode) should output “You passed phase 0 with the password <password>!” instead of “Phase 0 went BOOM!”
phase0 Method Breakdown
phase0 Method BreakdownThe phase0 method first generates a secret String correctPassword (you don’t
need to understand how shufflePassword works). The password passed in from
BombMain is then compared against correctPassword. The goal of this phase is
to use the debugger to find the value of correctPassword and pass in a
password that matches that value!
Visualizer (Phase 1) #
While being able to see variable values is great, sometimes we have data that’s not the easiest to inspect. The Java Visualizer shows a box-and-pointer diagram of the variables in your program, which is much better suited for large objects with a lot of data. To use the visualizer, run the debugger until you stop at a breakpoint, then click the “Java Visualizer” tab.
The password for phase 1 is an int[], not a String.
Task: Set a breakpoint at phase1 and use the Java Visualizer
to find the password for phase1 and replace the phase1 argument accordingly
in bomb/BombMain.java.
phase1 Method Breakdown
phase1 Method BreakdownThe phase1 method generates a secret int[] called correctArrPassword
(similar to the previous phase, you don’t need to understand how
shufflePasswordArr works). The password (in the form of an int[])
passed in from BombMain is then compared against the correctArrPassword
for equality. The goal of this phase is to use the debugger’s Java Visualizer to
find the structure and value of the correctArrPassword’s int[] and pass
in a password that matches it!
Optional Challenge: Conditional Breakpoints (Phase 2) #
Although phase 2 is optional, we highly recommend that you do it if you have time because conditional breakpoints are very useful!
Sometimes you may want to have your program pause only on certain conditions. To do so, create a breakpoint at the line of interest and open the “Edit breakpoint” menu by right-clicking the breakpoint icon itself. There, you can enter a boolean condition such that the program will only pause at this breakpoint if the condition is true.
Another thing you can do is to set breakpoints for exceptions in Java. If your
program is crashing, you can have the debugger pause where the exception is
thrown and display the state of your program. To do so, click
 in the debugger window and press the plus icon to create a “Java Exception
Breakpoint”. In the window that should appear, enter the name of the exception
that your program is throwing.
in the debugger window and press the plus icon to create a “Java Exception
Breakpoint”. In the window that should appear, enter the name of the exception
that your program is throwing.
Task: Set a breakpoint at phase2 and use the debugger to find the password
for phase2 and replace the phase2 argument accordingly in
bomb/BombMain.java. Remember, don’t edit Bomb.java!
Note: The password isn’t given explicitly like in the previous phases.
Rather, your task is to construct an input so that the boolean correct
variable is set to true after phase2 is run.
Tip: After you pass phase 0 and phase 1, before you change anything else for phase 2,
try running BombMain.java. You’ll see that the program will exit with an ArrayIndexOutOfBoundsException,
and resultant stack trace, which means that the code is trying to access an array at an index that does not fit within
the bounds of the array. Revisit the Reading Stack Traces section if you need a refresher on
stack traces.
Hint 1
You may want to look up Java’s split method for Strings if you’re unsure
of what it does.
Hint 2
You don’t necessarily need to construct the password in one line of code.
Hint 3
You’ll need to build the password in pieces so that the split method will cause
the correct number be in the right spot.
Hint 4
After you’ve constructed a sufficiently long String so that 1337 is a valid
index, set a conditional breakpoint inside the for loop that pauses the program
when i is close to 1337. Then step until you find the password.
phase2 Method Breakdown
phase2 Method BreakdownThe phase2 method takes in your password from BombMain and splits it by
spaces into the passwordPieces array. For example, if your password is "1 2
3", then passwordPieces will be equivalent to {"1", "2", "3"}.
The method then adds 100,000 random integers to a Set called numbers. It
then loops through them using a for-each loop, incrementing a variable i as it
goes along. On the 1338th iteration (because Java is zero-indexed, i == 1337
on iteration 1338), we check whether the integer at the 1337th index of the
passwordPieces array is equal to the current number.
At this point, you should be able to run the tests in tests/bomb/BombTest.java
and have all of them pass with a green checkmark.
Recap: Debugging #
By this point you should understand the following tools:
- Breakpoints
- Step Over
- Step Into
- Step Out (though you might not have actually used it in this lab)
- Resume
- Conditional breakpoints
However, this is simply scratching the surface of the features of the debugger! Feel free to experiment and search around online for more help.
Some useful features include:
- Remember that Watches tab? Why not read into what that does?
- Or try out the incredibly handy Evaluate Expressions calculator button (the last button on the row of step into/over/out buttons)?
- Or perhaps look deeper into breakpoints, and Exception Breakpoints which can pause the debugger right before your program is about to crash.
We won’t always use all of these tools, but knowing that they exist and making the debugger part of your toolkit is incredibly useful.
Testing Your Code with Truth #
In the rest of the lab, you will be officially introduced to Google’s Truth assertions library. It provides an intuitive way to write repeatable tests, which substantially reduces the tedium of testing your code. Many of your lab submissions for the rest of the course will include a Truth testing file and all of our autograders are written using Truth or JUnit.
You may already be familiar with JUnit, a common Java testing framework. Both Truth and JUnit make easy an approach to programming called test-driven development (TDD). TDD is a popular approach in industry in which you design and write test cases before writing the code they test. We will encourage it in the remainder of CS 61BL, starting by leading you through the steps of the construction of a class representing measurements (feet, yards, inches).
In 61BL, we will use Truth assertions inside JUnit framework tests instead of JUnit assertions for the following reasons:
- Better failure messages for lists.
- Easier to read and write tests.
- Larger assertions library out of the box.
We often write tests using the Arrange-Act-Assert pattern:
- Arrange the test case, such as instantiating the data structure or filling it with elements.
- Act by performing the behavior you want to test.
- Assert the result of the action in (2).
We will often have multiple “act” and “assert” steps in a single test method to reduce the amount of boilerplate (repeated) code.
Truth Assertions #
A Truth assertion takes the following format:
assertThat(actual).isEqualTo(expected);
To add a message to the assertion that displays upon failure, we can instead use:
assertWithMessage("actual is not expected")
    .that(actual)
    .isEqualTo(expected);
We can use things other than isEqualTo, depending on the type of actual.
For example, if actual is a List, we could do the following to check its
contents without constructing a new List:
assertThat(actualList)
    .containsExactly(0, 1, 2, 3)
    .inOrder();
If we had a List or other reference object, we could use:
assertThat(actualList)
    .containsExactlyElementsIn(expected)  // `expected` is a List
    .inOrder();
Truth has many assertions, including isNull and isNotNull; and
isTrue and isFalse for booleans. IntelliJ’s autocomplete will often give
you suggestions for which assertion you can use.
Example Test #
Let’s break down an example test:
@Test
/** In this test, we use only one assertThat statement.
    *  In other words, the tedious work of adding the extra assertThat statements isn't worth it. */
public void arrTest() {
    int[] arr = new int[3]; // arr is [0, 0, 0] because elements of int[] are initially set to 0

    arr[0] = 42; // after this we expect: [42, 0, 0]
    arr[1] = 27; // after this we expect: [42, 27, 0]
    arr[2] = 961; // after this we expect: [42, 27, 961]

    assertThat(arr).asList().containsExactly(42, 27, 961).inOrder();
}
@Testtells Java that this is method is a test, and should be run when we run tests.- Arrange: We construct a new
int[]calledarr, and set 3 elements in it at indices 0, 1, and 2. - Act: We call
asListon the result ofassertThat(arr), which turns the assertion object into a list and implicitly depends on the earlier sets to the array. - Assert: We use a Truth assertion to check that the object created from
asListcontains specific elements in a specific order.
Task: Using IntelliJ to Write Tests #
Similar to the debugging exercises, this section will not be graded, but it is recommended that you complete this exercise either now or sometime over the next few days. Testing is an equally important skill to learn as it will be used extensively throughout the rest of our class (in labs, projects, and exams).
Past that, in industry, testing your code is a huge part of what you will do as a software engineer. Writing code is incomplete without a solid set of tests to verify its fault tolerance and accuracy.
Untested code is broken code.
One of the many great features about IntelliJ is that it can be used to start generating JUnit tests, which we will use as a skeleton for our Truth assertions. We will illustrate how it can be used with the following example. Follow along each of the steps in IntelliJ.
-
Navigate to
Counter.java. In it, you will see an instance variablemyCount, some instance methods (increment(),reset(),value()), and the constructor, defined aspublic Counter() { myCount = 0; }. As a quick refresher, the constructor creates an instance of theCounterclass and initializes itsmyCountinstance variable (attribute) to 0. We’ll talk more about objects in depth next week; for now, we just want you to pay attention to the flow of how tests are generated, and for which methods. -
Make a new JUnit Test Case:
-
Click on the class name in the
Counter.javafile and select “Navigate -> Test”. Alternatively, you can use CTRL / CMD + Shift + T.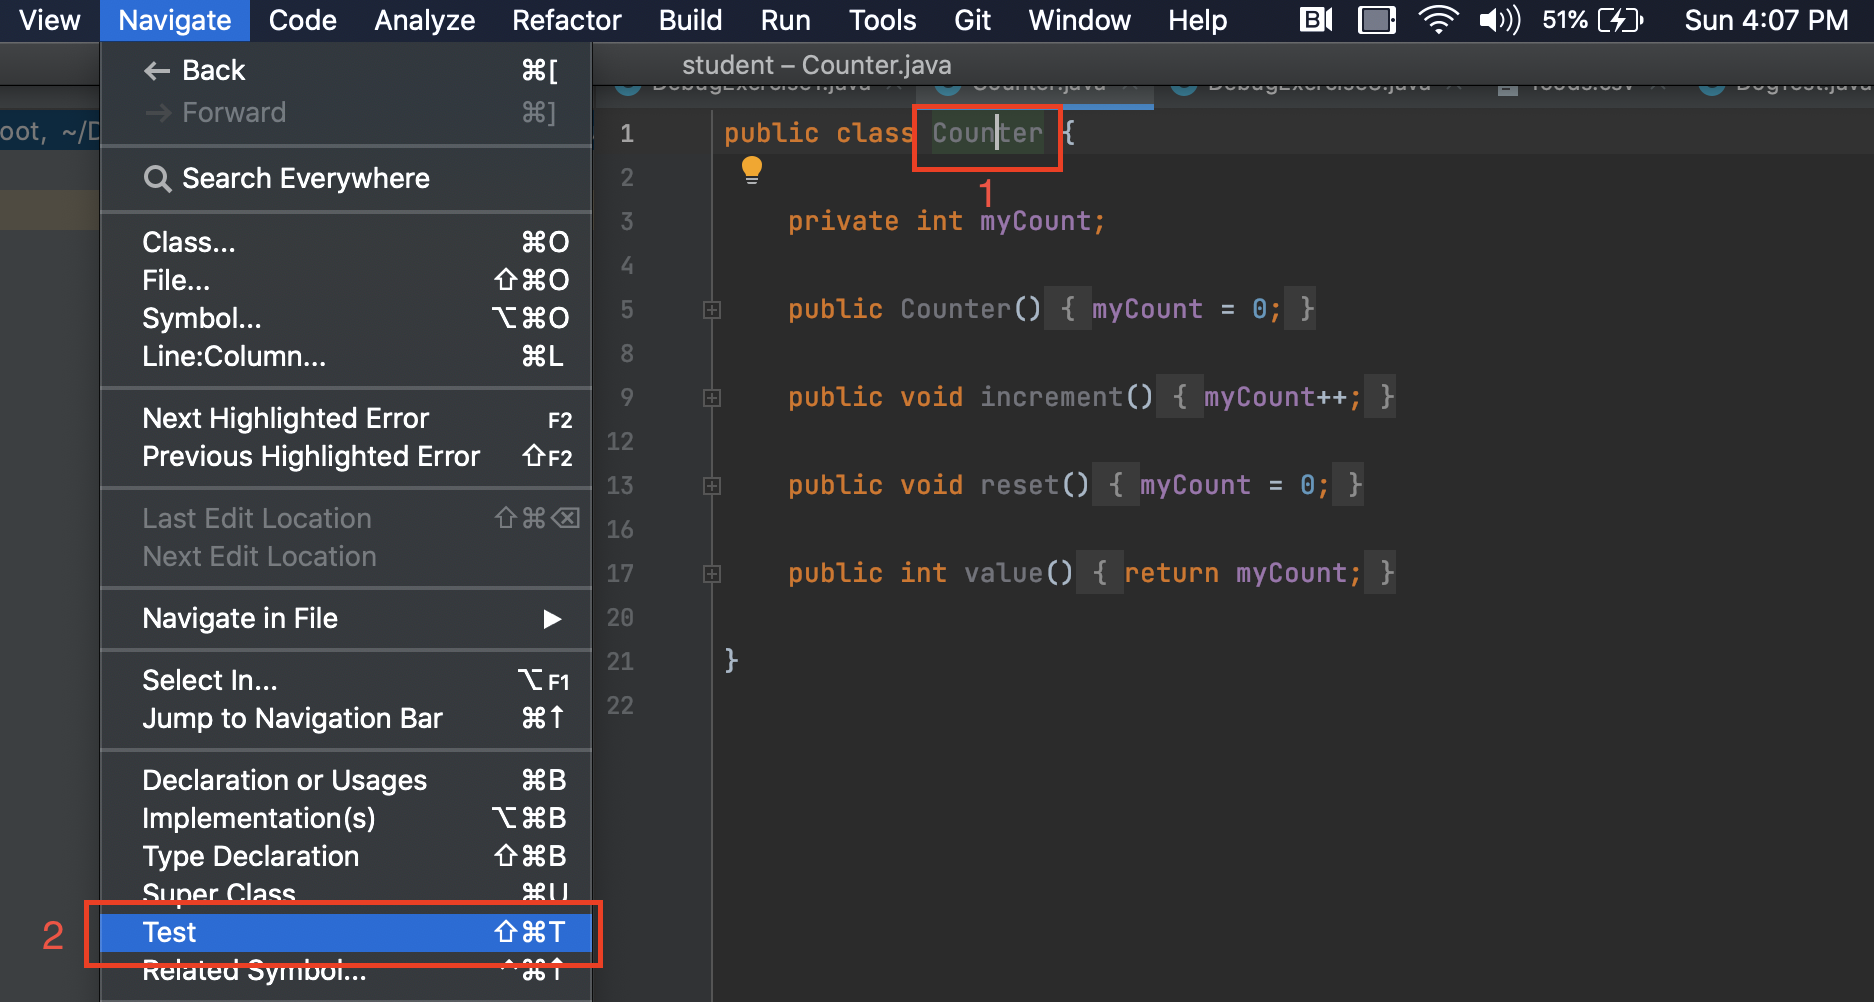
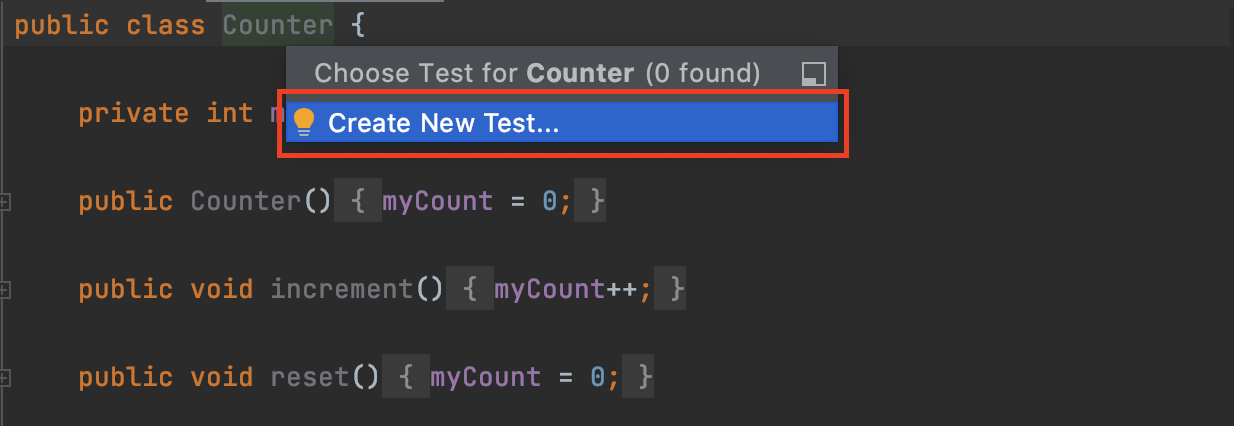
-
Click “Create New Test…“. If you are asked to create test in the same source root, click “Ok”.
-
Name the JUnit Test Case
CounterTest. Select “JUnit 4” as the testing library. Next check the boxes for theincrement()andreset()functions.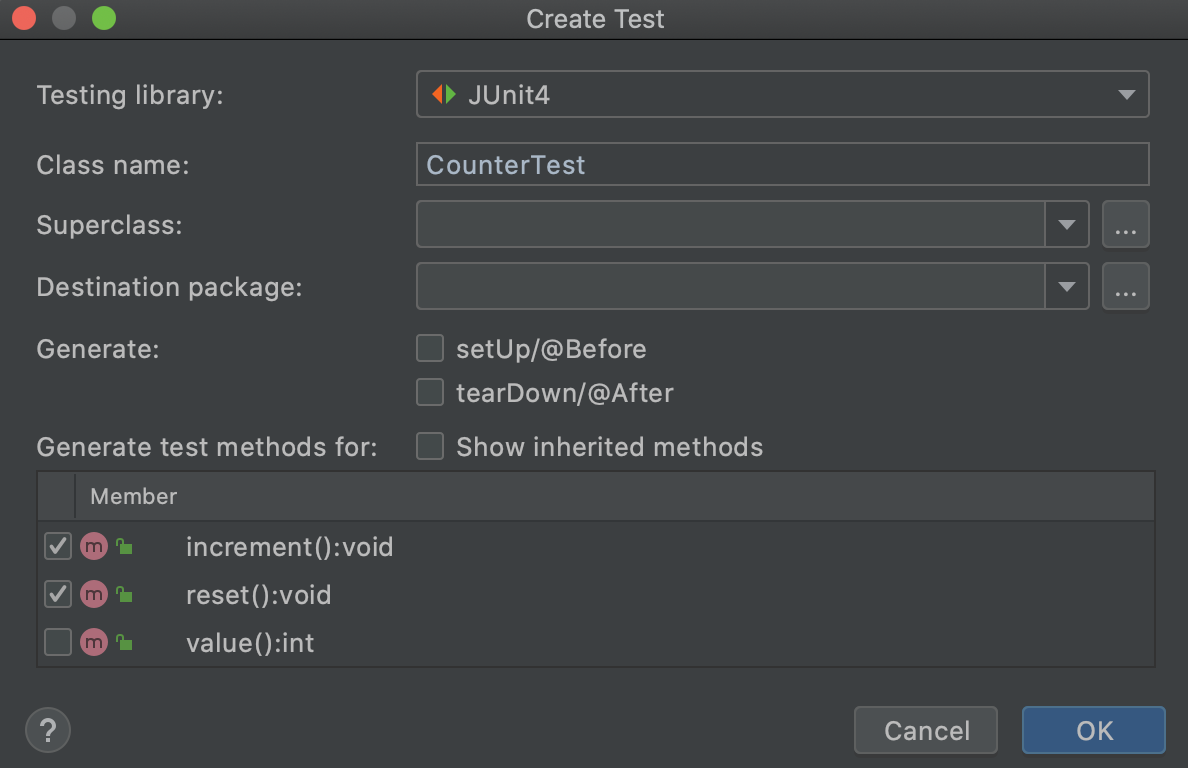
-
You should see a file similar to the following:
import org.junit.Test; import static org.junit.Assert.*; public class CounterTest { @Test public void increment() { } @Test public void reset() { } } -
At this point, we have a nice skeleton testing setup, but we don’t want to use JUnit assertions. Replace the
import static org.junit.Assert.*;line at the top withimport static com.google.common.truth.Truth.assertWithMessage;so that we can use Truth assertions. -
Edit your
CounterTest.javaas follows:-
In
testIncrement, put the codeCounter c = new Counter(); c.increment(); assertWithMessage("Counter value is not 1.").that(c.value()).isEqualTo(1); c.increment(); assertWithMessage("Counter value is not 2.").that(c.value()).isEqualTo(2); -
In
testReset, put the codeCounter c = new Counter(); c.increment(); c.reset(); assertWithMessage("Counter value is not 0 after reset.").that(c.value()).isEqualTo(0); -
IntelliJ doesn’t generate constructor tests. Add one:
@Test
public void testConstructor() {
    Counter c = new Counter();
    assertWithMessage("Counter value is not 0 upon instantiation.").that(c.value()).isEqualTo(0);
}
-
-
-
Run your tests individually; they should all pass. You should also be able to run your full test file (test case) and see that all tests pass.
-
We have shown you what it looks like to pass a test, but what happens if you fail? Intentionally introduce an error into one of the
CounterTestmethods, asserting for example that the value of a freshly-builtCounterobject should be 7. Run the test again and observe the error messages that result.
Testing Principles #
Test-Driven Development #
Test-driven development is a development process that involves designing test cases for program features before designing the code that implements those features. The work flow is:
- Write test cases that demonstrate what you want your program to be able to do. As the code isn’t written yet, most tests should fail.
- Write as little code as possible so that all the tests are passed.
- Clean up the code as necessary. Recheck that all tests still pass.
Test Effectiveness #
Unsurprisingly, there are effective tests and ineffective tests. The presence of tests alone does not mean that those tests are doing anything:
@Test
public static void uselessTest() {
    assertThat(true).isEqualTo(true);
}
Given a codebase, and tests for that codebase, how can we evaluate how “good” the tests are? In other words, how much confidence do our tests give us that our code is completely, fully correct?
Statement Coverage #
One testing principle you can imagine is that test values should exercise every statement in the program, since any statement that’s not tested may contain a bug. Below is a program that checks whether a given year is a leap year:
public static boolean isLeapYear(int year) {
    if (year % 400 == 0) {
        return true;
    } else if (year % 100 == 0) {
        return false;
    } else if (year % 4 == 0) {
        return true;
    } else {
        return false;
    }
}
The code contains four cases, exactly one of which is executed for any particular value of year. Thus we must test this code with at least one year value per case, so at least four values of year are needed for testing:
- a year that’s divisible by 400;
- a year that’s divisible by 100 but not by 400;
- a year that’s divisible by 4 but not by 100;
- a year that’s not divisible by 4.
This approach by itself is insufficient as we will see below.
Path Coverage #
To augment this first principle, we’ll say we need to test various paths
through the program. For example, suppose our program had two consecutive if
statements:
if ( ... ) {
    ...
}
if ( ... ) {
    ...
}
There are two possibilities for each if case: true or false.
Thus there are four paths through the two statements, corresponding to the four
possibilities
true,truetrue,falsefalse,truefalse,false
The following example shows why statement coverage is not a guarantee of correctness:
A year value of 2000 causes all the statements in the below program segment
to be executed, giving 100% statement coverage. However, there may be a bug in
this code it will not catch.
public static boolean isLeapYear(int year) {
    isLeapYear = true;
    if (year % 4 == 0) {
        isLeapYear = true;
    }
    if (year % 100 == 0) {
        isLeapYear = false;
    }
    if (year % 400 == 0) {
        isLeapYear = true;
    }
    return isLeapYear;
}
From the previous discussion, it looks like we need eight tests,
corresponding to the eight paths through the three if statements. They are listed below.
    year % 4 == 0, year % 100 == 0, and year % 400 == 0  // (which just means that year % 400 == 0)
    year % 4 == 0, year % 100 == 0, and year % 400 != 0
    year % 4 == 0, year % 100 != 0, and year % 400 == 0  // (not possible)
    year % 4 == 0, year % 100 != 0, and year % 400 != 0
    year % 4 != 0, year % 100 == 0, and year % 400 == 0  // (not possible)
    year % 4 != 0, year % 100 == 0, and year % 400 != 0  // (not possible)
    year % 4 != 0, year % 100 != 0, and year % 400 == 0  // (not possible)
    year % 4 != 0, year % 100 != 0, and year % 400 != 0  // (equivalently, year % 4 != 0)
Notice that some of the tests are logically impossible, and so we don’t need to use them. This leaves the four tests we needed to write.
Testing Loops #
Loops can vastly increase the number of logical paths through the code, making it impractical to test all paths. Here are some guidelines for testing loops, drawn from Program Development in Java by Barbara Liskov and John Guttag, a book used in previous CS 61B offerings.
- For loops with a fixed amount of iteration, we use two iterations. We choose to go through the loop twice rather than once because failing to reinitialize after the first time through a loop is a common programming error. We also make certain to include among our tests all possible ways to terminate the loop.
- For loops with a variable amount of iteration, we include zero, one, and two iterations, and in addition, we include test cases for all possible ways to terminate the loop. The zero iteration case is another situation that is likely to be a source of program error.
Liskov and Guttag also say: This approximation to path-complete testing is, of course, far from fail-safe. Like engineers’ induction “One, two, three—that’s good enough for me,” it frequently uncovers errors but offers no guarantees.
Black-box Testing #
All the testing principles discussed so far focused on testing features of the code. Since they assume that we can see into the program, these techniques are collectively referred to as glass-box testing, as if our code is transparent.
Another testing approach is called black-box testing. It involves generating test cases based only on the problem specification, not on the code itself. There are several big advantages of this approach:
-
The test generation is not biased by knowledge of the code. For instance, a program author might mistakenly conclude that a given situation is logically impossible and fail to include tests for that situation; a black-box tester would be less likely to fall into this trap.
-
Since black-box tests are generated from the problem specification, they can be used without change when the program implementation is modified.
-
The results of a black-box test should make sense to someone unfamiliar with the code.
-
Black-box tests can be easily designed before the program is written, so they go hand-in-hand with test-driven development.
In black-box testing as in glass-box testing, we try to test all possibilities of the specification. These include typical cases as well as boundary cases, which represent situations that are extreme in some way, e.g. where a value is as large or as small as possible.
There are often a variety of features whose “boundaries” should be considered.
For example, in the DateConverter program, boundary cases would include not
only dates in the first and last months of the year, but also the first and
last dates of each month, etc.
Whenever you write a program, try to think of any boundary cases. These cases, although potentially rare, are a common source of error. The safest thing to do is brainstorm as many unique ones as you can then write tests which test each unique boundary case.
Parting Advice on Testing #
As you progress through the course, you will hopefully improve your testing skills! Here are some last bits of advice for now.
-
Write tests as if you were testing your worst enemy’s code. You’re generally too familiar with your own code and might read a given line as containing what you meant to write rather than what you did write. Don’t fall into the trap of hoping not to find bugs in your own code.
-
Test your program with values that are as simple as possible. If the program is supposed to work for a set of 1000 data values, make sure it works on a set of 3 values first.
-
Wrapping a loop around your code may allow you to test it with multiple values in a single run.
-
Make sure you know how your program is supposed to behave on a given set of test data. Often lazy programmers try a test and just scan through it thinking that it “looks right”. Such a programmer might later be embarrassed to find out that they computed a product cost that’s greater than the national debt or a quantity that’s greater than the number of atoms in the universe.
-
Make sure to cover both the common cases and the extreme, edge or boundary cases. Forgetting one or the other (or both!) can cause you to miss critical bugs in your code.
Exercise: Testing a Triangle Class #
This section will be graded. All points for this part of the
lab will be derived from writing tests in TriangleTest.java. Note that
you will not be able to run the tests you write in this file locally; you
must submit to the autograder to run on our implementations of Triangle.java.
Now, you’re going to be writing the code and a whole file of
tests with Truth assertions for the Triangle class. Your goal is to write comprehensive tests
that pass on a correct implementation of the Triangle methods, but fail on incorrect implementations of Triangle
methods.
You’ll notice that Triangle.java and TriangleTest.java use the abstract keyword. You don’t need to know
what this is right now because we’ll cover it later in the course, but in TriangleTest.java,
when you are testing the Triangle methods, you must call them on a Triangle object returned by getNewTriangle().
The skeleton code has more on this.
You should follow this process for this exercise:
- Read over the
Triangle.javaclass throughly. The comments above each of the methods explain what the expected behavior of this class will be. - Write tests with Truth assertions in the
TriangleTest.javafile. You should write tests which allow you to test all of the methods and behavior in the class. You should think of edge cases that buggy implementations ofTriangle.javamethods are likely to fail. - Though you won’t exactly be practicing TDD here because you’re only writing the tests and not filling
in the
Triangle.javaclass after, still think about how you would implement the methods. Do your tests poke holes in your first instinctual implementations? Do you see how writing tests before writing the code can be beneficial?
Recap #
In this lab, we discussed:
- Effectively using the IntelliJ debugger.
- Truth assertions and the JUnit Testing Framework.
- Test-driven development and good testing principles.
Deliverables and Scoring #
The lab is out of 2 points. There are no hidden tests on Gradescope. If you
pass all the local required tests (not including the optional ones) and write comprehensive tests in TriangleTest.java,
you will receive full credit on the lab.
- Find the first 2 passwords in
BombMain.java. - (Optional) Find the 3rd password in
BombMain.java. - Write tests in
TriangleTest.javathat pass on the correctTriangle.javaimplementation and fail on buggyTriangle.javaimplementations.
Submission #
Just as you did in Lab 1, add, commit, then push your Lab 3 code to GitHub. Then, submit to Gradescope to test your code. If you need a refresher, check out the instructions in the Lab 1 spec and the Assignment Workflow Guide.
If you worked with a partner, remember each of you need a separate submission on Gradescope.
Acknowledgements #
This assignment is adapted from Adam Blank and previous iterations of CS 61B.