Introduction #
As usual, pull the files from the skeleton and open the Lab 10 directory in IntelliJ.
In this lab, we will introduce another data structure called a tree (you might have already seen this in CS 61A or another equivalent course). The meaning of the tree data structure originates from the notion of a tree in real life.
Below is a conceptual visualization of a tree. It’s not really a box and pointer diagram and should not be interpreted as a literal implementation in Java.
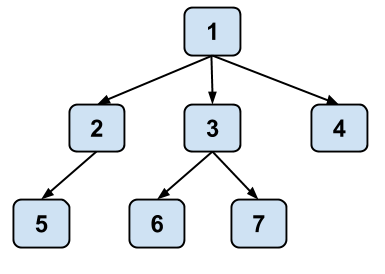
Note that while a tree in real life is rooted at the bottom and branches out and upwards, trees in computer science are typically drawn such that they are rooted at the top and branch out and downwards.
For this lab, we have not provided you with any local tests. Instead, we expect you to create your own test file and write your own tests! You can also use ad-hoc testing in the main methods to test quickly.
Vocabulary #
In order to be able to talk about trees, we first need to define some terminology.
| Term | Description | Example Above |
|---|---|---|
| Node | Single element in a tree | 1, 2, 3, 4, 5, 6, and 7 are all nodes. |
| Edge | A connection between two nodes | There is a direct edge from 1 to 2, but there is no direct edge from 1 to 7. |
| Path | A series of one or more edges that connects two nodes without using an edge more than once | There is a path from 1 to 7, consisting of edges 1 -> 3 and 3 -> 7. |
| Leaf | A node with no children | 4, 5, 6, and 7 are leaf nodes. |
| Root | The topmost node, which does not have a parent | 1 is the root node. |
Relationships #
These following terms are defined with respect to a particular node.
| Term | Description |
|---|---|
| Child | A node directly below the current node |
| Parent | Single node connected directly above the current node |
| Siblings | Nodes with the same parent |
| Ancestors | All nodes on the path from the selected node up to and including the root |
| Descendants | All the children, children’s children, and so forth of a node |
| Subtree | The tree consisting of the node and all of its descendants |
| Height | The length of the path from the node to its deepest descendant. By length, we mean the number of nodes traveled along a given path. Therefore, the height of a leaf node is 1. (Note: There is an alternate definition of height as the number of edges traversed. In that case, the height of a leaf would be 0.) |
| Depth | The length of the path from the node to the root. The depth of the root node is 0. |
Sometimes we’ll refer to the height and depth of a tree as a whole. In these cases, it’s usually assumed that we’re referring to the height of the root node and the depth of the deepest leaf, respectively.
Definition #
For a linked structure of nodes to be considered a tree:
- nodes must have either no parents or 1 parent
- there can be no cycles (paths that start and end at the same node)
- there can only be one path between any two nodes in a tree
- all nodes must be a descendant of the root (except the root itself)
Discussion: Examples of Trees #
Discuss with your partner whether the following examples would be considered trees as we’ve introduced them above.
- Linked List
- Family Tree
Trees are naturally recursive structures, so you’ll find that we implement a lot the methods in this lab using recursion because it tends to be the simplest solution. Unlike linked lists, trees can have one or more children which can make iterative approaches more difficult (this ultimately depends on the structure / implementation of your tree).
Binary Trees #
We’ll now move on from trees and explore a common, special case of the tree data
structure: the binary tree. A binary tree is a tree in which each node has at
most two children. Normally it has two separate variables left and
right for the left and right children of the binary tree.
Traversals #
The remainder of this lab will cover the key ideas related to traversing the notes of a tree structure. Before we go over the traversals themselves, let’s first briefly review some of the core ideas behind recursion and recursive programming!
Recursion: A Review #
One interpretation of recursive programming is the clever utilization of the recursive call stack to help us perform certain tasks and operations. Specifically, there is usually an exploration of relationship between the different stack frames of the recursive call stack.
There are two types of patterns that we commonly see:
- Void Recursive Methods: There is no explicit pass of information between frames of the recursive call stack. Or in other words, the recursive function doesn’t have a return value, and the operation is usually done while utilizing the execution order that follow the mechanisms of the recursive call stack.
- Non-void Recursive Methods: There is an explicit pass of information between frames of the recursive call stack. Specifically, the information is passed as return values from one frame to another, and operations are done by utilizing information from a “parent frame” (the previous recursive call) or “child frame” (the subsequent recursive call).
Things to keep in mind when working with recursion: #
A recursive function usually consists of two components:
- The recursive call, which operates on other stack frames.
- The rest of the function, which operates on the current stack frame.
Then naturally, these questions are will be important to keep in mind when working with recursion:
- Where should I put the recursive call relative to the code for my current stack frame?
- What is the relationship between the outcome of the recursive call and the code for my current stack frame?
Linked List Traversal #
To better understand the recursive logic behind tree traversals, it’s helpful to first look at a simpler example using a familiar data structure that is also inherently recursive: linked lists. Given the linked list below, how can we utilize the recursive call stack and traverse all items in the linked list?
1 -> 2 -> 3
Assuming our linked list is built with “Node” objects that have two instance variable:”val” and “next” (pointer to the next node), a traverse method that prints the values from the head of the linked list to the tail might look something this:
traverse(Node node) {
	if (node == null) {
		return;
	}
    //preorder position
    print(node.val);
	traverse(node.next);
}
Let’s take a look at what its call stack will look like, as well as the order of the printed outputs:
traverse(node)
    print(node.val): 1
	traverse(node.next)
        print(node.next.val): 2
		traverse(node.next.next)
            print(node.next.next.val):3
			traverse(null)
		traverse(node.next.next)
	traverse(node.next)
traverse(node)
Notice how the code of current stack frame (i.e. printing the value of the node) is executed BEFORE the recursive call is returned, and the printed outputs are: 1, 2, 3.
Now what if we want to print the values in reverse order? Turns out, we can achieve that exact effect by simply changing the position of the print statement with the recursive call!
traverse(Node node) {
	if (node == null) {
		return;
	}
	traverse(node.next);
    //postorder position
    print(node.val);
}
The recursive call stack and the order of printed outputs:
traverse(node)
	traverse(node.next)
		traverse(node.next.next)
			traverse(null)
		traverse(node.next.next)
        print(node.next.next.val):3
	traverse(node.next)
    print(node.next.val): 2
traverse(node)
print(node.val): 1
Notice how the code of current stack frame (i.e. printing the value of the node) is executed AFTER the recursive call is returned, and the printed outputs are: 3, 2, 1.
Tree Traversals #
Extending from the linked list example above, we can see how the items can be visited in different orders by placing the print statement in different positions relative to the recursive calls of binary trees.
Specifically, three processing sequences for nodes in a binary tree occur commonly enough to have names:
- preorder: process the root, process the left subtree (in preorder),
process the right subtree (in preorder)
traverse(Node TreeNode) { if (TreeNode == null) { return; } print(TreeNode.val); traverse(TreeNode.left); traverse(TreeNode.right); } - postorder: process the left subtree (in postorder), process the right
subtree (in postorder), process the root.
traverse(Node TreeNode) { if (TreeNode == null) { return; } traverse(TreeNode.left); traverse(TreeNode.right); print(TreeNode.val); } - inorder: process the left subtree (in inorder), process the root, process
the right subtree (in inorder).
traverse(Node TreeNode) {
  if (TreeNode == null) {
      return;
  }
  traverse(TreeNode.left);
  print(TreeNode.val);
  traverse(TreeNode.right);
}
Note that for preorder and postorder, it can often be equally valid to process the right and then the left, although it depends on the application. In this course we will typically assume that the processing will be done left and then right unless we specify otherwise. On most exams we will be precise in what order nodes will be processed.
Note that for preorder and postorder, it can often be equally valid to process the right and then the left, although it depends on the application. In this course we will typically assume that the processing will be done left and then right unless we specify otherwise. On most exams we will be precise in what order nodes will be processed.
Exercise: Processing Sequences #
With your partner, determine the preorder, inorder, and postorder processing sequence for the tree below. This exercise will not be graded, but understanding how traversals work is a crucial part of understanding how to operate on trees. We will rely on these for many topics in the rest of the course.
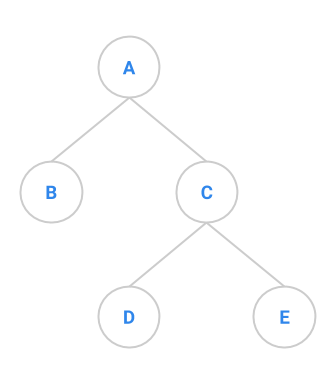
Answers below (highlight to reveal):
Stacks and Queues #
Before we go into more traversals, we will go over some a few more data structures that will help us when we implement the traversals later in the lab.
One of the first true data structures we encountered was the LinkedList data
structure. That data structure allowed for adding and removing at any position.
However sometimes that is too powerful and we do not need all of that
functionality. Thus, we will introduce the stack and the queue data
structures, which are like lists, but have more limited, precise functionality.
As you go through this section, think about how you can implement stacks and
queues by using a LinkedList.
A stack models a stack of papers, or plates in a restaurant, or boxes in a garage or closet. A new item is placed on the top of the stack, and only the top item on the stack can be accessed at any particular time. Stack operations include the following:
- Pushing an item onto the stack.
- Accessing the top item of the stack.
- Popping the top item off the stack.
- Checking if the stack is empty.
As a result, we often refer to stacks as processing in LIFO (last-in, first-out) ordering.
A queue is a waiting line. As with stacks, access to a queue’s elements is restricted. Queue operations include:
- Adding an item to the back of the queue.
- Accessing the item at the front of the queue.
- Removing the front item.
- Checking if the queue is empty.
As a result, we often refer to queues as processing in FIFO (first-in, first-out) ordering.
Stacks and Queues: Building a Tree Iterator #
We now consider the problem of returning the elements of a tree one by one,
using an iterator. To do this, we will implement the interface
java.util.Iterator. The first technique to traverse trees that we will examine
is depth-first iteration or depth-first search. The general idea is
that we walk along each branch, traveling as far down each branch as possible
before turning back and examining the next one. This depth first search traversal
should feel similar to the preorder and postorder we defined above. See if you
can see the connection!
We will also use a nested iterator class to hide the details of the iteration from the outer class. As with previous iterators, we need to maintain state-saving information that lets us find the next tree element to return, and we now must determine what that information might include. To help work this out, we’ll consider the sample tree below, with elements to be returned depth first as indicated by the numbers.
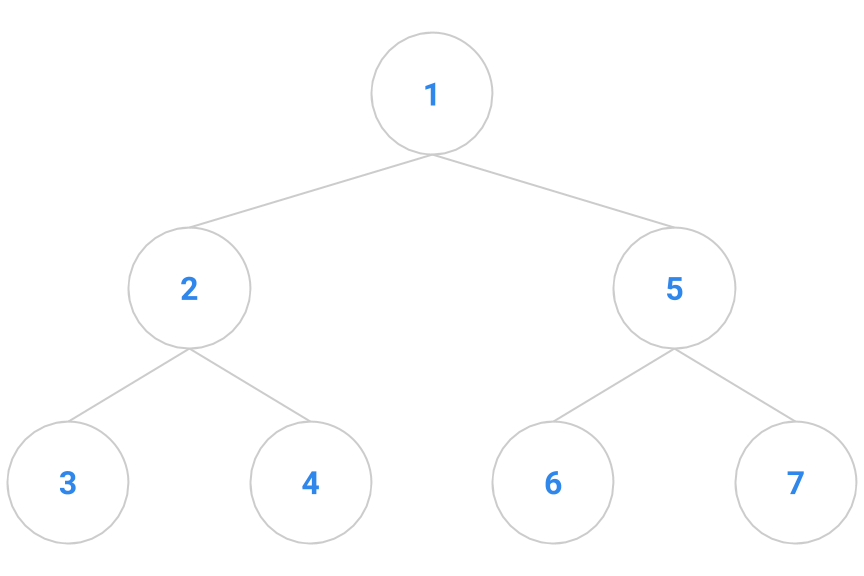
The first element to be returned is the one labeled “1”. Once that’s done, we have a choice whether to return “2” or “5”.
Suppose we break ties by lowest node label. As a result, based on our tie-breaking rule, we will pick “2” over “5”. Once we return element “2”, we have a choice between return “3” or “4” next. But don’t forget about “5” from earlier!
Next, we return “3”, again based on our tie-breaking rule. At this point, we still remember that we need to return to “4” and “5” as in the diagram below.
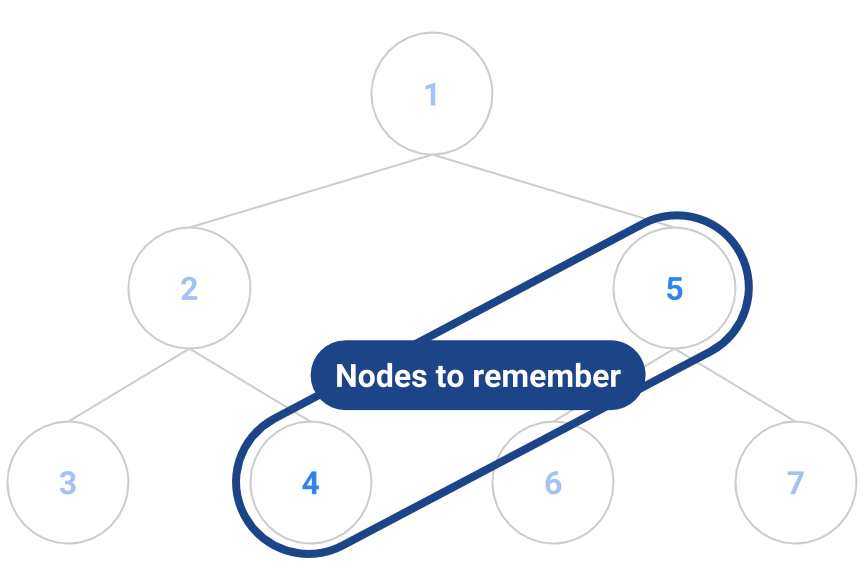
That means that our state-saving information must include not just a single pointer of what to return next, but a whole collection of “bookmarks” to nodes we’ve passed along the way.
More generally, we will maintain a collection that we’ll call the fringe,
containing all the nodes in the tree that are candidates for returning next. The
next method will choose one of the elements of the fringe as the one to
return, then add the returned element’s children to the fringe as candidates for
the next element to return. hasNext returns true when the fringe isn’t empty.
The iteration sequence will then depend on the order we take nodes out of the
fringe. Depth-first iteration, for example, results from storing the fringe
elements in a stack, a last-in first-out structure. The java.util class
library conveniently contains a Stack class with push and pop methods. We
illustrate this process on a binary tree in which TreeNodes have 0, 1, or 2
children named left and right. Here is the code:
public class DepthFirstIterator implements Iterator<TreeNode> {

    /* Where we will store our bookmarks. */
    private Stack<TreeNode> fringe = new Stack<TreeNode>();

    public DepthFirstIterator(TreeNode root) {
        if (root != null) {
            fringe.push(root);
        }
    }

    /* Returns whether or not we have any more "bookmarks" to visit. */
    public boolean hasNext() {
        return !fringe.isEmpty();
    }

    /* Throws an exception if we have no more nodes to visit in our traversal.
       Otherwise, it picks the most recent entry to our stack and "explores" it.
       Exploring it requires visiting the node and adding its children to the
       fringe, since we must eventually visit them too. */
    public TreeNode next() {
        if (!hasNext()) {
            throw new NoSuchElementException("tree ran out of elements");
        }
        TreeNode node = fringe.pop();
        if (node.right != null) {
            fringe.push(node.right);
        }
        if (node.left != null) {
            fringe.push(node.left);
        }
        return node;
    }

    /* This is left unimplemented for this example. */
    public void remove() {
        throw new UnsupportedOperationException();
    }
}
Task: Complete the conceptual exercises for the topics covered above on gradescope!
Optinonal Coding Practice: Amoeba Family Tree #
The following exercises are optional and are provided in the skeleton only as a reference for you to practice some recursive programming on your own! You can find the relevant files in the src and tests folders.
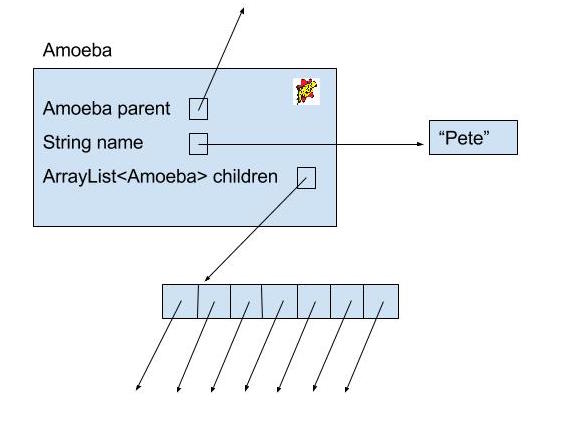
An amoeba family tree is an example of our above definition of a tree that you will be working with for this lab. It is simpler than a normal family tree because amoebas do not need partners in order to reproduce. An amoeba has one parent, zero or more siblings, and zero or more children. An amoeba also has a name.
Below is the skeleton code for an Amoeba. The full code is located in the
AmoebaFamily.java file.
class Amoeba {
    public String name;
    public Amoeba parent;
    public ArrayList<Amoeba> children;
}
And below is a box and pointer diagram of our Amoeba.
Amoebas (or amoebae) live dull lives. All they do is reproduce, so all we need to keep track of them are the following methods:
/* Creates an AmoebaFamily, where the first Amoeba's name is NAME. */
public AmoebaFamily(String name) {
    root = new Amoeba(name, null);
}

/* Adds a new Amoeba with childName to this AmoebaFamily as the youngest
   child of the Amoeba named parentName. This AmoebaFamily must contain an
   Amoeba named parentName. */
public void addChild(String parentName, String childName) {
    if (root != null) {
        root.addChildHelper(parentName, childName);
    }
}
The Amoeba objects are the nodes of our tree, represented by the
AmoebaFamily object. You will find that most of the methods of this
AmoebaFamily will be implemented through recursive helper methods of the
Amoeba class.
This organization structure should feel similar. Before for our
DLListwe had theDLListclass and within it the inner classNode. TheDLListencapsulated the recursive structure of theNodes. Now we will have ourAmoebaFamilywhich will encapsulate the recursive structure of theAmoebas.
Void Recursive Methods #
In the AmoebaFamily class, we provide the method addChild to add a new
Amoeba to the AmoebaFamily tree. The method implements a general traversal
of the tree using a void recursive method in the Amoeba class. Read through
this method and related functionality to get an understanding of how we are
traversing and manipulating the Object.
Non-void Recursive Methods #
So far, the methods we’ve seen for the AmoebaFamily class have not returned
anything; they have only been modifying the state of the AmoebaFamily. We will
be able to do cooler things if we can return values, and the next example will
take advantage of this.
Exercise: longestName #
Implement the longestName method in the AmoebaFamily class. Make this as
similar to longestNameLength as possible. You will find that these non-void
recursive methods follow a specific pattern, one that you will likely draw upon
again when solving problems that you face in the future.
You will not need to use longestNameLength directly in your implementation of
longestName.
Optional Exercise: Tree Iterators #
Optional Exercise 1: AmoebaDFSIterator #
Switch which partner is doing the coding if you have not done so recently.
Complete the definition of the AmoebaDFSIterator class (within the
AmoebaFamily class). It should successively return names of Amoebas from the
family in depth-first preorder. You will need to add Amoebas to the stack as you do
above, with the right child being pushed before the left child. Thus, for the
family set up in the AmoebaFamily main method, the name “Amos McCoy” should be
returned by the first call to next; the second call to next should return
the name “mom/dad”; and so on. Do not change any of the framework code.
Organizing your code as described in the previous step will result in a process
that takes time proportional to the number of Amoebas in the tree to return
them all. Moreover, the constructor and hasNext both run in constant time,
while next runs in time proportional to the number of children of the element
being returned.
Add some code at the end of the AmoebaFamily main method to test your
solution. We suggest using the tree examples and answers above as a starting
point for your tests.
Optional Exercise 2: AmoebaBFSIterator #
Now write the AmoebaBFSIterator class (within the AmoebaFamily class). This
will result in Amoeba names being returned in breadth-first order. That is,
the name of the root of the family will be returned first, then the names of its
children (oldest first), then the names of all their children, and so on. Another
way to think about breadth-first search is a level order traversal. All of the
nodes at depth 0 will be processed, then at depth 1, then at depth 2, etc.
Your code for your AmoebaBFSIterator should be very similar to that of
AmoebaDFSIterator with one big exception. In AmoebaBFSIterator instead of
using a stack you should use a queue. By making this one change you will greatly
alter the behavior of your iterator. We recommend using java.util.LinkedList
to implement your queue.
There is a
java.util.Queuebut it is just an interface. There are a number of Java classes which implement this interface, one of which beingjava.util.LinkedList. Any non-abstract subclass of this interface should work for this exercise.
For the family constructed in the AmoebaFamily main method, your modification will
result in the following iteration sequence:
Amos McCoy
mom/dad
auntie
me
Fred
Wilma
Mike
Homer
Marge
Bart
Lisa
Bill
Hilary
Note: You will need to change the return value of the iterator method to
AmoebaBFSIterator to see the above output.
Before implementing this, try working out this traversal on paper with the prior exercises to gain intuition for it. Keep track of the state of the queue during the traversal and try to see how the difference between the queue’s FIFO behavior and the stack’s LIFO behavior results in a different traversal.
Conclusion #
Extra Readings #
The next lab will cover binary search trees. You may find Shewchuk’s notes on Binary Search Trees helpful.
Deliverables #
To finish this lab, make sure to finish the following:
- Read through the lab spec and understand obtain a good understanding of these topics: tree definitions, traversals, stacks and queues.
- Complete the lab 10 assignment on gradescope. There is no coding submission required for this lab.
