
Before You Begin
Making Your Shared Partner Repository
Please do not skip this section. Partnerships are required and you must complete your work in the shared repository. See the Collaboration Guide for more information.
Today, you should be working with the partner you intend to collaborate with for project 1. Starting today, you two will be required to work together through the end of the week on both the labs and the project. If you are looking for a partner, please let your TA know; they’d love to help!
The two of you will be working from a shared repository. Please go to the Partnerships page on Beacon, and invite your Project 1 partner (Only one partner needs to do this!). Generate the magic link and have your partner click on it to confirm.
Once confirmed, your partnership page on beacon will contain a link to view the repository on GitHub, which should have a name of the form su19-proj1-s***-s***.
Both of you should clone this repository. Make sure you do not clone this repository inside of another repository–you will experience git problems if you do so.
$ git clone https://github.com/Berkeley-CS61B-Student/su19-proj1-s***-s***.git
Change directory into it:
$ cd su19-proj1-s***-s***
And add the skeleton remote:
$ git remote add skeleton https://github.com/cs61bl/skeleton-su19.git
You’ll then be able to pull as usual:
$ git pull skeleton master
If you get an error similar to “fatal: refusing to merge unrelated histories”, you can fix this by, for this time only, running:
$ git pull --rebase --allow-unrelated-histories skeleton master
You should be using this shared repository for this week’s labs and the project. Both you and your partner will work together on the same code base. After adding and commiting your own work, you can receive your partner’s work:
$ git pull origin master
Learning Goals for Today
This lab introduces you to the linked list, a data structure you may remember from CS 61A. Much like an array, a linked list stores sequential data. However linked lists use nodes; each node stores one item and a reference to the next node. The last node in a linked list has no next node, so it stores a null reference instead.
It is possible to implement linked lists that store any type of data by using generics, which you will be learning about in detail in a later lab. For now, this lab will focus on a Linked List that stores only integers - an IntList, for which we have provided a template. In this lab you will implement some basic functional methods for this data structure; in the next lab you will implement some more finicky destructive and non-destructive methods (you’ll get an introduction to these terms later today).
Along the way, we’ll also talk about testing and debugging software engineering principles.
Introduction to Linked Lists
In the next two labs we’re going to be working with the linked list. A linked list is similar to an array in that it also stores sequential data, but different operations have different runtimes between linked lists and arrays. Since different problems call for different efficient operations, choosing the right data structure is an important design choice for an engineer, and we’ll study this as we go through the course.
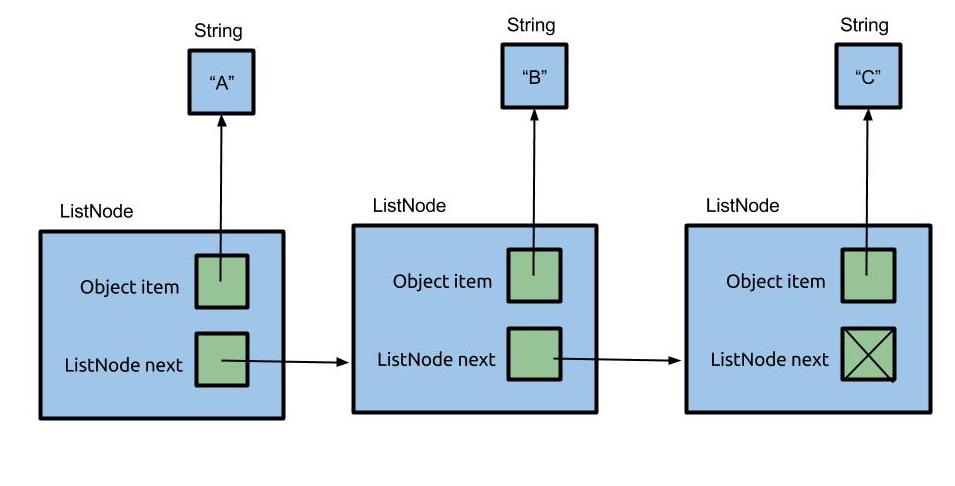
Here’s a picture of a simple implementation of a linked list that contains the items “A”, “B”, and “C” (can you draw the corresponding picture for an array that stores these items?). A linked list consists of nodes that are chained together. Here we represent nodes with a generic class ListNode. Each node contains an item called item. As you can see, the items form a sequence. In this example, the linked list items are Strings, though our linked list will contain ints instead, just like an int[].
IntList
A Straightforward Implementation of a Linked List
Here’s an implementation of an IntList which could easily be generalized to store different types of data. Notice how it stores an item item and a reference to another node next.
public class IntList {
    public int item;
    public IntList next;
}
Worksheet: 1. IntList Box and Pointer Diagram
Complete this exercise on your worksheet.
Only once you and your partner have given it a try and have compared answers, you may check your work by clicking on this Visualize button beneath the reproduced code below.
public class IntList {
    public int item;
    public IntList next;

    public static void main(String[] args) {
        IntList L = new IntList();
        L.item = 5;
        L.next = null;

        L.next = new IntList();
        L.next.item = 10;
        IntList p1 = L.next;

        L.next.next = new IntList();
        L.next.next.item = 15;
        IntList p2 = p1.next;
        p1.next = null;
    }
}
If it’s hard to see what’s going on in the Java Visualizer, enable the following two options from the code editor.
- Prefer non-nesting and vertical layouts
- Force linked lists to display vertically
Worksheet: 2. Iteration vs. Recursion
Complete this exercise on your worksheet.
Here is the code the question refers to:
public class IntList {
    public int item;
    public IntList next;

    public IntList(int f, IntList r) {
        item = f;
        next = r;
    }

    // Return the size of the list using no recursion!
    public int iterativeSize() {
        IntList p = this;
        int totalSize = 0;
        while (p != null) {
            totalSize += 1;
            p = p.next;
        }
        return totalSize;
    }

    // Return the size of the list using recursion!
    public int size() {
        if (next == null) {
            return 1;
        }
        return 1 + this.next.size();
    }

    public static void main(String[] args) {
        IntList L = new IntList(5,
                        new IntList(10,
                            new IntList(15, null)));
        System.out.println(L.iterativeSize());
        System.out.println(L.size());
    }
}
Testing
Let’s take a quick break to talk about testing. Unit testing is a great way to rigorously test each method of your code and ultimately ensure that you have a working project.
The ‘unit’ part of unit testing comes from the idea that you can break your program down into units, or the smallest testable part of an application. Therefore, unit testing enforces good code structure (each method should only do ‘One Thing’), and allows you to consider all of the edge cases for each method and test for them individually.
In this class, you will be using JUnit, a unit testing framework for Java, to create and run tests on your code to ensure its correctness. And when JUnit tests fail, you will have an excellent starting point for debugging.
JUnit Syntax
JUnit tests are written in Java. However, the JUnit library implements all the boring stuff like printing error messages, making test writing much simpler.
For this lab, we’ve written JUnit tests for you in IntListTest.java. Open it up and the first thing you’ll notice are the imports at the top. These imports are what give you easy access to the JUnit methods and functionality that you’ll need to run JUnit tests.
Next, you’ll see that there are several methods that follow the same template in the file.
@Test
public void testMethod() {
   assertEquals(expected, actual);
}
assertEquals is a common method used in JUnit tests. It tests whether a variable’s actual value is equivalent to its expected value.
When you create JUnit test files, you should precede each test method with a @Test annotation. Each test can have one or more assertEquals or assertTrue methods (provided by the JUnit library).
All tests must be non-static. This may seem weird since your tests don’t use instance variables and you probably won’t instantiate the class. However, this is how the designers of JUnit decided tests should be written, so we’ll go with it.
Exercise: The get Method
Fill in the get method in the IntList class. get takes an int position as an argument, and returns the list element at the given (zero-indexed) position in the list.
For example, if get(1) is called, you should return the second item in the list. If the position is out of range, get should throw IllegalArgumentException with an appropriate error message (just type in throw new IllegalArgumentException("YOUR MESSAGE HERE"). Assume get is always called on the first node in the list.
public class IntList {
    public int get(int position) {
        ....
    }
}
Once you have something, test your code by running IntListTest.java. Depending on your IntelliJ setup, a window should pop up giving you multiple options. Choose the IntListTest next to the icon with a red and green arrow contained in a rectangle. If your implementation is correct, you should pass the get method tests.
Exercise: toString and equals
In Lab 2, you worked with a Point class for your Pursuit Curves that contained an unexplained method called toString.
public class Point {
    public double x;
    public double y;

    public String toString() {
        return "(" + this.x + ", " + this.y + ")";
    }
}
The toString method is used by Java to determine how to represent an object as a string, like when printing objects to display to the user. In the example below, we create a new point at the origin, \((0, 0)\). When calling System.out.println, Java needs to figure out what exactly to print, so it invokes the toString method which returns (0.0, 0.0). Then, that string is displayed to the screen.
Point p = new Point();
System.out.println(p);  // (0.0, 0.0)
Likewise, the equals method is used whenever a user calls equals. We might define equality between two points as follows.
public class Point {
    public double x;
    public double y;

    public boolean equals(Object o) {
        Point other = (Point) o;
        return (this.x == other.x) && (this.y == other.y);
    }
}
Implement the standard Java methods, toString and equals, in the IntList class.
Once you’re done, test your code using the provided JUnit tester.
toString- The
toStringmethod forIntListreturns theStringrepresentation of this list, namely:- The
Stringrepresentation of the first element, followed by a space, - The
Stringrepresentation of the second element, followed by a space, - …
- The
Stringrepresentation of the last element.
The list containing the integers 1, 3, and 5 is represented by the string
1 3 5. - The
Hint: How would you convert an integer to a string in Java? Try searching for the answer online!
equals- Given an
Objectas argument, this method returnstrueif this list and the argument list are the same length and store equal items in corresponding positions (determined by using the elements’equalsmethod).
Hint: How would you check if the given object is of type
IntList? Check the Java Documentation for a method if you’re unsure.
Exercise: add
Fill in the add method, which accepts an int as an argument and appends an IntList with that argument at the end of the list. For a list 1 2 3 4 5, calling add with 8 would result in the same list modified to 1 2 3 4 5 8.
public void add(int value) {
    // TODO
}
Exercise: smallest
Implement the smallest method, which returns the smallest int that is stored in the list. For a list 6 4 3 2 3 2 2 5 999, a call to smallest would return 2.
public int smallest() {
    // TODO
}
Exercise: squaredSum
Finally, implement the squaredSum method. As the name suggests, this method returns the sum of the squares of all elements in the list. For a list 1 2 3, squaredSum should return 1 + 4 + 9 = 14.
public int squaredSum() {
    // TODO
}
This type of function is called a reducer. In a later lab, we’ll learn how higher-order functions can be used in Java, we’ll see a way to generalize these operations.
Debugger Basics
Before we finish off with the last IntList exercises for the day, let’s take some time to learn about debugging. Learning how to debug effectively is the key to overcoming bugs methodically and efficiently. If you ever find yourself staring at the same thing for awhile and not knowing where to go, think about what debugging tools you have available and use them to verify the values of your program against what you know they should be, piece by piece until you find a discrepancy.
Breakpoints and Step Into
We’ll start by running the main method in DebugExercise1.
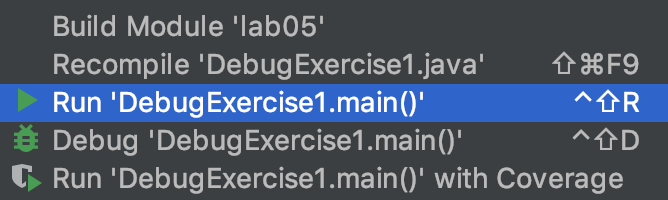
Open up this file in IntelliJ and click the Run button. You should see three statements printed to the console, one of which should strike you as incorrect. If you’re not sure how to run DebugExercise1, right click on it in the list of files and click the Run DebugExercise1.main button as shown below:
Somewhere in our code there is a bug, but don’t go carefully reading the code for it! While you might be able to spot this particular bug, often bugs are nearly impossible to see without actually trying to run the code and probe what’s going on as it executes.
Many of you have had lots of experience with using print statements to probe what a program is thinking as it runs. At times, print statements can be useful, especially when trying to search for where an error is occurring. However, they have a few disadvantages:
- They require you to modify your code (to add print statements).
- They require you to explicitly state what you want to know (since you have to say precisely what you want to print).
- They provide their results in a format that can be hard to read, since it’s usually just a big blob of text in the execution window.
Often (but not always) it takes less time and mental effort to find a bug if you use a debugger. The IntelliJ debugger allows you to pause the code in the middle of execution, step the code line by line, and even visualize the organization of complex data structures like linked lists with the same diagrams that would be drawn by the Online Java Visualizer.
While they are powerful, debuggers have to be used properly to gain any advantage. We encourage you to do what one might call “scientific debugging”, debugging by using something quite similar to the scientific method!
Generally speaking, you should formulate hypotheses about how segments of your code should behave, and then use the debugger to resolve whether those hypotheses are true. With each new piece of evidence, you will refine your hypotheses, until finally, you cannot help but stumble right into the bug.
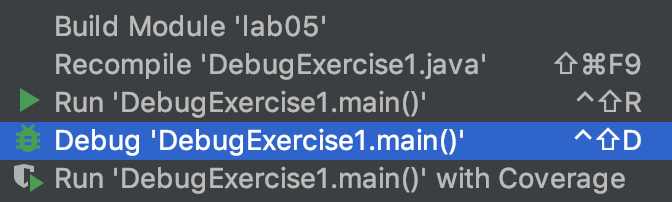
Our first exercise introduces us to two of our core tools, the Breakpoint and the Step Over button. In the left-hand Project view, right click (or two finger click) on the DebugExercise1 file and this time select the Debug option rather than the Run option. If the Debug option doesn’t appear, it’s because you didn’t properly import your lab05 project. If this is the case, repeat the lab [setup][] instructions.
You’ll see that the program simply runs again, with no apparent difference! That’s because we haven’t given the debugger anything interesting to do. Let’s fix that by setting a breakpoint.
To set a breakpoint, scroll to the line that says int t3 = 3;, then left click just to the right of the line number. You should see a red dot appear that vaguely resembles a stop sign, which means we have now set a breakpoint.
If we run the program in debug mode again it’ll stop at that line. If you’d prefer to avoid right-clicking to run your program again, you can click the bug icon in the top right of the screen instead.
If the text console (that says things like round(10/2)) does not appear when you click the debug button, you may need to perform one additional step before proceeding. At the top left of the information window in the bottom panel, you should see two tabs labeled Debugger and Console. Click and drag the Console window to the far right of the bottom panel. This will allow you to show both the debugger and the console at the same time.
Once you’ve clicked the debug button (and made your console window visible if necessary), you should see that the program has paused at the line at which you set a breakpoint, and you should also see a list of all the variables at the bottom, including t, b, result, t2, b2, and result2. We can advance the program one step by clicking on the “step into” button, which is an arrow that points straight down as shown below:

Make sure you’re pressing Step Into rather than Step Over. Step into points straight down, whereas step over points diagonally up and then diagonally down.
Each time you click this button, the program will advance one step.
Before you click each time, formulate a hypothesis about how the variables should change.
Repeat this process until you find a line where the result does not match your expectations. Then, try and figure out why the line doesn’t do what you expect. If you miss the bug the first time, click the stop button (red square), and then the debug button to start back over. Optionally, you may fix the bug once you’ve found it.
Step Over and Step Out
Just as we rely on layering abstractions to construct and compose programs, we should also rely on abstraction to debug our programs. The “step over” button in IntelliJ makes this possible. Whereas the “step into” from the previous exercise shows the literal next step of the program, the “step over” button allows us to complete a function call without showing the function executing.
The main method in DebugExercise2 is supposed to take two arrays, compute the element-wise max of those two arrays, and then sum the resulting maxes. For example, suppose the two arrays are {2, 0, 10, 14} and {-5, 5, 20, 30}. The element-wise max is {2, 5, 20, 30}, and the sum of this element-wise max is 2 + 5 + 20 + 30 = 57.
There are two different bugs in the provided code. Your job for this exercise is to fix the two bugs, with one special rule: You should NOT step into the max or add functions or even try to understand them.
These are very strange functions that use poor syntax (and bad style) to do easy tasks in an incredibly obtuse way. If you find yourself accidentally stepping into one of these two functions, use the “step out” button (an upwards pointing arrow) to escape.
Even without stepping INTO these functions, you should be able to tell whether they have a bug or not. That’s the glory of abstraction! Even if I don’t know how a fish works at a molecular level, there are some cases where I can clearly tell that a fish is dead.
Now that we’ve told you what “step over” does, try exploring how it works exactly and try to find the two bugs. If you find that one of these functions has a bug, you should completely rewrite the function rather than trying to fix it.
If you’re having the issue that the using run (or debug) button in the top right keeps running
DebugExercise1, right click onDebugExercise2to run it instead.
If you get stuck or just want more guidance, read the directions below.
Further Guidance (for those who want it)
To start, try running the program. The main method will compute and print an answer to the console. Try manually computing the answer, and you’ll see that the printed answer is incorrect. If you don’t know how to manually compute the answer, reread the description of what the function is supposed to do above, or read the comments in the provided code.
Next, set a breakpoint to the line in main that calls sumOfElementwiseMaxes. Then use the debug button, followed by the step-into function to reach the first line of sumOfElementWiseMaxes. Then use the “step over” button on the line that calls arrayMax. What is wrong with the output (if anything)? How does it fail to match your expectations?
Note that to see the contents of an array, you may need to click the rightward pointing triangle next to the variable name in the variables tab of the debugger window in the bottom panel.
If you feel that there is a bug, step into arrayMax (instead of over it) and try to find the bug.
Reminder: do not step into
max. You should be able to tell ifmaxhas a bug using step over. Ifmaxhas a bug, replace it completely.
Repeat the same process with arraySum and add. Once you’ve fixed both bugs, double check that the sumOfElementwiseMaxes method works correctly for the provided inputs.
Conditional Breakpoints and Resume
Sometimes it’s handy to be able to set a breakpoint and return to it over and over. In this final debugging exercise, we’ll see how to do this and why it is useful.
Try running DebugPractice3, which attempts to count the number of turnips available from all grocery stores nearby. It does this by reading in foods.csv, which provides information about foods available, where each line of the file corresponds to a single product available at a single store. Feel free to open the file to see what it looks like. Strangely, the number of turnips seems to be negative.
Set a breakpoint on the line where totalTurnips = newTotal occurs, and you’ll see that if you “step over”, the total number of turnips is incremented as you’d expect. One approach to debugging would be to keep clicking “step over” repeatedly until finally something goes wrong. However, this is too slow. One way we can speed things up is to click on the “resume” button (just down and to the left from the step-over button), which looks like a green triangle pointing to the right. Repeat this and you’ll see the turnip count incrementing repeatedly until something finally goes wrong.
An even faster approach is to make our breakpoint conditional. To do this, right (or two-finger) click on the red breakpoint dot. Here, you can set a condition for when you want to stop. In the condition box, enter “newTotal < 0”, stop your program, and try clicking “debug” again. You’ll see that you land right where you want to be.
See if you can figure out the problem. If you can’t figure it out, talk to your partners, another partnership, or a lab assistant.
Recap: Debugging
By this point you should understand the following tools:
- Breakpoints
- Stepping over
- Stepping into
- Stepping out (though you might not have actually used it in this lab)
- Conditional breakpoints
- Resuming
However, this is simply scratching the surface of the features of the debugger! Feel free to experiment and search around online for more help.
Remember that Watches tab? Why not read into what that does?
Or try out the incredibly handy Evaluate Expressions calculator button (the last button on the row of step into/over/out buttons)?
Or perhaps look deeper into breakpoints, and Exception Breakpoints which can pause the debugger right before your program is about to crash.
We won’t always use all of these tools, but knowing that they exist and making the debugger part of your toolkit is incredibly useful.
Destructive vs. Non-Destructive
Suppose you have an IntList representing the list of integers 1 2 3 4. You want to find the list that results from squaring every integer in your list, 1 4 9 16.
There are two ways we could go about solving this problem. The first way is to traverse your existing IntList and actually change the items stored in your nodes. Such a method is called destructive because it can change (mutate or destroy) the original list.
IntList myList = IntList.of(1, 2, 3, 4);
IntList squaredList = IntList.dSquareList(myList);
System.out.println(myList);
System.out.println(squaredList);
Running the above, destructive program would print,
1 4 9 16
1 4 9 16
Observe that the
IntList.of()method makes it much easier to create IntLists compared to the brute force approach.IntList myList = new IntList(0, null); myList.next = new IntList(1, null); myList.next.next = new IntList(2, null); myList.next.next.next = new IntList(3, null); // One line of using IntList.of() can do the job of four lines!
The second way is called non-destructive, because it allows you to access both the original and returned lists. This method returns a list containing enough new IntList nodes such that the original list is left unchanged.
IntList myList = IntList.of(1, 2, 3, 4);
IntList squaredList = IntList.squareList(myList);
System.out.println(myList);
System.out.println(squaredList);
Running the above, non-destructive program would print,
1 2 3 4
1 4 9 16
In practice, one approach may be preferred over the other depending on the problem you are trying to solve and the specifications of the program.
dSquareList Implementation
Here is one possible implementation of dSquareList, along with a call to dSquareList.
public static void dSquareList(IntList L) {
    while (L != null) {
        L.item = L.item * L.item;
        L = L.next;
    }
}
IntList origL = IntList.of(1, 2, 3)
dSquareList(origL);
// origL is now (1, 4, 9)
The reason that dSquareList is destructive is because we change the values of the original input IntList. As we go along, we square each value, and the action of changing the internal data persists.
It is also important to observe that the bits in the origL box do not change, i.e. the variable still points to exactly the same object in memory when dSquareList completes.
Testing dSquareList
The dSquareList implementation above is provided to you in your skeleton file as well.
Use the Java Visualizer plugin to visualize the IntList and to understand how the dSquareList method works, discussing with your partner as you do so. Pointers and IntLists might seem confusing at first, but it’s important that you understand these concepts!
Note: The choice to return void rather than a pointer to L was an arbitrary decision. Different languages and libraries use different conventions (and people get quite grumpy about which is the “right” one).
Non-Destructive Squaring
squareListIterative() and squareListRecursive() are both non-destructive. That is, the underlying IntList passed into the methods does not get modified, and instead a fresh new copy is modified and returned.
public static IntList squareListIterative(IntList L) {
    if (L == null) {
        return null;
    }
    IntList res = new IntList(L.item * L.item, null);
    IntList ptr = res;
    L = L.next;
    while (L != null) {
        ptr.next = new IntList(L.item * L.item, null);
        L = L.next;
        ptr = ptr.next;
    }
    return res;
}
public static IntList squareListRecursive(IntList L) {
    if (L == null) {
        return null;
    }
    return new IntList(L.item * L.item, squareListRecursive(L.next));
}
Ideally, you should spend some time trying to really understand them, including possibly using the visualizer. However, if you don’t have time, note that the iterative version is much messier.
The iterative versions of non-destructive IntList methods are often (but not always) quite a bit messier than the recursive versions, since it takes some careful pointer action to create a new IntList, build it up, and return it.
Exercise: Concatenation
To complete the lab, implement dcatenate and catenate as described below. You may find the squaring methods from above to be useful as you write your code.
public static IntList dcatenate(IntList A, IntList B) {
    // TODO
}
public static IntList catenate(IntList A, IntList B) {
    // TODO
}
Both methods take in two IntLists and concatenate them together, so catenate(IntList A, IntList B) and dcatenate(IntList A, IntList B) both result in an IntList which contains the elements of A followed by the elements of B. The only difference between these two methods is that dcatenate modifies the original IntList A (it’s destructive) and catenate does not.
To complete the lab:
- Fill in one of
dcatenate()orcatenate(), and run them against our tests. Revise your code until it passes our tests. - Repeat for the method you haven’t yet completed. (We recommend you do one first and finish it before you start the next, because then you’ll be able to take advantage of the similar logic).
IntList problems can be tricky to think about, and there are always several approaches which can work. Don’t be afraid to pull out pen and paper or go to the whiteboard and work out some examples! If you get stuck, drawing out the pointers can probably steer you back onto the path of progress. And, as always, the debugger is a great option!
Feel free to use either recursion or iteration. For extra practice, try both!
It’s also often useful to first think about base cases, such as when A is null, for example. This works especially well for building up a recursive solution. In other words, write up a solution that would work for the base case, then stop and think about how to expand this solution into something that works for other bigger cases.
For this problem, it is okay for dcatenate to return one or the other list if one or both of A and B are null. For catenate, it is okay to attach B to the end of A without making a full copy of B. However, think about and discuss the following two questions with your partner:
- Why does this still produce a ‘correct’ program?
- What kinds of problems could this decision cause?
Recap
Today we talked about the IntList. Methods involving Linked Lists can be implemented iteratively and recursively. These functions can also be destructive or non-destructive.
We also used JUnit tests for the first time, and we became more familiar with debugging and the tools IntelliJ provides us with.
Deliverables
IntList.javagettoStringequalsaddsmallestsquaredSumcatenatedcatenate
As usual, don’t forget to turn in your worksheet to your lab TA before the end of your section.