
FAQ #
This assignment has an FAQ page.
Before You Begin #
Pull from the skeleton to get a new lab04 folder. Follow the IntelliJ setup steps from Lab 1 to get started. It’s important for this lab to add the .jar files, so don’t forget that!
Optional: Windows IntelliJ Embedded Terminal #
IntelliJ has the cool feature that you can have a working terminal in the workspace so you don’t have to constantly switch between having IntelliJ and your terminal, if that becomes necessary for whatever reason.
For Mac users, you should be able to skip this setup section. Windows users will likely have to put in a little leg work. This setup assumes you are a Windows user and you have Git Bash installed.
-
First, find the Preferences/settings tab and select it. (Or use Ctrl+Alt+S.)
-
Type in “terminal” in the search bar. Once there, type in
"C:\Program Files\Git\bin\bash.exe"into the Shell Path field. Click OK.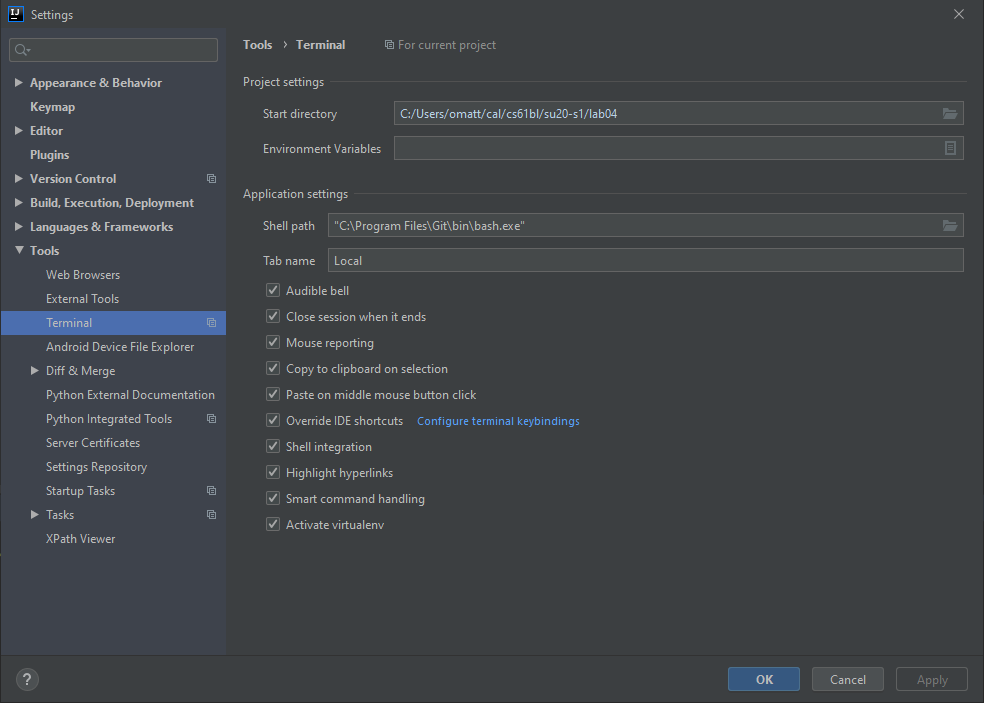
-
To test if you’ve properly set this up, hover over the little box in the bottom left corner and select terminal; the bottom third of your screen should now be a terminal, the equivalent of having git bash right there. Try typing something in! If you’re able to run basic commands like
lsorcdorecho 'Hello world'you’ve done it!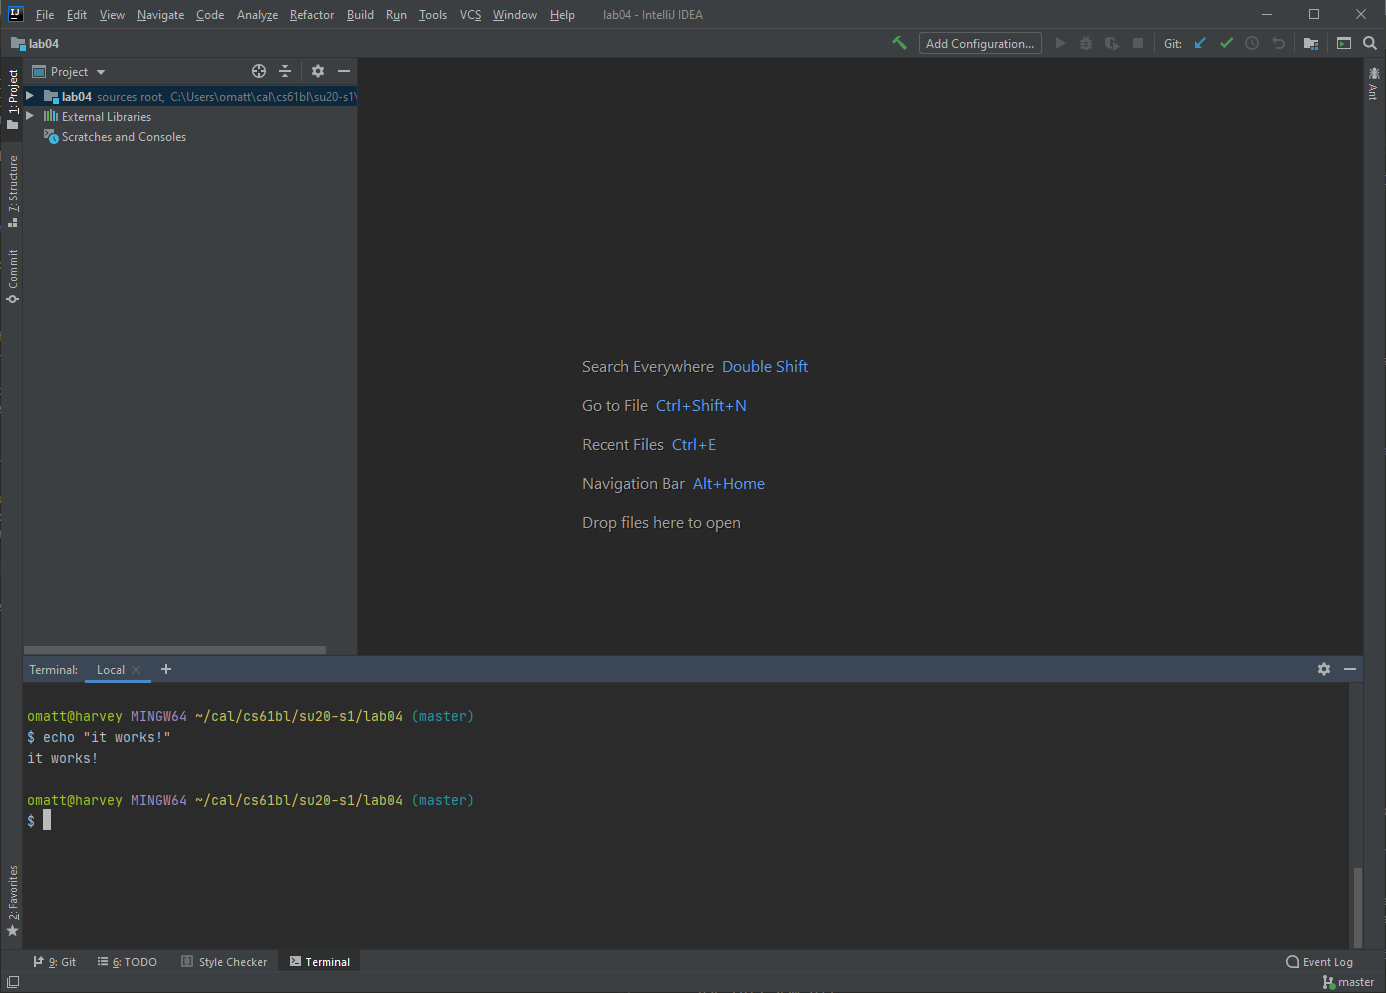
Using the IntelliJ Debugger #
This section will walk you through three different debugging exercises which will introduce you to the IntelliJ debugger. This is one of the single most important features of IntelliJ. The debugger will allow you to hopefully resolve bugs in your code more efficiently.
These debugging exercises are not graded in the autograder for this lab, but if you skip them, you will set yourself back.
Why not print? #
Many of you have had lots of experience with using print statements to probe what a program is thinking as it runs. At times, print statements can be useful, especially when trying to search for where an error is occurring. However, they have a few disadvantages:
- They require you to modify your code (to add print statements).
- Sometimes, adding print statements can make the bug change its behavior. These bugs are known as heisenbugs.
- They require you to explicitly state what you want to know in advance (since you have to say precisely what you want to print). Adding new print statements requires recompiling your code.
- They provide their results in a format that can be hard to read, since it’s usually just a big blob of text in the execution window. This is especially true for print statements in loops or recursive functions, where you get all the output.
Task: Breakpoints and Step Into #
We’ll start by running the main method in DebugExercise1.
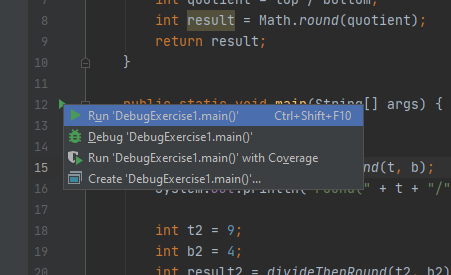
Open up this file in IntelliJ and click the Run button. You should see three statements printed to the console, one of which should strike you as incorrect. If you’re not sure how to run DebugExercise1, right click on it in the list of files and click the Run DebugExercise1.main button as shown below:
Somewhere in our code there is a bug, but don’t go carefully reading the code for it! While you might be able to spot this particular bug, often bugs are nearly impossible to see without actually trying to run the code and probe what’s going on as it executes. We will practice using the debugger.
Often (but not always) it takes less time and mental effort to find a bug if you use a debugger. The IntelliJ debugger allows you to pause the code in the middle of execution, step through the code line by line, and even visualize the organization of complex data structures like linked lists with the same diagrams that would be drawn by the Online Java Visualizer.
While they are powerful, debuggers have to be used properly to gain any advantage. We encourage you to do what one might call “scientific debugging”, debugging by using something quite similar to the scientific method!
Generally speaking, you should formulate hypotheses about how segments of your code should behave, and then use the debugger to resolve whether those hypotheses are true. With each new piece of evidence, you will refine your hypotheses, until finally, you cannot help but stumble right into the bug.
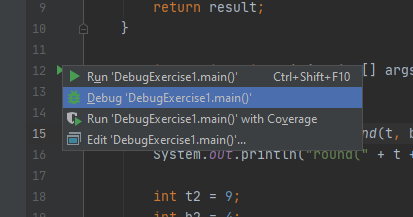
Our first exercise introduces us to two of our core tools, the Breakpoint and the Step Over button. In the left-hand Project view, right click (or two finger click) on the DebugExercise1 file and this time select the Debug option rather than the Run option. If the Debug option doesn’t appear, it’s because you didn’t properly import your lab04 project. If this is the case, repeat the lab IntelliJ setup instructions above.
You’ll see that the program simply runs again, with no apparent difference! That’s because we haven’t give the debugger anything interesting to do. Let’s fix that by setting a breakpoint.
Breakpoints #
To set a breakpoint, scroll to the line that says int t3 = 3;, then left click just to the right of the line number. You should see a red dot appear that vaguely resembles a stop sign, which means we have now set a breakpoint.
If we run the program in debug mode again it’ll stop at that line. If you’d prefer to avoid right-clicking to run your program again, you can click the bug icon in the top right of the screen instead.
If the text console (that says things like round(10/2)) does not appear when you click the debug button, you may need to perform one additional step before proceeding. At the top left of the information window in the bottom panel, you should see two tabs labeled Debugger and Console. Click and drag the Console window to the far right of the bottom panel. This will allow you to show both the debugger and the console at the same time.
Once you’ve clicked the debug button (and made your console window visible if necessary), you should see that the program has paused at the line at which you set a breakpoint, and you should also see a list of all the variables at the bottom, including t, b, result, t2, b2, and result2.
Step Into #
We can advance the program and enter the divideThenRound function by clicking on the “Step Into” button, which is an arrow that points down as shown below:
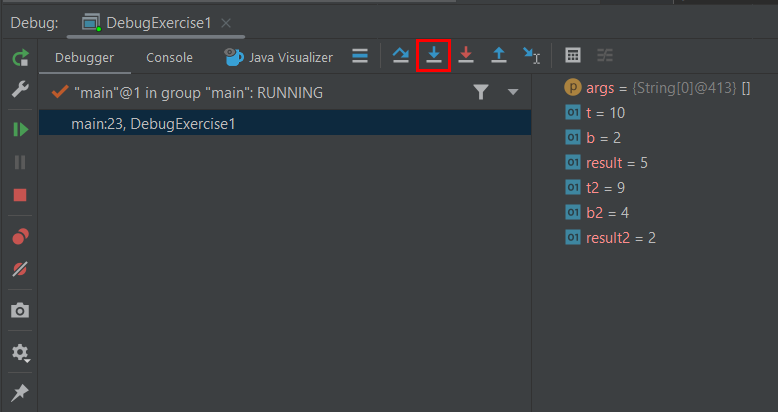
The “Step Into” button advances the code one “step”. If the next step is a function call, the debugger will enter the function, and take you to the function’s code.
JetBrains’ help: Step Into
Each time you click this button, the program will advance one “step”.
Before you click each time, formulate a hypothesis about how the variables should change. We can’t figure out where our code is broken if we don’t know what to expect!
Repeat this process until you find a line where the result does not match your expectations. Then, try and figure out why the line doesn’t do what you expect. If you miss the bug the first time, click the stop button (red square), and then the debug button to start back over. Optionally, you may fix the bug once you’ve found it.
Task: Step Over and Step Out #
Step Over #
Just as we rely on layering abstractions to construct and compose programs, we should also rely on abstraction to debug our programs. The “Step Over” button in IntelliJ makes this possible.
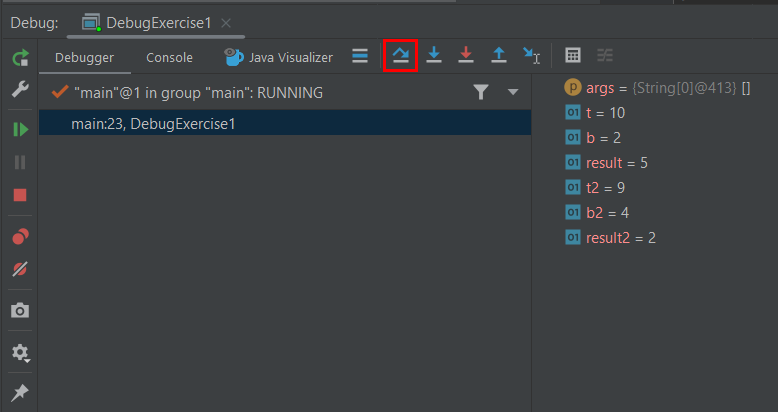
The “Step Over” button is similar to “Step Into”, but does not enter function calls. Instead, it advances to the next line of code in the current function.
JetBrains’ help: Step Over
The main method in DebugExercise2 is supposed to take two arrays, compute the element-wise max of those two arrays, and then sum the resulting maxes. For example, suppose the two arrays are {2, 0, 10, 14} and {-5, 5, 20, 30}. The element-wise max is {2, 5, 20, 30}, and the sum of this element-wise max is 2 + 5 + 20 + 30 = 57.
There are two different bugs in the provided code. Your job for this exercise is to fix the two bugs, with one special rule: You should NOT step into the max or add functions or even try to understand them.
Step Out #
These are very strange functions that use syntax (and bad style) to do easy tasks in an incredibly obtuse way. If you find yourself accidentally stepping into one of these two functions, use the “Step Out” button (an upwards pointing arrow) to escape.
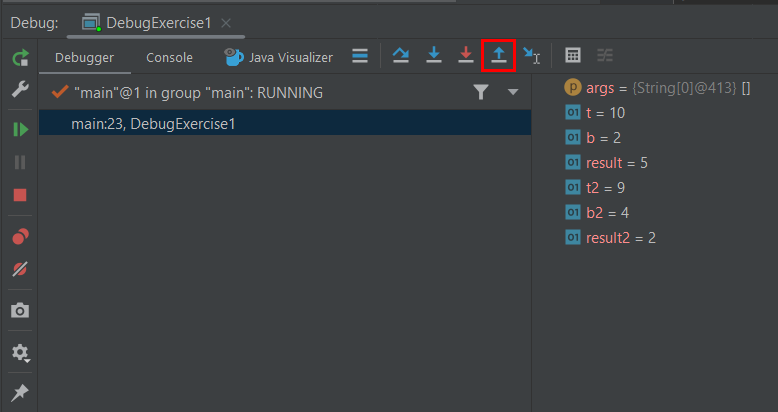
The “Step Out” button steps out of the current function and advances to where it was called from.
JetBrains’ help: Step Out
Even without stepping INTO these functions, you should be able to tell whether they have a bug or not. That’s the glory of abstraction! Even if I don’t know how a fish works at a molecular level, there are some cases where I can clearly tell that a fish is dead.
Now that we’ve told you what “Step Over” does, try exploring how it works exactly and try to find the two bugs. If you find that one of these functions has a bug, you should completely rewrite the function rather than trying to fix it.
If you’re having the issue that the using run (or debug) button in the top right keeps running DebugExercise1, right click on DebugExercise2 to run it instead.
If you get stuck or just want more guidance, read the directions below.
Optional: Step Over and Step Out Hints #
To start, try running the program. The main method will compute and print an answer to the console. Try manually computing the answer, and you’ll see that the printed answer is incorrect. If you don’t know how to manually compute the answer, reread the description of what the function is supposed to do above, or read the comments in the provided code.
Next, set a breakpoint to the line in main that calls sumOfElementwiseMaxes. Then use the debug button, followed by the step-into function to reach the first line of sumOfElementWiseMaxes. Then use the “step over” button on the line that calls arrayMax. What is wrong with the output (if anything)? How does it fail to match your expectations?
To see the contents of an array, you may need to click the rightward pointing triangle next to the variable name in the variables tab of the debugger window in the bottom panel.
If you feel that there is a bug, step into arrayMax (instead of over it) and try to find the bug.
Reminder: do not step into max. You should be able to tell if max has a bug using step over. If max has a bug, replace it completely.
Repeat the same process with arraySum and add. Once you’ve fixed both bugs, double check that the sumOfElementwiseMaxes method works correctly for the provided inputs.
Task: Resume and Conditional Breakpoints #
Sometimes it’s handy to be able to set a breakpoint and return to it repeatedly. In this final debugging exercise, we’ll see how to do this and why it is useful.
Resume #
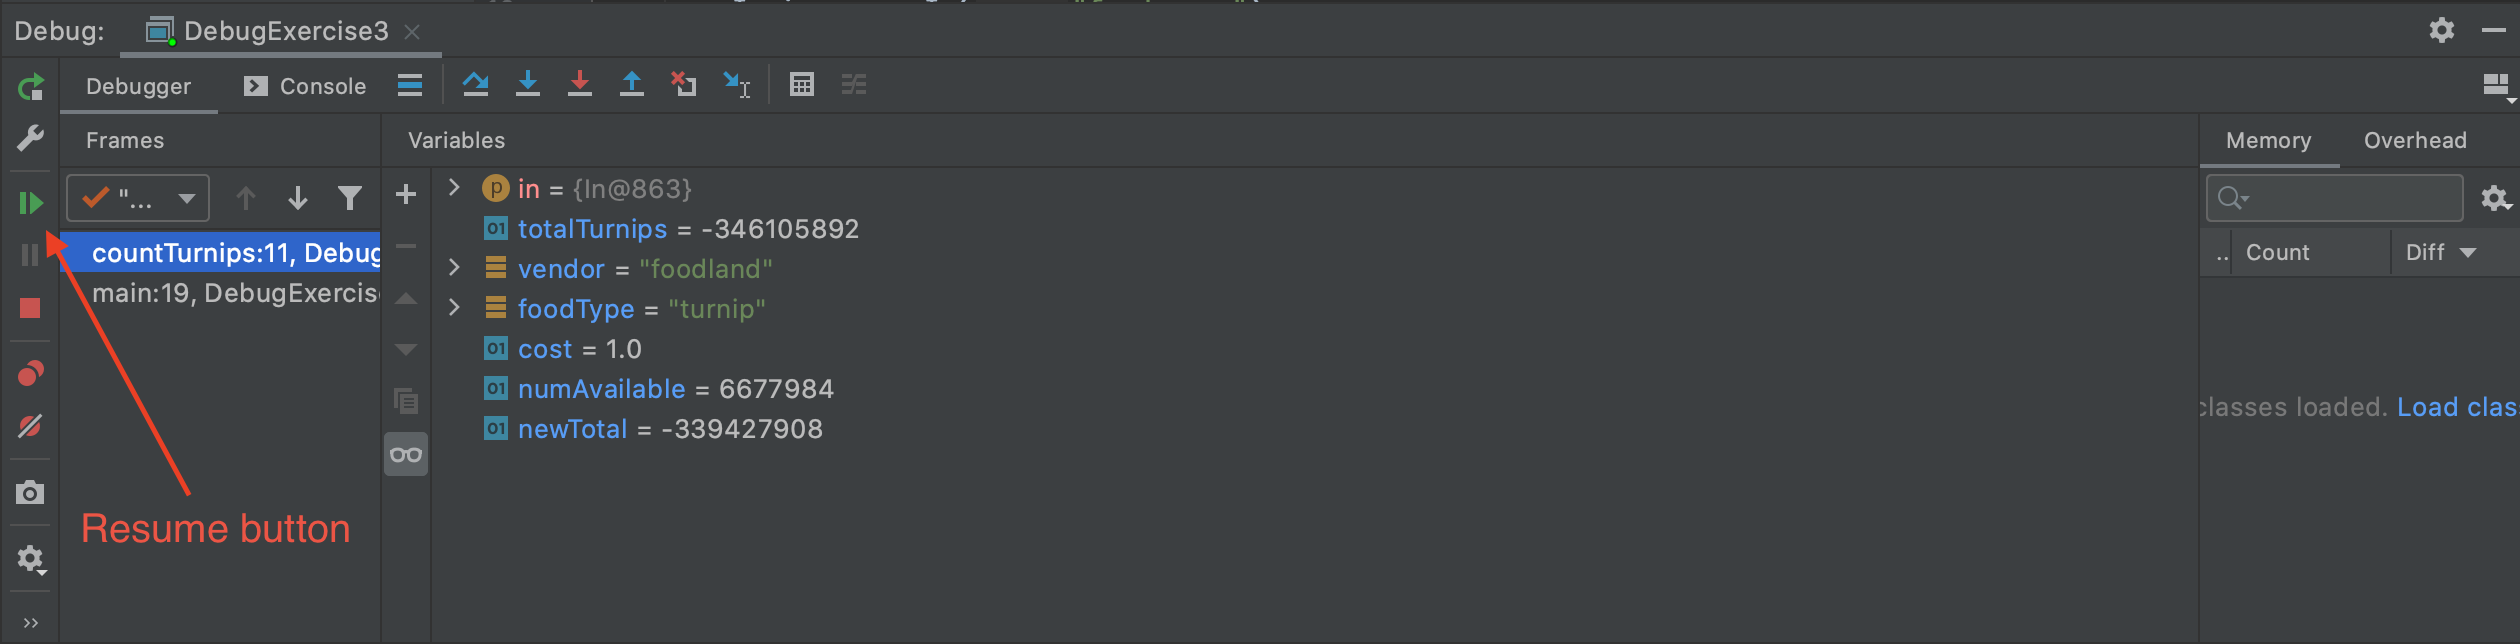
Try running DebugExercise3, which attempts to count the number of turnips available from all grocery stores nearby. It does this by reading in foods.csv, which provides information about foods available, where each line of the file corresponds to a single product available at a single store. Feel free to open the file to see what it looks like. Strangely, the number of turnips seems to be negative.
Set a breakpoint on the line where totalTurnips = newTotal occurs, and you’ll see that if you “step over”, the total number of turnips is incremented as you’d expect. One approach to debugging would be to keep clicking “step over” repeatedly until finally something goes wrong. However, this is too slow.
Since we’re only interested in a particular line of the program, we could skip all lines without breakpoints.
The “Resume” button continues the program until it reaches the next breakpoint while the code is running. It’s equivalent to clicking “Step Into” many times, but much quicker.
In this case, we’re resuming to the same breakpoint. Resume will actually continue to any breakpoint! It’s useful for both seeing the program state in a loop, and for inspecting multiple breakpoints at different places in the program.
Press “Resume” many times, and you’ll see the turnip count incrementing repeatedly until something finally goes wrong. However, there are 141 lines in the foods.csv file, and we might have to go through all of them every time we want to debug our code. 141 lines is fairly small, as data goes.
Conditional Breakpoints #
An even faster approach is to make our breakpoint “conditional”:
A “Conditional Breakpoint” is like a normal breakpoint, but only pauses execution when the condition evaluates true.
Under the hood, conditional breakpoints work a bit like:
int newTotal = totalTurnips + numAvailable;
totalTurnips = newTotal;  // conditional breakpoint: newTotal < 0
corresponding to
int newTotal = totalTurnips + numAvailable;
if (newTotal < 0) {
    int dummy = 0;  // breakpoint
}
totalTurnips = newTot;
However, doing this ourselves should remind you of the drawbacks of print debugging. IntelliJ gives us useful tools, and we should use them!
JetBrains’ help: Breakpoint Condition
To make a breakpoint conditional, right (or two-finger) click on the red breakpoint dot. Here, you can set a condition for when you want to stop. In the condition box, enter newTotal < 0, stop your program, and try clicking “debug” again.
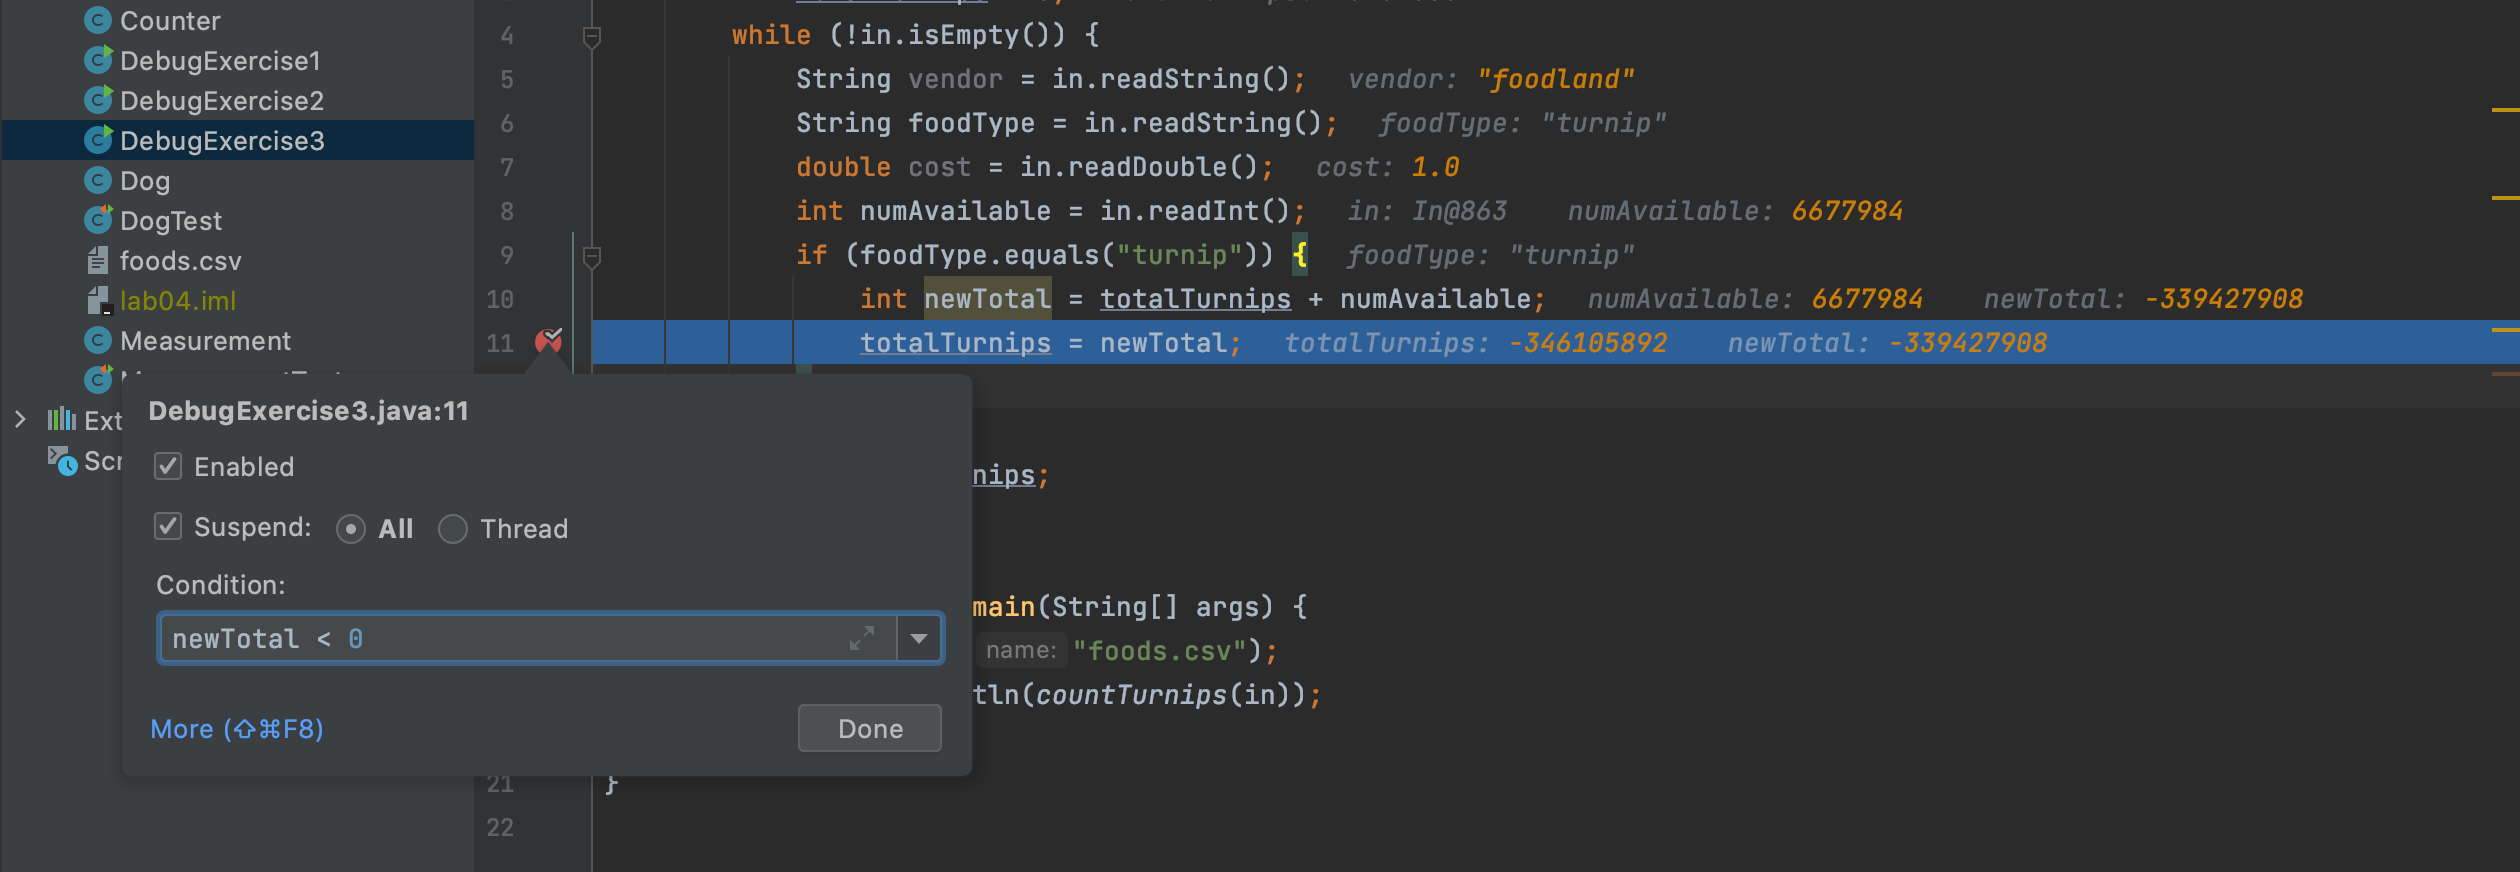
You’ll see that you land right where you want to be. See if you can figure out the problem. If you can’t figure it out, talk to your partners, another partnership, or a lab assistant.
For this exercise, you do not have to fix the problem once you’ve found it.
Recap: Debugging #
By this point you should understand the following tools:
- Breakpoints
- Step Over
- Step Into
- Step Out (though you might not have actually used it in this lab)
- Resume
- Conditional breakpoints
However, this is simply scratching the surface of the features of the debugger! Feel free to experiment and search around online for more help.
Some useful features include:
- Remember that Watches tab? Why not read into what that does?
- Or try out the incredibly handy Evaluate Expressions calculator button (the last button on the row of step into/over/out buttons)?
- Or perhaps look deeper into breakpoints, and Exception Breakpoints which can pause the debugger right before your program is about to crash.
We won’t always use all of these tools, but knowing that they exist and making the debugger part of your toolkit is incredibly useful.
Testing Your Code with JUnit #
In the rest of the lab, you will be introduced to JUnit. JUnit provides a way to write repeatable tests, which substantially reduces the tedium of testing your code. Many of your lab submissions for the rest of the course will include a JUnit testing file and all of our autograders are written using JUnit.
JUnit also makes easy an approach to programming called test-driven development (TDD). TDD is a popular approach in industry in which you design and write test cases before writing the code they test. We will encourage it in the remainder of CS 61BL, starting by leading you through the steps of the construction of a class representing measurements (feet, yards, inches).
JUnit Framework #
JUnit is a testing framework that integrates nicely into IntelliJ. Each of the test functions is written using a number of assertion methods provided by the JUnit framework. Some of the most useful methods provided by JUnit are the following:
| method | description |
|---|---|
void assertTrue (boolean condition); | If assertTrue’s condition evaluates to false, then the test fails. |
void assertTrue (String errmsg, boolean condition); | Like assertTrue, but if it fails, it prints a provided error message. Nearly all assertions have a version that accepts an error message. |
void assertNull (Object obj); | If assertNull’s argument isn’t null, the test fails. An error message may also be supplied. |
void assertNotNull(Object obj); | Fails for a null argument. An error message may be supplied. |
void assertEquals (Object expected, Object actual); | assertEquals succeeds when expect.equals(actual). For primitives, it checks expected == actual. An error message may also be supplied. |
void fail(); | If this method is called, the test fails. An error message may be supplied. |
You can find more JUnit methods in their docs.
JUnit Example #
Suppose we have written a toString method for a Line class and want to test that it works correctly. The constructor for this class has the signature Line(int x1, int y1, int x2, int y2). We expect a Line object to have a String representation of the form (x1, y1), (x2, y2). Here’s an example test using JUnit that could test this functionality:
@Test
void testToString() {
    Line l = new Line(8, 6, 4, 2);
    assertEquals("(8, 6), (4, 2)", l.toString());
}
Task: Using IntelliJ to Write JUnit Tests #
Similar to the debugging exercises, this section will not be graded, but it is recommended that you complete this exercise either now or sometime over the next few days. JUnit testing is an equally important skill to learn as it will be used extensively throughout the rest of our class (in labs, projects, and exams).
Past that, in industry, testing your code is a huge part of what you will do as a software engineer. Writing code is incomplete without a solid set of tests to verify its fault tolerance and accuracy.
Untested code is broken code.
One of the many great features about IntelliJ is that it can be used to start generating JUnit tests. We will illustrate how it can be used with the following example. Follow along each of the steps in IntelliJ.
-
Navigate to the
Counter.java. -
Make a new JUnit Test Case:
-
Click on the class name in the
Counter.javafile and select “Navigate -> Test”. Alternatively, you can use CTRL / CMD + Shift + T.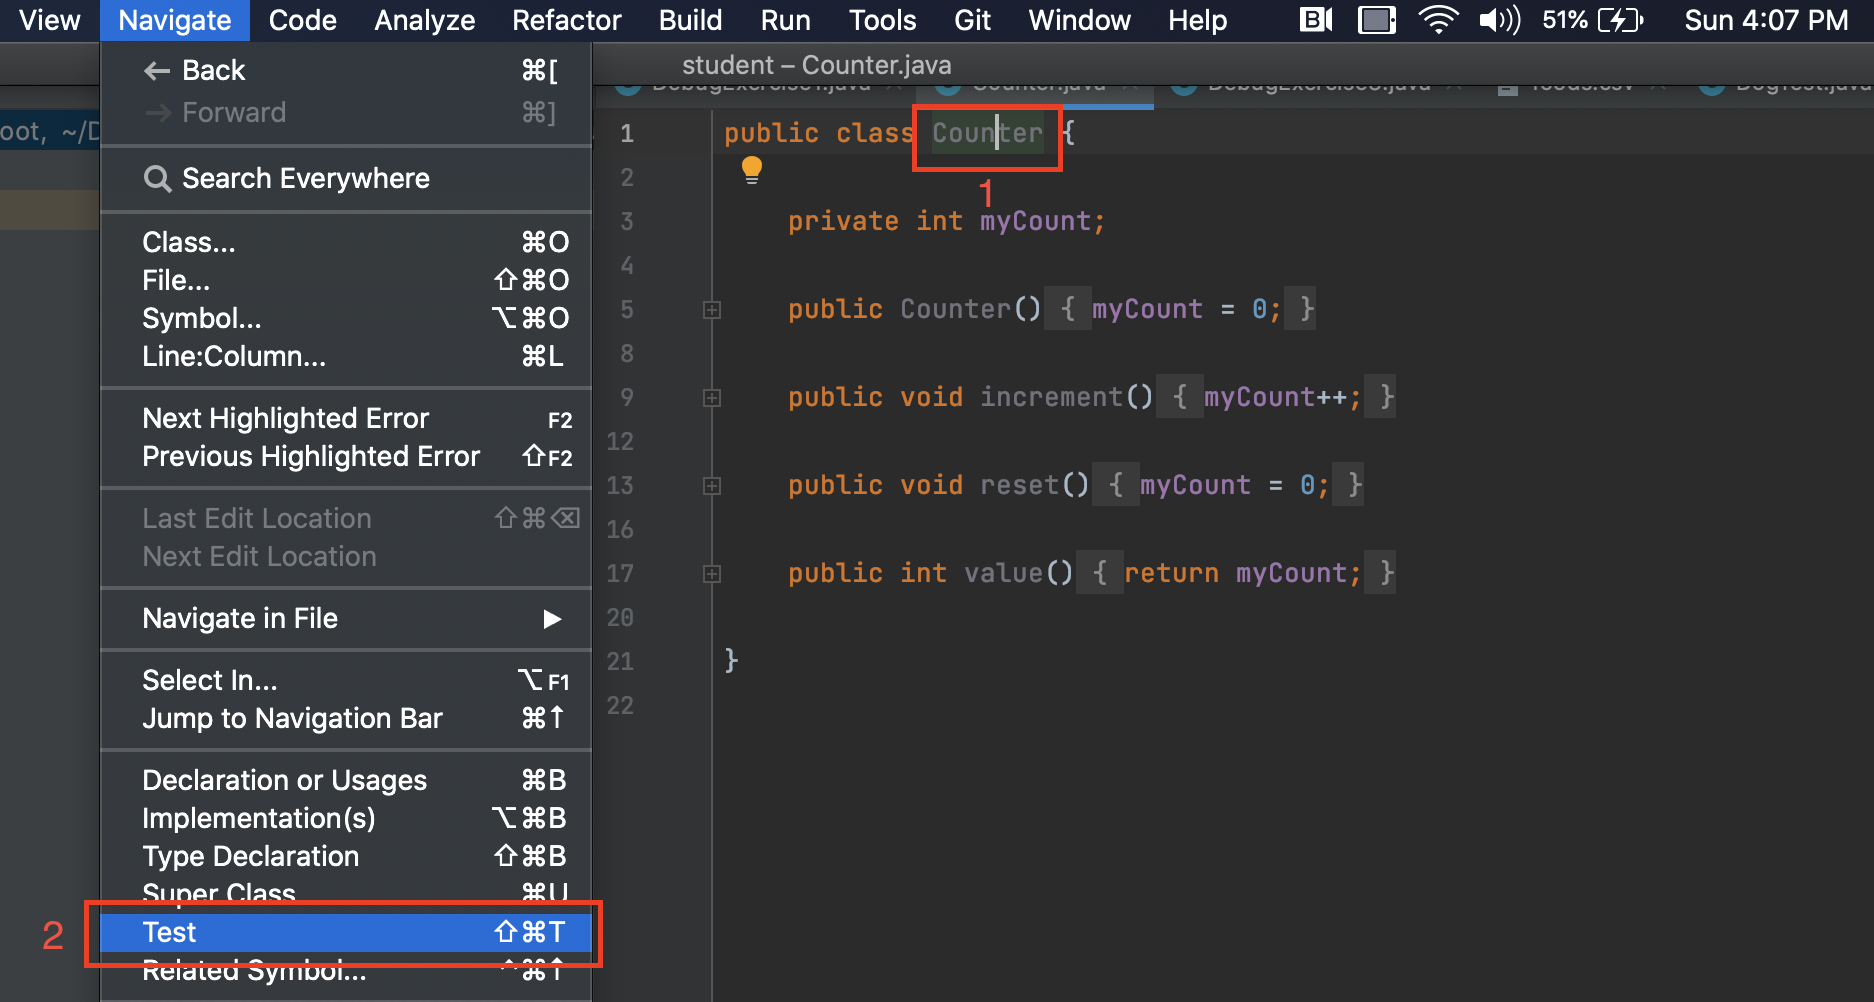
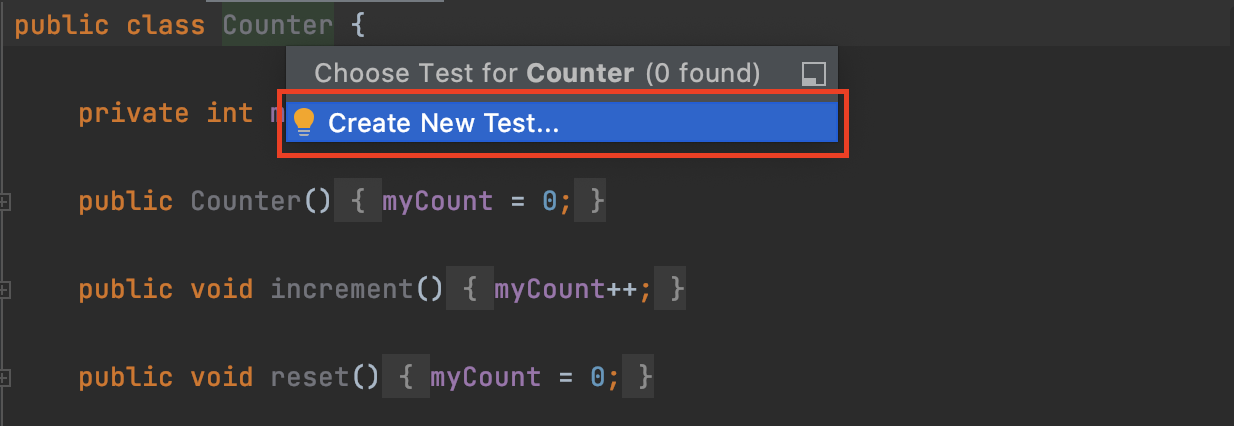
-
Click “Create New Test…“. If you are asked to create test in the same source root, click “Ok”.
-
Name the JUnit Test Case
CounterTest. Select “JUnit 4” as the testing library. Next check the boxes for theincrement()andreset()functions.
-
You should see a file similar to the following:
import org.junit.Test; import static org.junit.Assert.*; public class CounterTest { @Test public void increment() { } @Test public void reset() { } } -
Edit your
CounterTest.javaas follows:-
In
testIncrement, put the codeCounter c = new Counter(); c.increment(); assertEquals(1, c.value()); c.increment(); assertEquals(2, c.value()); -
In
testReset, put the codeCounter c = new Counter(); c.increment(); c.reset(); assertEquals(0, c.value()); -
IntelliJ doesn’t generate constructor tests. Add one:
@Test
public void testConstructor() {
    Counter c = new Counter();
    assertEquals(0, c.value());
}
-
-
-
Run your JUnit Test Case. Similar to before, you should be able to run your JUnit test, and all tests will pass.
-
We have shown you what it looks like to pass a test, but what happens if you fail? Intentionally introduce an error into one of the
CounterTestmethods, asserting for example that the value of a freshly-builtCounterobject should be 7. Run the JUnit test again and observe the error messages that result.
Testing Principles #
Test-Driven Development #
Test-driven development is a development process that involves designing test cases for program features before designing the code that implements those features. The work flow is:
- Write test cases that demonstrate what you want your program to be able to do. As the code isn’t written yet, most tests should fail.
- Write as little code as possible so that all the tests are passed.
- Clean up the code as necessary. Recheck that all tests still pass.
Test Effectiveness #
Unsurprisingly, there are effective tests and ineffective tests. The presence of tests alone does not mean that those tests are doing anything:
@Test
public static void uselessTest() {
    assertTrue(true);
}
Given a codebase, and tests for that codebase, how can we evaluate how “good” the tests are? In other words, how much confidence do our tests give us that our code is completely, fully correct?
Statement Coverage #
One testing principle you can imagine is that test values should exercise every statement in the program, since any statement that’s not tested may contain a bug. Recall the leap year program from Lab 1 - below is an example of how it might be implemented:
public static boolean isLeapYear(int year) {
    if (year % 400 == 0) {
        return true;
    } else if (year % 100 == 0) {
        return false;
    } else if (year % 4 == 0) {
        return true;
    } else {
        return false;
    }
}
The code contains four cases, exactly one of which is executed for any particular value of year. Thus we must test this code with at least one year value per case, so at least four values of year are needed for testing:
- a year that’s divisible by 400;
- a year that’s divisible by 100 but not by 400;
- a year that’s divisible by 4 but not by 100;
- a year that’s not divisible by 4.
This approach by itself is insufficient as we will see below.
Path Coverage #
To augment this first principle, we’ll say we need to test various paths through the program. For example, suppose our program had two consecutive if statements:
if ( ... ) {
    ...
}
if ( ... ) {
    ...
}
There are two possibilities for each if case: true or false. Thus there are four paths through the two statements, corresponding to the four possibilities
true,truetrue,falsefalse,truefalse,false
The following example shows why statement coverage is not a guarantee of correctness:
A year value of 2000 causes all the statements in the below program segment to be executed, giving 100% statement coverage. However, there may be a bug in this code it will not catch.
public static boolean isLeapYear(int year) {
    isLeapYear = true;
    if (year % 4 == 0) {
        isLeapYear = true;
    }
    if (year % 100 == 0) {
        isLeapYear = false;
    }
    if (year % 400 == 0) {
        isLeapYear = true;
    }
    return isLeapYear;
}
From the previous discussion, it looks like we need eight tests, corresponding to the eight paths through the three tests. They are listed below.
    year % 4 == 0, year % 100 == 0, and year % 400 == 0  // (which just means that year % 400 == 0)
    year % 4 == 0, year % 100 == 0, and year % 400 != 0
    year % 4 == 0, year % 100 != 0, and year % 400 == 0  // (not possible)
    year % 4 == 0, year % 100 != 0, and year % 400 != 0
    year % 4 != 0, year % 100 == 0, and year % 400 == 0  // (not possible)
    year % 4 != 0, year % 100 == 0, and year % 400 != 0  // (not possible)
    year % 4 != 0, year % 100 != 0, and year % 400 == 0  // (not possible)
    year % 4 != 0, year % 100 != 0, and year % 400 != 0  // (equivalently, year % 4 != 0)
Notice that some of the tests are logically impossible, and so we don’t need to use them. This leaves the four tests we needed to write.
Testing Loops #
Loops can vastly increase the number of logical paths through the code, making it impractical to test all paths. Here are some guidelines for testing loops, drawn from Program Development in Java by Barbara Liskov and John Guttag, a book used in previous CS 61B offerings.
- For loops with a fixed amount of iteration, we use two iterations. We choose to go through the loop twice rather than once because failing to reinitialize after the first time through a loop is a common programming error. We also make certain to include among our tests all possible ways to terminate the loop.
- For loops with a variable amount of iteration, we include zero, one, and two iterations, and in addition, we include test cases for all possible ways to terminate the loop. The zero iteration case is another situation that is likely to be a source of program error.
Liskov and Guttag also say: This approximation to path-complete testing is, of course, far from fail-safe. Like engineers’ induction “One, two, three—that’s good enough for me,” it frequently uncovers errors but offers no guarantees.
Black-box Testing #
All the testing principles discussed so far focused on testing features of the code. Since they assume that we can see into the program, these techniques are collectively referred to as glass-box testing, as if our code is transparent.
Another testing approach is called black-box testing. It involves generating test cases based only on the problem specification, not on the code itself. There are several big advantages of this approach:
-
The test generation is not biased by knowledge of the code. For instance, a program author might mistakenly conclude that a given situation is logically impossible and fail to include tests for that situation; a black-box tester would be less likely to fall into this trap.
-
Since black-box tests are generated from the problem specification, they can be used without change when the program implementation is modified.
-
The results of a black-box test should make sense to someone unfamiliar with the code.
-
Black-box tests can be easily designed before the program is written, so they go hand-in-hand with test-driven development.
In black-box testing as in glass-box testing, we try to test all possibilities of the specification. These include typical cases as well as boundary cases, which represent situations that are extreme in some way, e.g. where a value is as large or as small as possible.
There are often a variety of features whose “boundaries” should be considered. For example, in the DateConverter program, boundary cases would include not only dates in the first and last months of the year, but also the first and last dates of each month, etc.
Whenever you write a program, try to think of any boundary cases. These cases, although potentially rare, are a common source of error. The safest thing to do is brainstorm as many unique ones as you can then write tests which test each unique boundary case.
Exercise: Test Driven Development with Mod \(N\) Counters #
Yet again, the ModNCounter exercises covered here will not be graded. You should attempt them if you have time in lab to complete this, otherwise you should skim through this section to see what test driven development looks like in practice.
Mod \(N\) Counters Defined #
Now that we’ve covered some basics of how to use JUnit and some testing principles, we’ll use an example of a class that implements a Mod \(N\) counter to demonstrate good testing practices.
For our purposes, a Mod \(N\) counter is a counter that counts up to a specified amount (the \(N\)), and then cycles back to zero. For example, if we had a Mod 4 counter, it would count like this: 0, 1, 2, 3, 0, 1, 2, 3, 0, …
The ModNCounter class is similar to the Counter class, but notice that in order to keep track of the value of \(N\) it will need an extra instanc variable—a good name for it is myN. myN is initialized with a one-argument constructor whose argument is the intended myN value. Thus the following code should initialize a Mod \(N\) counter with \(N=2\) and print 0, then 1, then 0.
ModNCounter c = new ModNCounter(2);
System.out.println(c.value());
c.increment();
System.out.println(c.value());
c.increment();
System.out.println(c.value());
c.increment();
Task: Renaming a Class in IntelliJ #
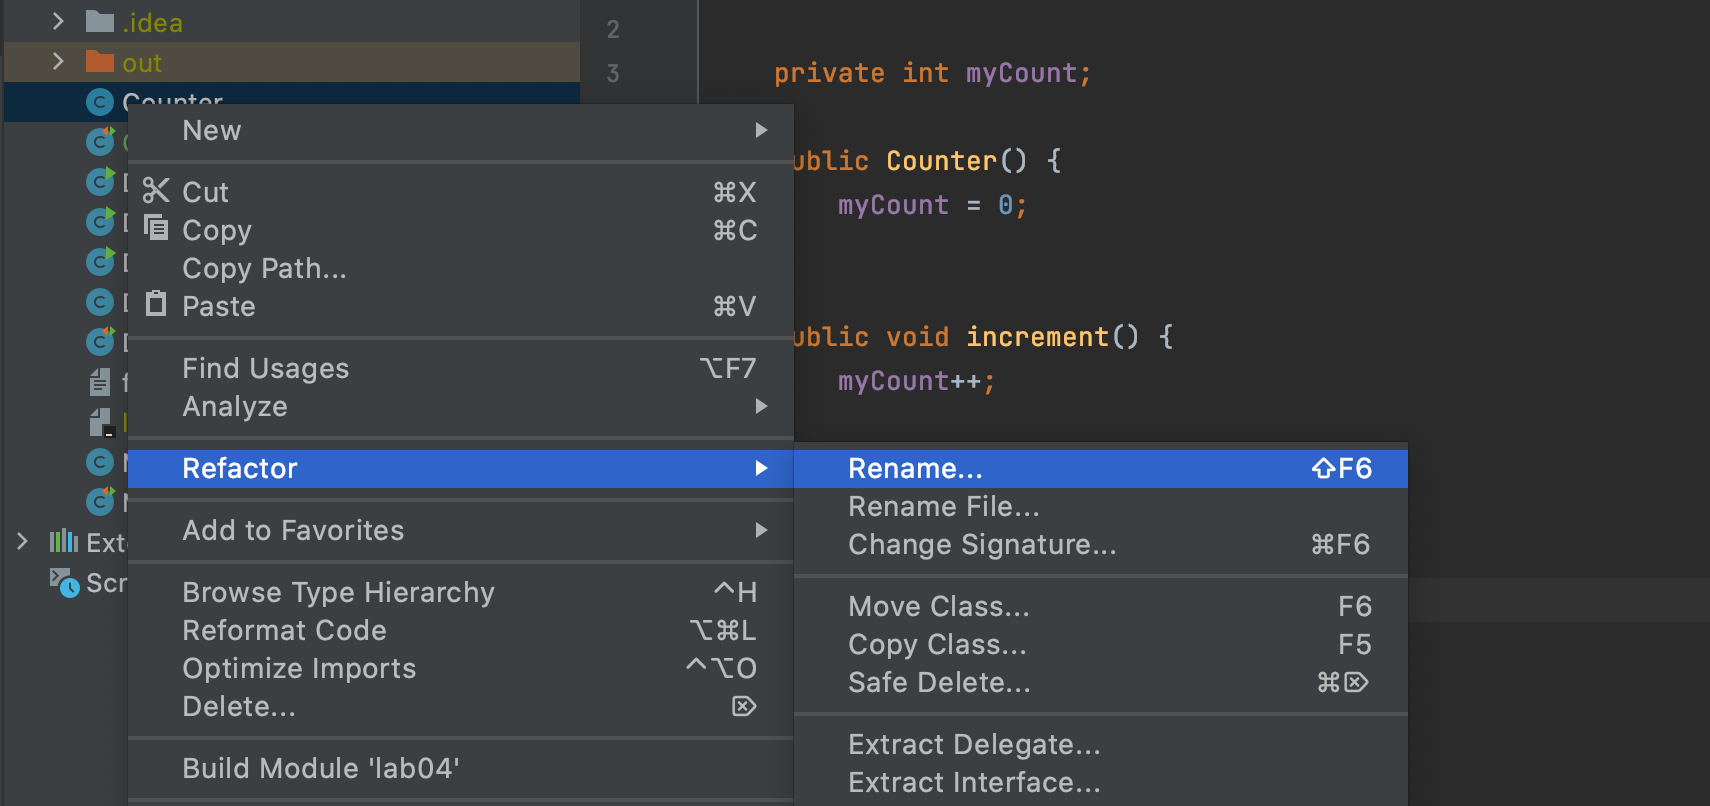
This time to write the ModNCounter class, we’re going to modify the Counter class from earlier. Again open the Counter.java program you just tested.
-
Right-click “Counter” within the Java code and selec “Refactor —> Rename”.
-
Next type
ModNCounterin the little box that appears.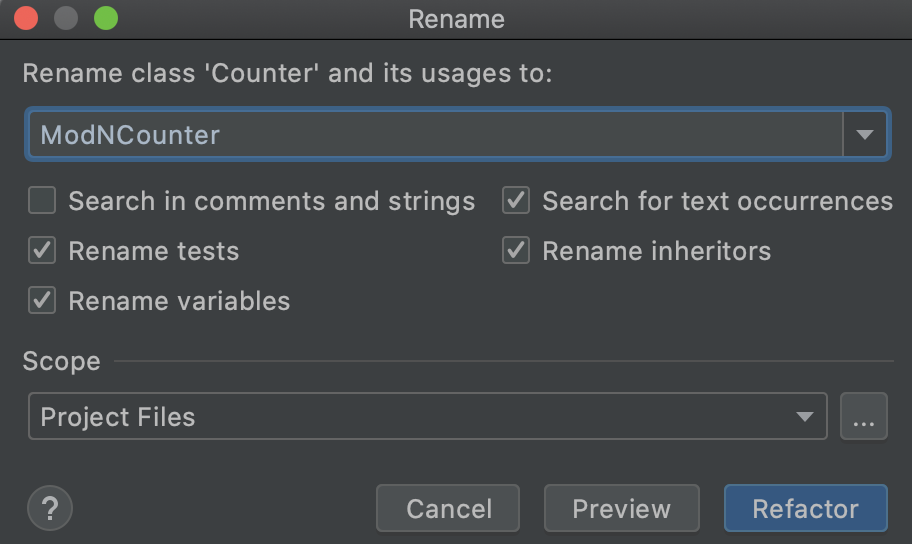
-
After you do this, a dialog will likely pop up asking if you want to rename CounterTest as well. Check the box shown to the left of
class CounterTest, and select “OK”.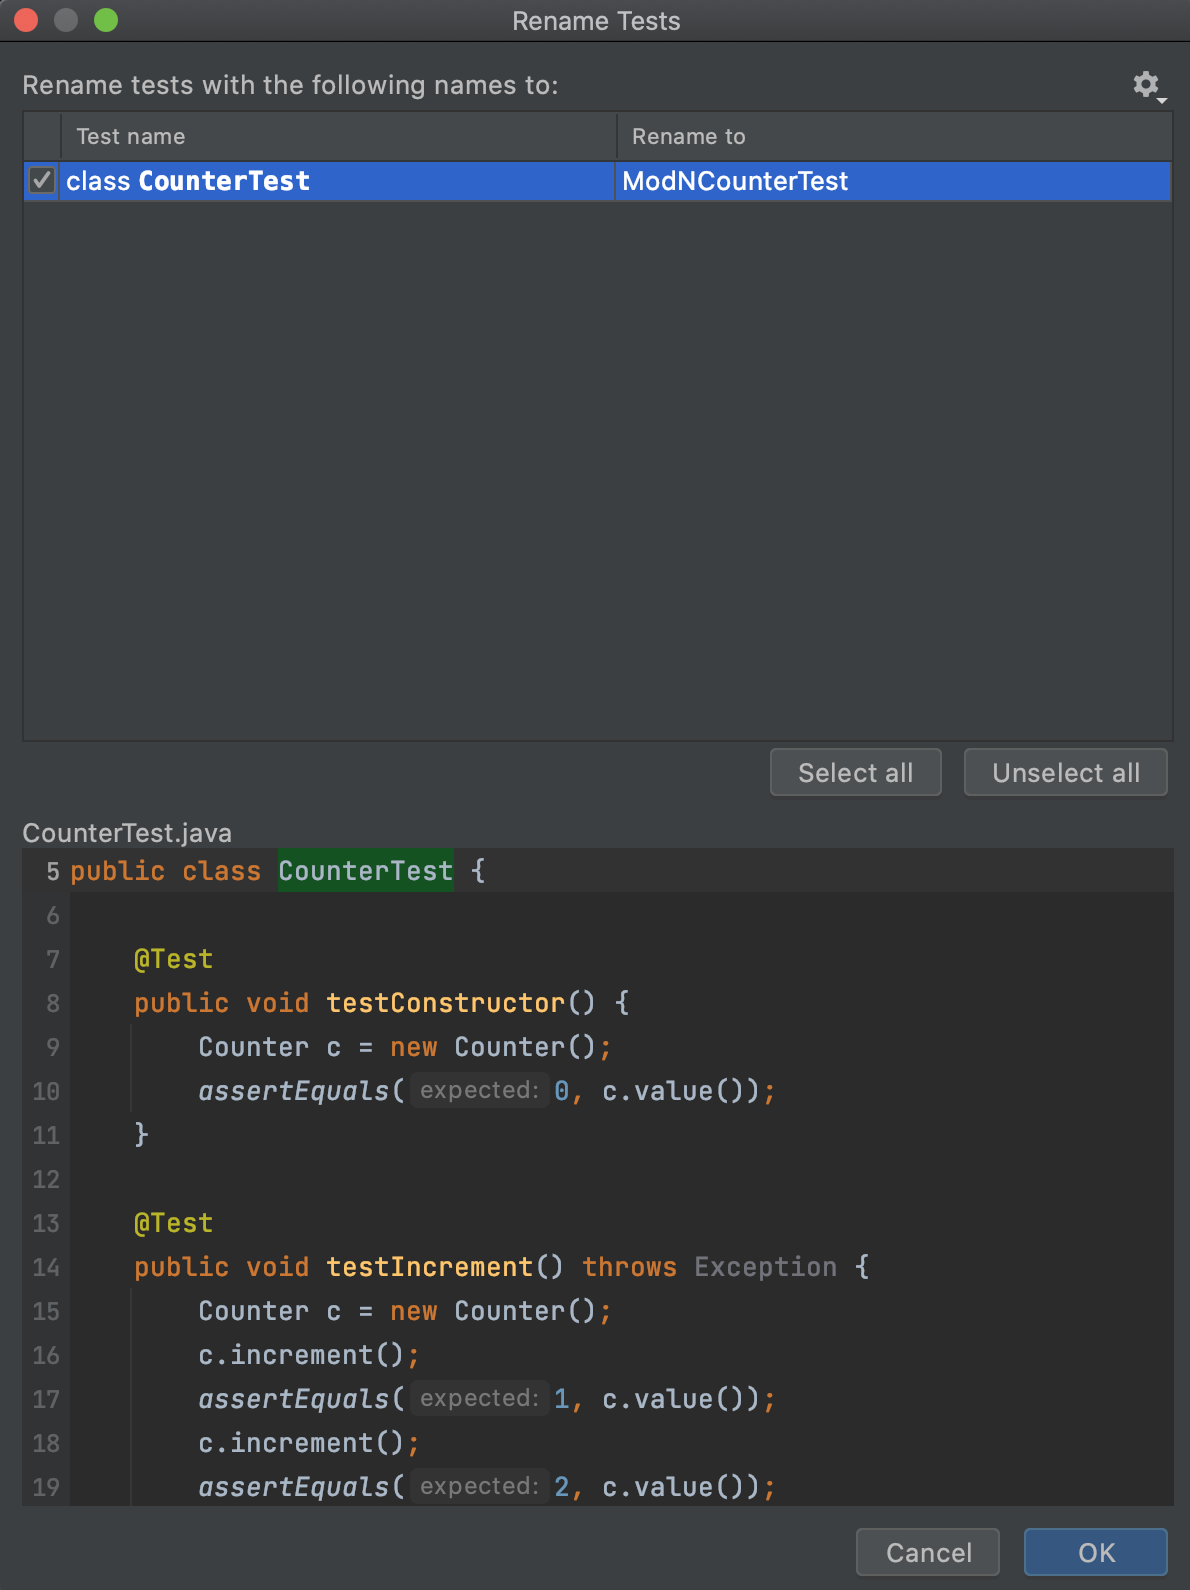
The effect of this change is to change any reference to Counter to ModNCounter, not only in Counter.java but also in CounterTest.java (or any other Java files within the project).
You should notice that the name of the file Counter.java is now ModNCounter.java and the name of the file CounterTest.java is now ModNCounterTest.java. In addition, all references to these classes have been changed appropriately. Don’t make any other changes to ModNCounter.java just yet.
Remember this refactoring operation! It’s pretty common to want to rename an identifier (a variable or a class name) at some point. IntelliJ makes this easy by renaming not only the definition of the identifier but also everywhere it’s used.
Task: Test-driven Development for ModNCounter #
Here’s a walk through of how to do test-driven development for creating ModNCounter:
-
Decide what you’re going to change in your program: In
ModNCounterTest.java, supply an argument for each of the constructor calls, because you know you will have to initialize aModNCounterwith some value ofN. -
Write code in JUnit to test the change: Add code in
testIncrementthat checks (using assertions) that wraparound of the cycling counter works correctly. -
Eliminate compilation errors: In
ModNCounter.java, add an argument to the constructor. Both files should now be free of compiler errors. Don’t make any other changes inModNCounter.java. We don’t want it to work just yet. RunModNCounterTest. All tests should pass except the wraparound check. -
Write code to make the all of the tests pass: Now go fix the
incrementmethod and run the JUnit test again. If all goes well, your updated code should pass all the tests.
So you’ve done some test-driven development! First, you supplied test cases in the ModNCounterTest class. Then you changed as little code as possible in ModNCounter to remove compile-time errors. Then you provided the code to pass the tests.
Parting Advice on Testing #
As you progress through the course, you will hopefully improve your testing skills! Here are some last bits of advice for now.
-
Write tests as if you were testing your worst enemy’s code. You’re generally too familiar with your own code and might read a given line as containing what you meant to write rather than what you did write. Don’t fall into the trap of hoping not to find bugs in your own code.
-
Test your program with values that are as simple as possible. If the program is supposed to work for a set of 1000 data values, make sure it works on a set of 3 values first.
-
Wrapping a loop around your code may allow you to test it with multiple values in a single run.
-
Make sure you know how your program is supposed to behave on a given set of test data. Often lazy programmers try a test and just scan through it thinking that it “looks right”. Such a programmer might later be embarrassed to find out that they computed a product cost that’s greater than the national debt or a quantity that’s greater than the number of atoms in the universe.
-
Make sure to cover both the common cases and the extreme, edge or boundary cases. Forgetting one or the other (or both!) can cause you to miss critical bugs in your code.
Exercise: Testing a Measurement Class #
Unlike the previous exercises, this section will be graded. All points for this lab will be derived from completing the Measurement class and from writing the corresponding tests in MeasurementTest.java.
Now, you’re going to be writing the code and a JUnit Test Case (a whole file of tests) for the Measurement class. We have provided “stubs” for each of the methods in Measurement.java. Stubs show the header of the method. Note that all the methods in this class are filled with meaningless code to allow the file to compile. You should delete all of these implementations, i.e. start each method from scratch. We have also included an empty MeasurementTest.java which is where you should write your JUnit tests. You will both be writing the code for these methods and, we hope, doing test-driven development (write the tests first).
You should follow this process for this exercise:
- Read over the
Measurement.javaclass to understand how the class should work. The comments above each of the methods and constructors explain what the expected behavior of this class will be. Discuss this with your partner to make sure that you both understand this completely before continuing on to the next step. - Write JUnit tests in the
MeasurementTest.javafile. You should write tests which allow you to test all of the methods and behavior in the class. - Run the tests in
MeasurementTest.java. As you still have not implemented the code inMeasurement.java, you should fail these tests. - Write code to make the all of the tests pass. If you fail some of your tests, make sure that the test is correct and if it is then proceed to debug your tests until you pass.
As mentioned in lab and lecture, all your instance variables should be private. For this exercise you are not to change the public interface of the Measurement class; e.g. don’t add any additional public getter methods. You are allowed to add anything that’s private.
Recap #
In this lab, we discussed:
- Effectively using the IntelliJ debugger
- The JUnit Testing Framework.
- Test driven development and good testing principles.
Deliverables #
As a reminder, this assignment has an FAQ page.
Your work will be graded on two criteria:
- The correctness of your
Measurement.java - Whether or not you have written > 1 tests in
MeasurementTest.java, all of which you pass.
For this assignment we expect you to do all testing on your own, so you should not rely on the autograder to check your work. We have intentionally increased the length of time that it takes tokens to recharge and decreased the number of tokens that you have. You should only submit to the autograder once you have finished all testing on your own.
Additionally, if you have not already, you should complete the other non-graded exercises throughout the lab. By the start of next week try to have read through and completed these exercises. We will start to rely heavily on the concepts covered in this very long lab and you will benefit greatly from investing the time early to understand the debugging and testing.