
FAQ #
Each assignment will have an FAQ linked at the top. You can also access it by adding “/faq” to the end of the URL. The FAQ for Lab 8 is located here.
Intro #
Here’s an optional intro video for the lab with some explanations of concepts, examples of usage of methods mentioned in the spec, and an intro to the coding portion of the lab. It is a very useful video but was recorded in Spring 2020 by the wonderful Michelle. Thus, some of the information about assignment logistics is out of date or irrelevant (e.g. mentions of a “Project 2”, which we have not done). All the information in the video is covered in the spec and timestamps for topics are in the video description.
So far in this class, you have exclusively made programs whose state only persists while the program is running, and all traces of the program disappear once the program exits. For example, in Project 1, you created two data structures but there was no way to save the deque, quit java, turn off your computer, eat a sandwich, and then reload your deque. In this lab, we will go over two methods to make the state of your program persist past the execution of your program: one through writing plain text to a file, and the other through serializing objects to a file. This will be directly applicable to Project 2: Gitlet as well as any future projects you want to do where you want to be able to save state between programs.
As always, you can get the skeleton files with the following command:
git pull skeleton main
Files and Directories #
Before we jump into manipulating files and directories in Java, let’s go through some file system basics.
Current Working Directory #
The current working directory (CWD) of a Java program is the directory from where you execute that Java program. Examples follow for Windows & Mac / Linux users - they are very similar, just different stylistically.
CWD: Windows #
For example, let’s say we have this small Java program located in the folder C:/Users/Zephyr/example (or ~/example) named Example.java:
// file C:/Users/Zephyr/example/Example.java
class Example {
  public static void main(String[] args) {
     System.out.println(System.getProperty("user.dir"));
  }
}
This is a program that prints out the CWD of that Java program.
If I ran:
cd C:/Users/Zephyr/example/
javac Example.java
java Example
the output should read:
C:\Users\Zephyr\example
CWD: Mac & Linux #
For example, for Mac & Linux users, let’s say we have this small Java program located in the folder /home/Zephyr/example (or ~/example) named Example.java:
// file /home/Zephyr/example/example.java
class Example {
  public static void main(String[] args) {
     System.out.println(System.getProperty("user.dir"));
  }
}
This is a program that prints out the CWD of that Java program.
If I ran:
cd /home/Zephyr/Example
javac Example.java
java Example
the output should read:
/home/Zephyr/example
CWD: IntelliJ #
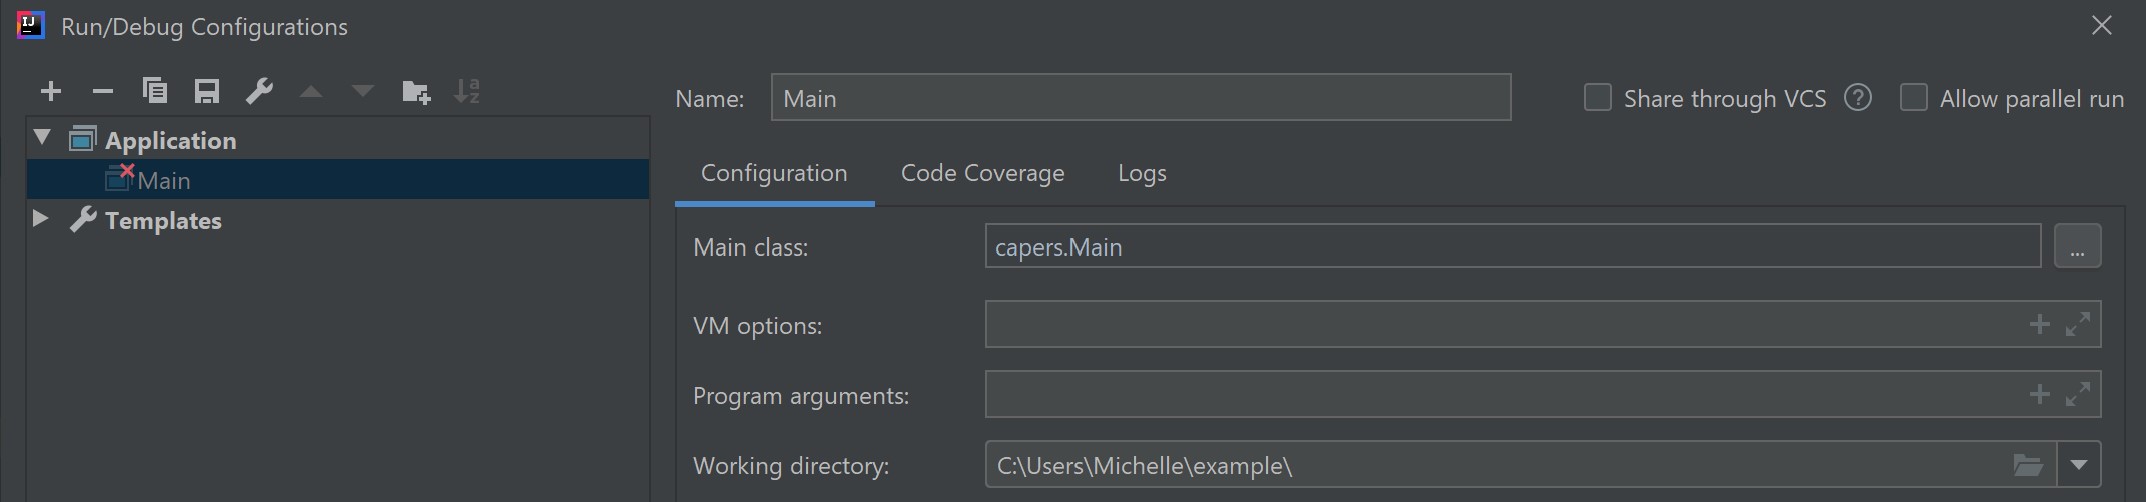
In IntelliJ, you can view the CWD of your program under Run > Edit Configurations > Working Directory.
CWD: Terminal #
In the terminal / Git Bash, the command pwd will give you the CWD.
Absolute and Relative Paths #
A path is the location of a file or directory. There are two kinds of paths: absolute paths and relative paths. An absolute path is the location of a file or directory relative to the root of the file system. In the example above, the absolute path of Example.java was C:/Users/Zephyr/example/Example.java (Windows) or /home/Zephyr/example/Example.java (Mac/Linux). Notice that these paths start with the root which is C:/ for Windows and / for Mac/Linux. A relative path is the location of a file or directory relative to the CWD of your program. In the example above, if I was in the C:/Users/Zephyr/example/ (Windows) or /home/Zephyr/example/ (Mac/Linux) folders, then the relative path to Example.java would just be Example.java. If I were in C:/Users/Zephyr/ or /home/Zephyr/, then the relative path to Example.java would be example/Example.java.
Note: the root of your file system is different from your home directory. Your home directory is usually located at C:/Users/<your username> (Windows) or /home/<your username> (Mac/Linux). We use ~ as a shorthand to refer to your home directory, so when you are at ~/repo, you are actually at C:/Users/<your username>/repo (Windows) or /home/<your username>/repo (Mac/Linux).
When using paths, . refers to the CWD. Therefore, the relative path ./example/Example.java is the same as example/Example.java.
Java and Compilation #
For this lab, we are going to be using both Intellij and our starting tools. What we’re referring to here is compiling and running Java code through the command line (your terminal). You may be used to this idea from CS 61A, where we often ran code directly from terminal using python3 myprogram.py.
The Java implementations we use compile Java source code, written by the programmer in a .java file, into Java .class files containing Java byte code, which may then be executed by a separate program. Often, this separate program, called java, does a mix of interpreting the class file and compiling it into machine code and then having the bare hardware execute it.
We’re going to walk through how to compile and run a .java file from just your terminal. In order for this all to work, ensure that the following are both version 17 or above:
javac -version
java -version
NOTE: If you’re in Windows, make sure that you’re using a Bash prompt. That is, if your terminal starts with “C:", you’re in the wrong kind of terminal window. Open up git bash instead.
If they aren’t, please redo the relevant part from Lab 1.
First, ensure your current working directory is su22-p***/lab08/capers.
While you’re here, go ahead and run the ls command. You’ll see all the capers files, but the one we want to focus on is a file called Main.java.
To compile the source file and all of its dependencies, run this command within your terminal:
javac *.java
The *.java wildcard simply returns all the .java files in the current directory. Run ls again, and you’ll see a bunch of new .class files, including Main.class. These files constitute the compiled code. Let’s see what it looks like.
cat Main.class
That command will print out the contents of the file. You’ll see mostly garbage with many special characters. This is called bytecode, and even though it looks foreign to us, the java program can take this compiled code and actually interpret it to run the program. Let’s see it happen:
java Main
Oops! We got an error.
Error: Could not find or load main class Main
Caused by: java.lang.NoClassDefFoundError: capers/Main (wrong name: Main)
If we were to translate this error to English, it’s saying “I don’t know what Main you’re talking about.” That’s because Main.java is inside a package, so we must use its fully canonical name which is capers.Main. To do this:
cd ..                 # takes us up a directory to su22-p***/lab08
java capers.Main
And now the program finally runs and prints out
Must have at least one argument
The lesson: to run a Java file that is within a package, we must enter the parent directory (in our case, lab08) and use the fully canonical name.
One last thing about command line execution: how do we pass arguments to the main method? Recall that when we run a class (i.e. java Main), what really happens is the main(String[] args) method of the class is called. To pass arguments, simply add them in the call to java:
$ java capers.Main story "this is a single argument"
As demonstrated, you can have a space in one of your elements of String[] args by wrapping that argument in quotation marks.
In the above execution, the String[] args variable had these contents:
{"story", "this is a single argument"}
You’ll be using the String[] args variable in this lab and in Gitlet. Some skeleton is already provided to show you how it’s done in the main method of the Main class.
Although we will sometimes use command-line compilation to run and debug our code, we will still be using IntelliJ to make edits to the code. Please open up Lab 8 in IntelliJ as normal.
Open Main.java, and find the line (around line number 40) that looks like:
if (args.length == 0) {
    exitWithError("Must have at least one argument");
}
Immediately below this code add System.out.println("args: " + Arrays.toString(args));, so that the code now reads:
if (args.length == 0) {
    exitWithError("Must have at least one argument");
}
System.out.println("args: " + Arrays.toString(args));
The word Arrays will be in red, so you’ll want to put your cursor on the red word and press alt+enter (or option+enter on a Mac) to import the java.util.Arrays class. Once you’ve done this, try compiling and running the code from the command line (not IntelliJ!) using the commands below:
javac capers/Main.java
java capers.Main story "this is a single argument"
This time, your program should print out:
args: [story, this is a single argument]
Note: You may notice a bunch of .class files in IntelliJ in the same folder as your code. As you may recall, we did not have such .class files in Project 0, Project 1, or in previous labs. This is because IntelliJ stores the .class files that it generates in another folder (usually called either out or target).
Although we could use these ourselves, it’s a much longer command to type.
We’ll now move onto how to manipulate files and directories in Java.
File & Directory Manipulation in Java #
The Java File class represents a file or directory in your operating system and allows you to do operations on those files and directories. In this class, you usually will want to be doing operations on files and directories by referring to them to their relative paths. You’ll want any new files or directories you create to be in the same directory as where you run your program (in this lab, the su22-p***/lab08 folder) and not some random place on your computer.
Files #
You can make a File object in Java with the File constructor and passing in the path to the file:
File f = new File("dummy.txt");
The above path is a relative path where we are referring to the file dummy.txt in our Java program’s CWD. You can think of this File object as a reference to the actual file dummy.txt - when we create the new File object, we aren’t actually creating the dummy.txt file itself, we are just saying, “in the future, when I do operations with f, I want to do these operations on dummy.txt”. To actually create this dummy.txt file, we could call
f.createNewFile();
and then the file dummy.txt will actually now exist (and you could see it in File Explorer / Finder). However, f.createNewFile() actually throws an exception! We’ll learn about how to deal with this ourselves in Lab 9, but for now, we’ve created a method that handles it for you. We recommend you use our Utils.writeContents(f, "") to make an empty file, rather than ever calling f.createNewFile().
Our Utils methods can help abstract away some of the complexity of the Java file manipulation methods.
You can check if the file “dummy.txt” already exists or not with the exists method of the File class:
f.exists()
We can also write to the file with the following:
Utils.writeContents(f, "Hello World");
Now dummy.txt would now have the text “Hello World” in it. Note that Utils is a helper class provided in this lab and project 2 and is not a part of standard Java.
Directories #
Directories in Java are also represented with File objects. For example, you can make a File object that represents a directory:
File d = new File("dummy");
Similar to files, this directory might not actually exist in your file system. To actually create the folder in your file system, you can run:
d.mkdir();
and now there should be a folder called dummy in your CWD.
Files Summary #
There are many more ways to manipulate files in Java, and you can explore more by looking at the File Javadocs and Googling. There are a ton of resources online and, if you Google it, doing more extensive file operations in Java can get a bit complicated. I’d recommend understanding the basics by doing this lab, and in the future if you come across a use case you don’t know how to handle, then start searching or making a help ticket. For this lab and Gitlet, we provide you with a Utils class that has many useful helper functions for file operations. Open it up and read through the provided methods!
Serializable #
Writing text to files is great and all, but what if we want to save some more complex states in our program? For example, what if we want to be able to save our Deques so we can come back to them later? We could somehow write a toString method to convert a Deque to a String and then write that String to a file. If we do that though, we would also need to figure out how to load the Deque by parsing that file, which can get complicated.
Luckily, we have an alternative called serialization which Java has already implemented for us. Serialization is the process of translating an object to a series of bytes that can then be stored in the file. We can then deserialize those bytes and get the original object back.
To enable this feature for a given class in Java, this simply involves implementing the java.io.Serializable interface:
import java.io.Serializable;

class Deque implements Serializable {
    ...
}
This interface has no methods; it simply marks its implementers for the benefit of some special Java classes for performing I/O on objects. For example,
Deque d = ....;
File outFile = new File(saveFileName);
try {
    ObjectOutputStream out =
        new ObjectOutputStream(new FileOutputStream(outFile));
    out.writeObject(d);
    out.close();
} catch (IOException excp) {
    ...
}
will convert d to a stream of bytes and store it in the file whose name is stored in saveFileName. The object may then be reconstructed with a code sequence such as
Deque d;
File inFile = new File(saveFileName);
try {
    ObjectInputStream inp =
        new ObjectInputStream(new FileInputStream(inFile));
    d = (Deque) inp.readObject();
    inp.close();
} catch (IOException | ClassNotFoundException excp) {
    ...
    d = null;
}
The Java runtime does all the work of figuring out what fields need to be converted to bytes and how to do so. We have provided helper functions in Utils.java that does the above two for you.
Note: There are some limitations to Serializable that are noted in the Project 2 spec. You will not encounter them in this lab.
Exercise: Canine Capers #
For this lab, you will be writing a program that will be taking advantage of file operations and serialization. We have provided you with four files:
Main.java: The main method of your program. Run it withjava capers.Main [args]to do the operations specified below. The majority of the FIXMEs in this program are in here.Dog.java: Represents a dog that has a name, breed, and age. Contains a few FIXMEs.Utils.java: Utility functions for file operations and serialization. These are a subset of those provided with Gitlet, so not all will be used.CapersTests.java: The provided tests which additionally serve as an example of how to write additional tests for this lab.
You can change the skeleton files in any way you want except for Utils.java as long as the spec and comment above the main method in Main.java is satisfied. You do not need to worry about error cases or invalid input. You should be able to complete this lab with just the methods provided in Utils.java and other File class methods mentioned in this spec, but feel free to experiment with other methods.
Main #
You should allow Main to run with the following three commands:
story [text]: Appends “text” + a newline to a story file in the.capersdirectory. Additionally, prints out the current story.dog [name] [breed] [age]: Persistently creates a dog with the specified parameters; should also print the dog’s toString(). Assume dog names are unique.birthday [name]: Advances a dog’s age persistently and prints out a celebratory message.
All persistent data should be stored in a .capers directory in the current working directory.
Recommended file structure (you do not have to follow this):
.capers/ -- top level folder for all persistent data
    - dogs/ -- folder containing all of the persistent data for dogs
    - story -- file containing the current story
You should not create these manually; your program should create these folders and files.
Note: Naming a folder or file with a period in the front makes it hidden - to be able to see it in the terminal, run ls -a instead of just ls. If you want to remove all saved data from your program, just remove the .capers directory (NOT the capers directory) with rm -rf .capers. Be very careful with the rm -rf command – it will delete anything you tell it to as quickly as it can!
Suggested Order of Completion #
Please be sure to read the comments above each method in the skeleton for a description of what they do.
- Fill out the
mainmethod inMain.java. This should consist mostly of calling other methods. - Fill out
CAPERS_FOLDERinMain.java, thenDOG_FOLDERinDog.java, and thensetUpPersistenceinMain.java. - Fill out
writeStoryinMain.java. Thestorycommand should now work. - Fill out
saveDogand thenfromFileinDog.java. You will also need to address the FIXME at the top ofDog.java. Remember dog names are unique! - Fill out
makeDogandcelebrateBirthdayinMain.javausing methods inDog.java. You will find thehaveBirthdaymethod in theDogclass useful. Thedogandbirthdaycommands should now work.
Each FIXME should take at most around 8 lines, but many are fewer.
Running from Terminal #
The easiest way to run and test your program is to compile it in terminal with javac and then run it from there. E.g.
cd lab08                     # Make sure you are in your lab08 folder (NOT the lab08/capers folder)
javac capers/*.java          # Make sure to recompile your program each time you make changes!
java capers.Main [args]      # Run the commands you want! e.g., java story hello
For the story command, if you want to pass in a long string that includes spaces as the argument, you will want to put it in quotes, e.g.
java capers.Main story "hello world"
If running in IntelliJ, you will need to use Run > Edit Configurations > Program Arguments to add the command line arguments.
Useful Utils Functions #
For this lab and Gitlet, we provide you with a Utils class that has many useful helper functions for file operations. Some of the methods that you may find useful are:
writeContents- writes out strings/byte arrays to a filereadContentsAsString- reads in a file as a stringreadContents- reads in a file as a byte arraywriteObject- writes a serializable object to a filereadObject- reads in a serializable object from a file. You can get aClassobject by using<Class name>.class, e.g.Dog.class.join- joins together strings or files into a path. e.g.Utils.join(".capers", "dogs")would give you aFileobject with the path of.capers/dogs
Command-Line Testing #
There are two ways to test your program: simply running the program with different arguments or using our JUnit tests!
You can test your program yourself by running it in the command line. This is the method that the Gradescope autograder will use. The AG tests are a combination of running these commands in order:
$ java capers.Main story Hello
Hello

$ java capers.Main story World
Hello
World

$ java capers.Main dog Sammie Samoyed 5
Woof! My name is Sammie and I am a Samoyed! I am 5 years old! Woof!
$ java capers.Main birthday Sammie
Woof! My name is Sammie and I am a Samoyed! I am 6 years old! Woof!
Happy birthday! Woof! Woof!
$ java capers.Main dog Larry Lab 11
Woof! My name is Larry and I am a Lab! I am 11 years old! Woof!
$ java capers.Main birthday Sammie
Woof! My name is Sammie and I am a Samoyed! I am 7 years old! Woof!
Happy birthday! Woof! Woof!
$ java capers.Main birthday Larry
Woof! My name is Larry and I am a Lab! I am 12 years old! Woof!
Happy birthday! Woof! Woof!
It also ignores whitespace at the beginning and end of the output so don’t worry too much about that.
JUnit Testing #
In this lab, and in the upcoming project, you will be utilizing JUnit tests to assess the correctness of your code. You should read through the provided tests and try running them before settling in to write code in any of the other files.
Intellij recognizes test methods automatically if you utilize the @Test annotation. This will cause a small green play triangle to appear to the left of the method header. You can use this to run specific tests, rather than the entire suite of tests! This will become useful as you work on specific elements of the spec.
There are two possible failure outputs that you might see that aren’t the usual test failures:
- Tests fail with “This test is not being run in the
testingdirectory. Please see the spec for information on how to fix this.”-
To fix: Your JUnit configs are probably messed up. Delete all your existing run configurations by clicking “Run > Edit Configurations”, and clicking the minus. Then, ensure that
.idea/runConfigurationscontains a file named_template__of_JUnit.xml, with contents:<component name="ProjectRunConfigurationManager"> <configuration default="true" type="JUnit" factoryName="JUnit"> <option name="MAIN_CLASS_NAME" value="" /> <option name="METHOD_NAME" value="" /> <option name="TEST_OBJECT" value="class" /> <option name="VM_PARAMETERS" value="-ea -Djava.security.manager=allow" /> <option name="WORKING_DIRECTORY" value="$ProjectFileDir$/testing" /> <method v="2"> <option name="Make" enabled="true" /> </method> </configuration> </component>Finally, close and reopen IntelliJ, then try running the test again.
-
- IntelliJ pops up a little red error bubble:
"Error running <Test>: Cannot start process, the working directory .../testing does not exist"- To fix: make the directory inside the project folder, i.e.
lab08/testingorproj2/testing.
- To fix: make the directory inside the project folder, i.e.
Git Branches (Optional) #
Branching is a very powerful git operation that lets you try out new features or implementations without muddying your working solution. A branch represents an independent line of development and thus when you want to add a new feature, or fix a bug, you can create a new branch to encapsulate your changes. This makes it unlikely that non-functional code will end up in your project!
Branching can save a lot of time and tears when managing large, shared repos, such as the repository you will be working in to code Gitlet.
The default branch is main. So far, all of your work has gone on this branch.
Branch Example: Building a Game #
Let’s say we are building a fun game. We have just finished the base implementation and can’t wait to show our family tomorrow. However, there is one new feature we are dying to add. What should we do?
If we just start working from where we are, we would have to do a lot of work tomorrow to ensure that the version of code running is the code that works as expected.
Branching gives us the freedom to try implementing this new feature while not breaking our working game.
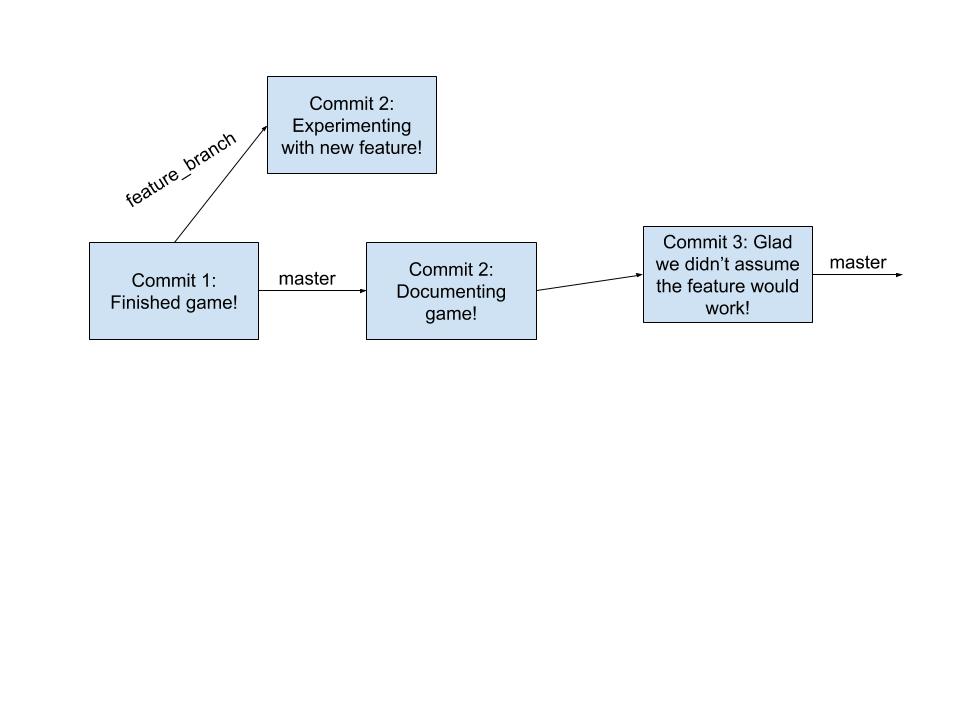
Let’s say we make a new branch called feature_branch.
We could do this with the command git branch <branch name>, so for us git branch feature_branch. This will create a new branch (starting from where we are) but will not do anything else. If we ran git branch, which displays all the current branches in our repo, we would see that we are still on the main branch, denoted with a * next to the name. We want all our new changes to go here, so we have to move onto the new branch before we can make any new changes. You can swap to a new branch by doing git checkout <branch name>, so for us git checkout feature_branch. Once we execute this command if we run git branch again we will see that the * has moved from main to feature_branch. We have successfully swapped branches!! Now new commits will be on the feature_branch rather than our main branch.
Branching to Avoid Bugs #
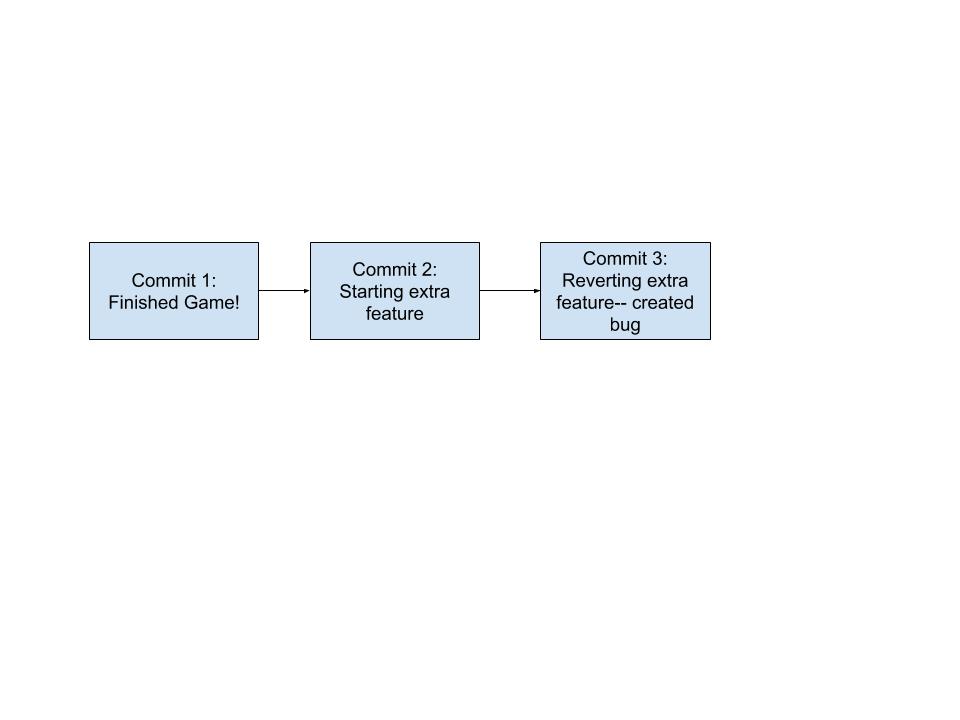
Sometimes the changes we make don’t turn out as we want them to. When we implement these changes on branches, we can ignore them or delete the entire branch – easy peasy. We don’t have to worry about removing all the changes we made as the clean code is still on our main branch!
Branching to Merge New Features #
Sometimes however we are able to complete the new feature before our family comes over to play the game! In this case, we can use git merge <branch name> to merge the code in our branch with the clean code on main!
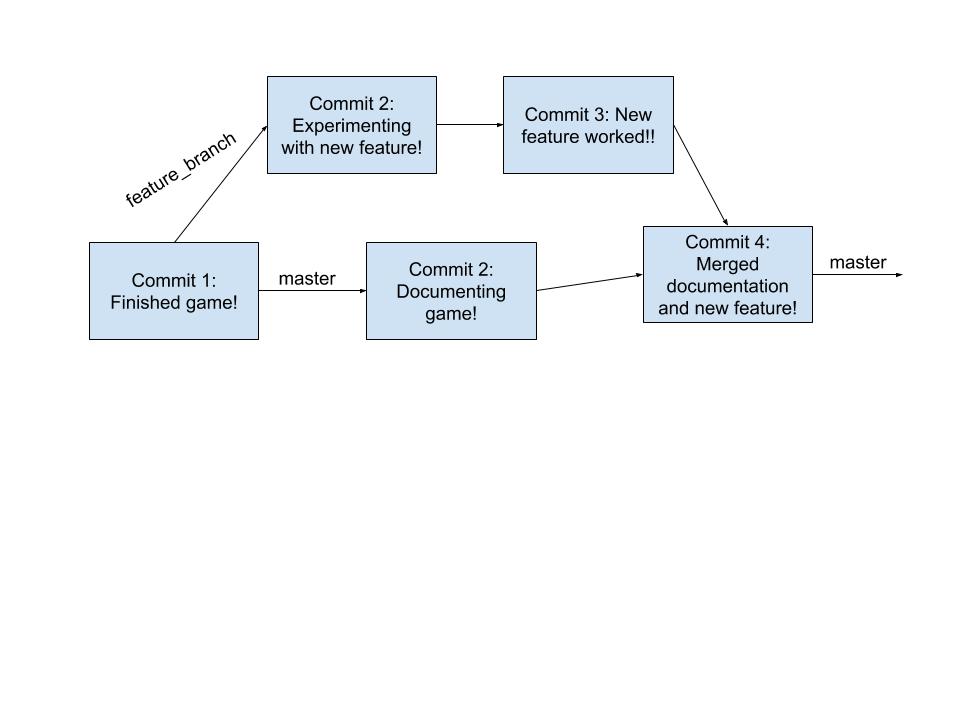
To do this, we have to go back to main, as we want our resulting functioning code to remain on main. We do this with the same command as before, but swap feature_branch with main: git checkout main. Now if we run git branch we will see that the * is back next to main!
Now we can merge in the changes we made in feature_branch by executing git merge feature_branch. This creates our merge commit, commit number 4. It will have all the new code for our feature mixed with our functioning game code!
Branch Usage #
Branching can be very useful to maintain order in shared repos. Ultimately, however, the way you organize your repository is entirely up to you. As a final reminder, if throughout this process you get a detached HEAD state, check out the git WTFs guide.
Submission #
You should have made changes in capers/Main.java and capers/Dog.java. You should not be submitting a .capers data folder. Do not use git add . or git add -A to add your files. git add your files one by one. One partner can submit the lab as always, through the Gradescope interface after committing and pushing such as:
git commit -m "submitting lab08. So ready for Gitlet!!"
git push origin main
You can then go to Gradescope, submit, and add your partner to your submission. There is no style check for this lab.
Credits #
Capers was originally written by Sean Dooher in Fa19. Spec was rewritten by Michelle Hwang in Sp20 and adapted for Su20 by Zephyr Omaly. Test suite was adapted to JUnit tests written in Su22 by Ethan Ordentlich.